Transform your toy macro photography with unique lighting techniques like using diffused light for soft shadows and bounce lighting for even illumination. Experiment with dramatic effects by backlighting and crafting silhouettes with rim lighting. Enhance mood with colored gels, and achieve a vintage look with low-key lighting. Utilize reflective surfaces for dynamic highlights and LED light panels for precision control. Explore natural light for authentic textures. Stay engaged for more enchanting art form secrets.
Using Diffused Light for Soft Shadows
When you're aiming for soft shadows in toy macro photography, diffused light is your best friend. To achieve this, you'll want to use a light source covered with a diffuser, like a softbox or a simple white sheet. This spreads the light evenly, reducing harsh shadows and creating a gentle, even illumination across the toy's surface. Position your diffused light close to the subject, adjusting the angle to minimize unwanted shadows.
Experiment with different diffusers to find what works best for you; even a translucent plastic container can work in a pinch. Remember, the key is to soften the light without sacrificing detail. By mastering diffused lighting, you'll enhance the textures and colors of your toy subjects, making your macro shots truly enchanting.
Creating Dramatic Effects With Backlighting
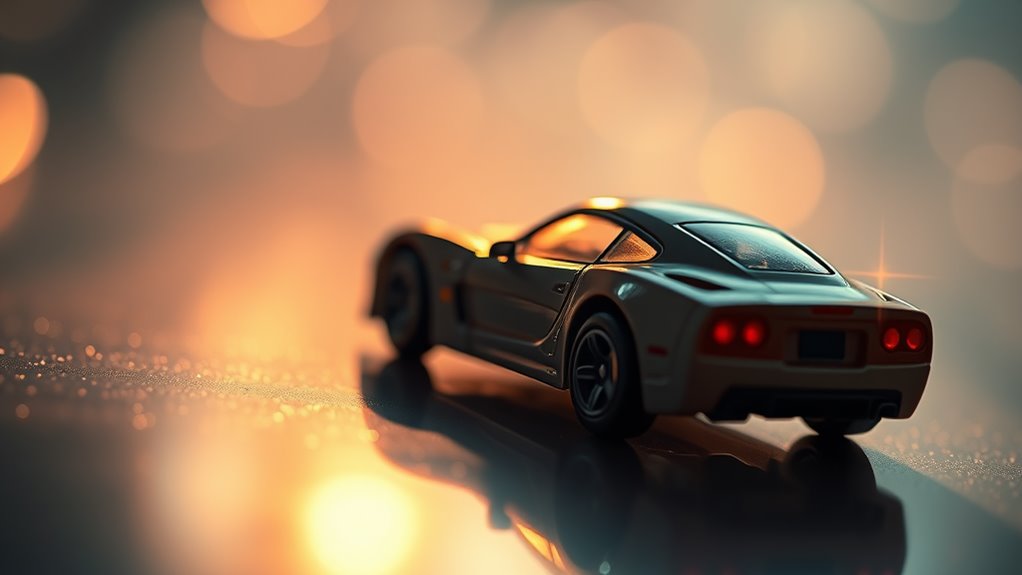
Ever wonder how to add drama to your toy macro photography? Backlighting is your secret weapon. Position your light source behind the toy, creating a stunning silhouette that emphasizes its shape and contours. This technique adds depth and intrigue, drawing the viewer's eye and sparking imagination. Try placing a small light or even a flashlight behind your subject, adjusting the angle for the desired effect. You'll notice how the light creates a glowing outline, making your toy stand out against a darker background. Play with distance and intensity to control the mood—closer light for a bolder look, further for softer drama. It's all about experimentation! With backlighting, you're transforming simple toy shots into enchanting visual stories.
Experimenting With Colored Gels for Mood Enhancement

Although often overlooked, colored gels can greatly enhance the mood of your toy macro photography. By simply placing a colored gel over your light source, you can transform an ordinary scene into something magical. Imagine using a soft blue gel to create a serene, underwater world for your toy figurines or a fiery red to evoke a dramatic, intense atmosphere. It's all about experimenting with different colors to see what best conveys the mood you're aiming for. Don't be afraid to mix gels either; layering them can result in unexpected, enchanting hues. Pay attention to how the colors interact with your subject's features and textures, as this will considerably impact the overall composition. With colored gels, the possibilities are endless.
Implementing Bounce Lighting for Even Illumination
To achieve even illumination in toy macro photography, start by carefully positioning reflective surfaces to bounce light onto your subject. This technique helps eliminate harsh shadows and creates a balanced look. Additionally, diffusing your light sources can soften the light, ensuring your toys are evenly lit without losing detail.
Positioning Reflective Surfaces
When capturing the intricate details of toy macro photography, positioning reflective surfaces can make a significant difference in achieving even illumination through bounce lighting. First, place a white foam board or reflector opposite your primary light source. This setup helps soften shadows and distribute light evenly across your subject. Adjust the angle of the reflector to control how light bounces back onto the toy, filling in darker areas. If you're working in a confined space, small mirrors or aluminum foil can act as handy improvised reflectors. Remember, the key is to experiment with different positions to find what works best for your scene. By mastering this technique, you'll enhance textures and details, making your toy subjects truly pop in your macro shots.
Diffusing Light Sources
While mastering toy macro photography, diffusing your light sources is crucial for achieving soft, even illumination. You can create a gentle, natural light effect by implementing bounce lighting. This technique helps eliminate harsh shadows and highlights, allowing the intricate details of your tiny subjects to shine. To start, position your main light source so it doesn't directly hit the toy. Instead, bounce the light off a nearby surface, like a white wall or a reflector. Here's how you can accomplish it:
- Use a white foam board: It's affordable and efficiently reflects light, creating a smooth glow.
- Employ a translucent umbrella: Diffuse the light softly to mimic natural daylight.
- Try a light tent: Surround your setup with a tent to guarantee uniform light distribution.
Crafting Silhouettes With Rim Lighting
To create striking silhouettes in toy macro photography, focus on strategic backlight placement. Position your light source behind the toy to highlight its edges and bring out its shape. This technique enhances contrast, adding depth and drama to your images. Experimenting with different angles and distances can further refine your silhouettes, allowing for unique interpretations of each toy. Additionally, combining this technique with other macro photography techniques for toys, such as using shallow depth of field, can emphasize the subject while keeping the background softly blurred. This approach creates an enchanting atmosphere, drawing viewers into the miniature world you’ve captured.
Backlight Placement Techniques
Creating striking silhouettes in toy macro photography can transform a simple scene into a dramatic visual story, and mastering backlight placement is key to achieving this effect. By positioning the light source strategically, you can highlight the toy's contours, adding depth and intrigue. Here's how you can enhance your compositions:
- Behind the subject: Place the light directly behind the toy to create a bold silhouette, emphasizing its shape against a bright background.
- Slightly above: Elevate the light slightly to cast gentle rim lighting, outlining the toy and providing a halo effect.
- Angle adjustment: Experiment with different angles to find the perfect balance between shadow and light, ensuring the toy's features are subtly highlighted.
These techniques will make your toy photography visually enchanting and unique.
Enhancing Contrast Effects
When you aim to elevate your toy macro photography, enhancing contrast effects with rim lighting is an essential technique. By using rim lighting, you can create striking silhouettes that emphasize the toy's outline, adding depth and drama to your shots. Position a light source behind your toy, ensuring it's slightly above or to the side. This setup will illuminate the edges, crafting a glowing outline while the rest remains in shadow.
Experiment with different light angles to achieve the desired effect. Adjust the intensity and distance of your light source to control the brightness and sharpness of the rim light. Don't hesitate to use diffusers or reflectors to soften or emphasize the glow. With practice, you'll master crafting enchanting silhouettes that make your toy photography stand out.
Utilizing Reflective Surfaces for Dynamic Highlights
Although toy macro photography often focuses on meticulous detail, incorporating reflective surfaces can elevate your images by adding dynamic highlights. You can create eye-catching effects and guide your viewer's gaze by strategically placing these surfaces. Reflective materials can bounce light in intriguing ways, producing unique highlights that make your toys pop.
Consider using:
- Mirrors: Position small mirrors around your setup to direct light onto specific areas of the toy, emphasizing its form and texture.
- Foil: Crumple aluminum foil for a textured highlight, or use it flat for a smooth, even reflection.
- Glossy paper: Place glossy paper under or behind your toy for subtle reflections and added depth.
Experiment with angles and distances to discover how these surfaces can transform your toy photography. Utilize natural light to enhance the textures and colors of your toys, creating a more dynamic and engaging scene. Additionally, consider using props and backgrounds that complement your subjects, which can contribute significantly to the overall composition. These techniques for realistic toy photography will elevate your images and provide a more immersive experience for your audience.
Achieving a Vintage Look With Low-Key Lighting
To give your toy macro photography a vintage feel, embrace low-key lighting techniques that emphasize shadows and contrast. Start by dimming your primary light source to create a moody atmosphere. Position your light at a slight angle, casting a shadow that highlights your toy's textures and details. This method allows you to capture the nostalgic essence reminiscent of classic film photography.
Use a black or dark backdrop to enhance the effect, ensuring your toy remains the focal point. Adjust your camera settings to lower ISO and longer exposure times, which will help deepen shadows and enrich contrast. Experiment with light modifiers like snoots or barn doors to direct the light precisely, giving you control over where shadows and highlights fall, enhancing the vintage aesthetic.
Incorporating LED Light Panels for Precision Control
While venturing into toy macro photography, incorporating LED light panels can offer you precise control over your lighting setup. These panels allow you to manipulate light direction, intensity, and color temperature effortlessly. With LED panels, you can easily highlight intricate details or create dramatic shadows, enhancing your toy photos' visual impact. Consider the following benefits:
- Adjustable Brightness: Modify the intensity to suit your subject's scale and intricacy without altering your camera settings.
- Color Temperature Control: Shift between warm and cool tones to match the mood or theme of your scene, ensuring your toys always look their best.
- Compact and Portable: Easily position these lightweight panels around your shooting area, allowing for quick experimentation and adjustments.
Leveraging Natural Light for Authentic Textures
LED light panels offer great control, but sometimes you want the authenticity only natural light can provide. Natural light brings out textures that artificial sources might miss, casting soft shadows that add depth to your toy macro photography. To harness this, shoot during the golden hours—shortly after sunrise or before sunset—when the light is softer and warmer. Position your toys near a window to capture gentle, diffused light.
Try using a white reflector to bounce sunlight back onto the toys, reducing harsh shadows and enhancing details. Pay attention to the direction of light; side lighting can emphasize textures, while backlighting creates a halo effect, making toys stand out. By adjusting angles and distances, you'll capture stunning, lifelike textures with ease. Experimenting with different reflectors, such as silver or gold, can introduce more warmth or coolness to your images, depending on the desired mood. Finding the perfect lighting for toy photos not only highlights their vibrant colors but also adds an enticing dimension to the scene. Take your time to explore various setups until you discover a combination that truly brings your toys to life.
Frequently Asked Questions
What Camera Settings Are Best for Toy Macro Photography?
For toy macro photography, you'll want a small aperture like f/8 to f/16 for depth of field. Use a low ISO to reduce noise, and adjust shutter speed for proper exposure. Manual mode gives you full control.
How Do I Prevent Lens Flare in Toy Macro Shots?
To prevent lens flare, use a lens hood and adjust your shooting angle to avoid direct light hitting the lens. You can also shield the lens with your hand or a piece of cardboard for extra protection.
What Are Common Mistakes to Avoid in Toy Macro Lighting?
You shouldn't rely solely on direct flash; it can create harsh shadows. Avoid using too many light sources, as they can overexpose your subject. Don't forget to diffuse the light for a softer, more natural look.
How Can I Simulate Natural Light Indoors for Toy Photography?
Transform your room into a sunlit paradise! Use softboxes or diffused lamps to mimic the sun's gentle touch. Add reflectors for extra glow and adjust angles to create that perfect, natural light ambiance for your toy photos.
What Accessories Enhance Toy Macro Photography Lighting?
You can enhance your toy macro photography lighting with accessories like ring lights, diffusers, and reflectors. Don't forget to use gels for color effects and light tents to eliminate shadows, giving your photos a professional touch.
At a Glance
You've now got a toolkit of unique lighting techniques for toy macro photography, ready to make your images shine like a diamond in the rough. By playing with diffused light, backlighting, and colored gels, you can set the mood just right. Bounce lighting and reflective surfaces help create even and dynamic illumination, while rim lighting crafts striking silhouettes. Don't forget, natural light and LED panels offer precision and authenticity that can elevate your shots to the next level.


