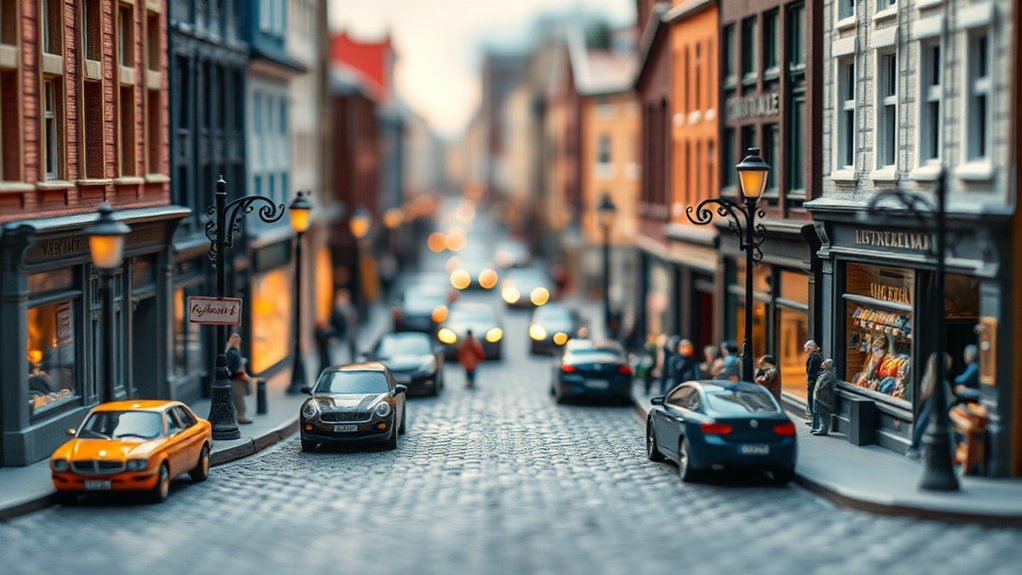
Building a DIY miniature set for toy scene photography requires creativity and the right materials. Start with a sturdy base like plywood or foam board. Gather paints, small brushes, and craft knives for detail work. Incorporate elements like hills and rivers, and use props scaled to your toys. Experiment with lighting to create depth and use different angles for dynamic shots. Using everyday items will enhance your scenes effectively. You’ll discover more ways to create enthralling worlds. Consider creating your own diy toy photography props, such as miniature furniture or tiny signs, to add unique touches to your scenes. Additionally, think about incorporating natural materials like twigs or leaves to provide an organic feel. This attention to detail will make your photographs stand out and invite viewers into the whimsical worlds you’ve crafted. Additionally, consider incorporating textures in your scenery, such as sand or fabric, to bring your set to life. As you refine your skills, explore mobile toy photography techniques that allow for spontaneity and flexibility while shooting. This approach can help you capture unique moments and showcase your creativity in new ways.
Gathering Essential Materials for Miniature Set Building
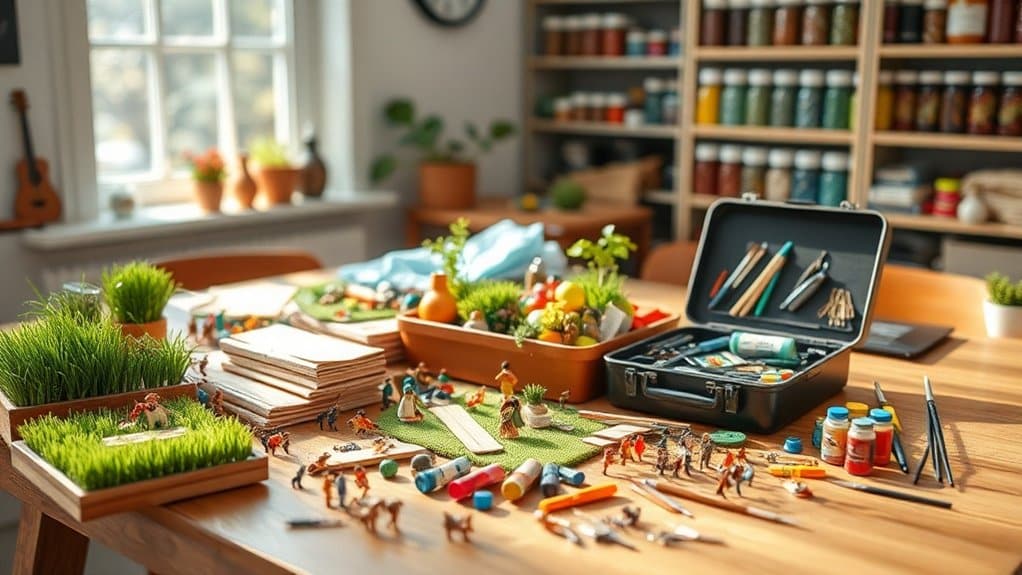
Before diving into creating your miniature set, you’ll need to gather some essential materials. Start with a sturdy base, like a piece of foam board or plywood, to provide stability. Collect a variety of paints to add color and texture, along with small brushes for detailed work. You’ll also need craft knives or scissors for precision cutting. Gather materials such as balsa wood, card stock, or clay for building structures. Don’t forget adhesives like glue sticks or tacky glue to hold everything together. To add realism, find miniature props like trees, figures, or furniture; these can often be found in hobby stores. Having a ruler and pencil handy will assist in accurate planning and measuring. With these tools, you’re set to begin your creative journey.
Designing a Theme for Your Miniature Scene
With your materials gathered, it’s time to focus on the creative aspect of your miniature set: designing a theme. Think about the story you want to tell. Is it a bustling city street, a serene forest glade, or a cozy living room? Your theme sets the tone and guides your design choices. Consider the mood you wish to convey. Use colors, props, and lighting to enhance this atmosphere. Brainstorm ideas that resonate with your interests or the toys you’ll photograph. Sketch out rough drafts to visualize your concepts. Keep the scale of your toys in mind to guarantee everything fits harmoniously. Don’t be afraid to experiment and let your imagination run wild. A strong theme will bring your miniature scene to life.
Constructing Realistic Terrain and Landscapes
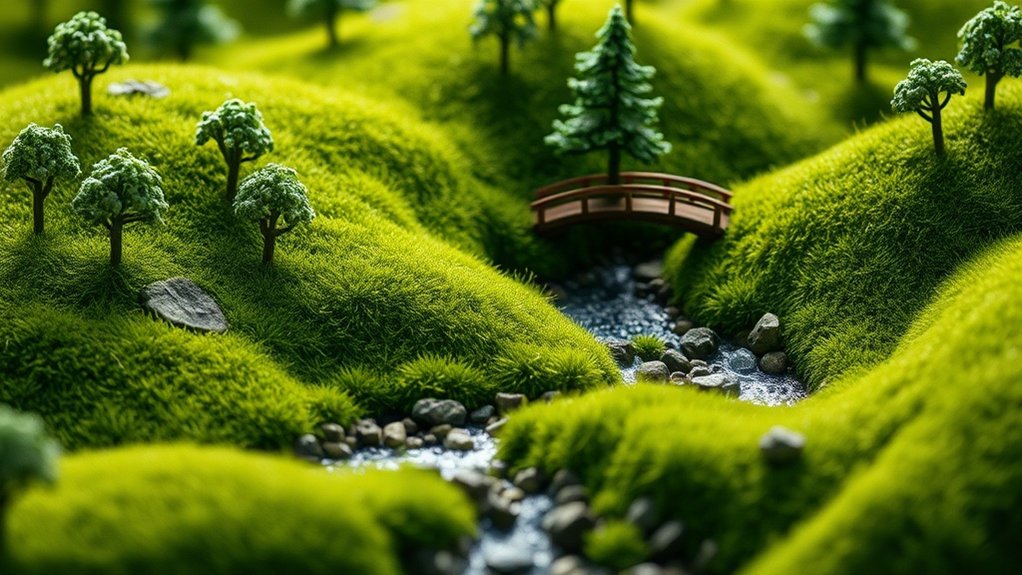
When you’re ready to plunge into constructing realistic terrain and landscapes, think about the natural elements you want to include. Consider features like hills, rivers, and forests that fit your scene’s theme. Start with a sturdy base, like foam or cardboard, which allows easy shaping. Use lightweight clay or plaster to mold hills and valleys. For water features, try clear resin or glossy paint to simulate rivers or lakes. Enhance textures using materials like sand, gravel, or fine sawdust for realistic surfaces. Paint with earth tones to add depth and realism. Add greenery using model foliage or moss to mimic grass and trees. Experiment with layering to achieve a dynamic landscape. Your attention to detail will make your miniature world come alive.
Creating Scale-Appropriate Props and Accessories
To elevate your miniature sets, focus on crafting props and accessories that match the scale of your scene. Begin by identifying the size of your main subjects—whether action figures, dolls, or toy cars—and verify every prop complements them proportionately. Use materials like clay, balsa wood, or even recycled household items to create detailed miniatures. For example, a tiny clay phone or a balsa wood table adds authenticity. Invest time in painting and texturing these items to enhance realism. It’s crucial to research real-world counterparts to capture accurate details like buttons, handles, and hinges. As you finalize these elements, remember that small props can greatly impact the overall narrative and visual appeal of your toy photography.
Incorporating Lighting Techniques for Dramatic Effects
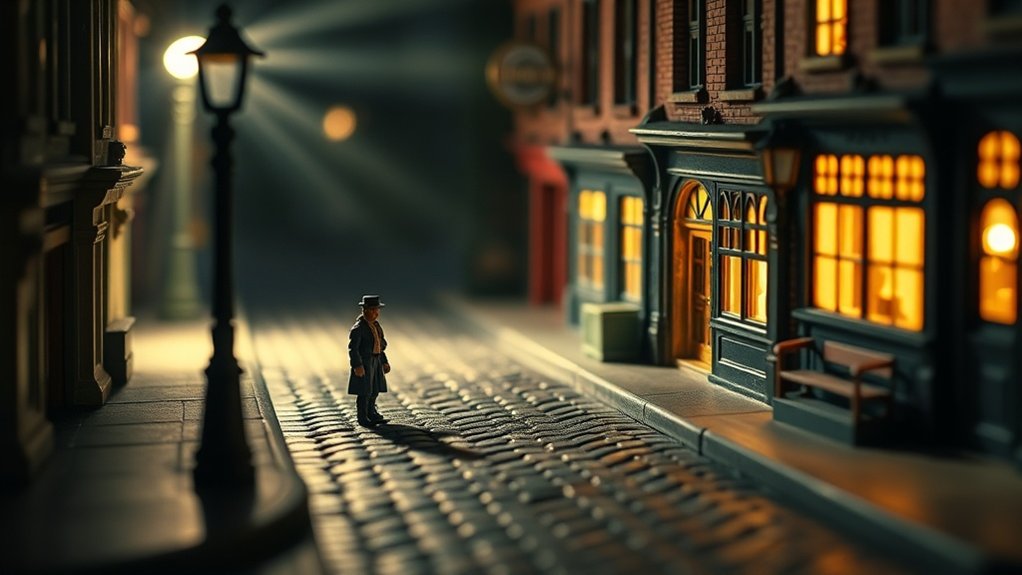
When you’re working with miniature sets, creative light positioning can transform your scene and add depth. Experiment with different angles to highlight details and create shadows that enhance the mood. Don’t forget that color temperature choices can dramatically alter the atmosphere, so play around to find the perfect balance for your vision.
Creative Light Positioning
Anyone can transform a miniature set from ordinary to extraordinary with creative light positioning. By carefully placing lights, you can add depth and drama to your toy scenes. Start by experimenting with different angles. Position a light source to one side to create interesting shadows, giving your scene a sense of mystery or tension. You can also place lights behind objects to create silhouettes, which adds depth and intrigue.
Try using small, adjustable LED lights to focus on specific details, drawing attention to key elements. Don’t be afraid to move lights closer or farther to see varying effects on textures and surfaces. By actively playing with light positioning, you’ll discover new ways to make your miniature world come alive with emotion and storytelling.
Color Temperature Choices
Choosing the right color temperature is essential for setting the mood in your miniature photography. You can create dramatic effects by understanding how different temperatures influence the scene. Warm tones (around 2000K-3000K) give your images a cozy, inviting feel, perfect for sunset scenes or intimate settings. On the other hand, cooler tones (5000K-6500K) evoke a crisp, sterile environment, ideal for simulating daylight or creating a sense of unease.
Experiment with various light sources and gels to achieve your desired effect. Try mixing temperatures to add depth and contrast, spotlighting specific elements in your scene. Use LED lights with adjustable settings for flexibility, allowing you to fine-tune the temperature. Remember, color temperature dramatically impacts your viewers’ perception and emotions, so choose thoughtfully.
Applying Paint and Texture for Authentic Details
To bring your miniature sets to life, applying paint and texture is essential for achieving authentic details. Start by choosing a color palette that matches the scene you’re creating. Use acrylic paints for their quick-drying and versatile properties. Apply thin layers, gradually building up color to avoid overpowering your miniatures. Add washes of darker shades into crevices for depth.
Texture is vital. Use sponges or brushes to dab paint, mimicking surfaces like stone or wood. For rust or weathering effects, try dry brushing with a lighter color. You can also sprinkle fine sand or baking soda onto wet paint for gritty surfaces. Always let layers dry before moving to the next step, ensuring each detail stands out vividly in your toy scene photography.
Using Everyday Items to Enhance Your Scenes
Incorporating everyday items into your miniature photography can add unique and unexpected elements to your scenes. Look around your home for small objects that can double as props or set pieces. A bottle cap can become a stool, or a cotton ball might mimic a fluffy cloud. Use colorful paperclips as ladders or fences, and experiment with buttons for wheels or stepping stones.
Think creatively and reimagine the purpose of these items. A kitchen sponge can transform into a grassy field, while a piece of fabric can serve as a picnic blanket. Even a spoon can become a slide or a bridge in your tiny world. By repurposing these items, you’ll infuse your scenes with character, making them more engaging and imaginative.
Crafting Custom Backgrounds for Depth and Dimension
When you’re crafting custom backgrounds for your miniature photography, start by choosing color schemes that complement your subject and enhance the overall mood. Incorporate texture elements to add depth, making your scenes feel more dynamic and engaging. Don’t forget to play with lighting and shadows, as they can dramatically transform the perception of space and dimension in your shots.
Choosing Color Schemes
Selecting the right color scheme transforms your miniature photography set from flat to enchanting. By carefully choosing colors, you create a mood that captivates the viewer’s imagination and enhances the scene’s storytelling. Start with a color wheel to understand complementary and contrasting colors, which add visual interest. Consider the theme and emotion you want to convey, ensuring the colors align with your narrative.
Here are a few tips to refine your choices:
- Complementary Colors: Use colors opposite each other on the color wheel for a vibrant look.
- Analogous Colors: Select colors next to each other for a harmonious feel.
- Monochromatic Scheme: Stick to variations of a single color for a clean, sophisticated style.
- Accent Colors: Add pops of bright colors to highlight focal points.
Incorporating Texture Elements
Texture breathes life into your miniature photography sets, adding depth and dimension that captivates the eye. When crafting custom backgrounds, reflect on incorporating diverse materials to enrich the scene. Use materials like textured paper, fabric, or clay to simulate surfaces such as brick, wood, or stone.
Start by selecting textures that match your scene’s theme. For instance, burlap or canvas can evoke rustic charm, while metallic sheets suggest an industrial vibe. Experiment with layering different textures to create visual interest.
Don’t forget to weigh scale; textures should complement the size of your toys. Small details make a big difference! Test various combinations to see what works best. By thoughtfully integrating textures, you’ll transform your miniature sets into compelling, immersive environments.
Lighting and Shadows
Once you’ve mastered texture, it’s time to harness the power of lighting and shadows to add depth and dimension to your miniature sets. Proper lighting can transform a flat scene into a dynamic world. Start by experimenting with different light sources and angles. Position your lights to create interesting shadows that emphasize the contours of your miniatures, making them pop against the backdrop.
Consider these tips:
- Use diffused lighting: Softens harsh shadows and creates a more natural look.
- Play with angles: Change the direction of your lights to see how shadows alter the scene.
- Incorporate color gels: Add mood and atmosphere with subtle color changes.
- Layer lights: Use multiple light sources to create depth and highlight different areas.
These techniques will elevate your toy scene photography to new heights.
Experimenting With Different Angles and Perspectives
Have you ever wondered how a shift in angle can transform a photograph? When it comes to toy scene photography, experimenting with different angles and perspectives can take your images from ordinary to extraordinary. By lowering your camera to eye level with your miniature subjects, you create an immersive experience, making them appear life-sized. Try shooting from above for a bird’s-eye view that reveals the entire scene. Alternatively, tilting your camera slightly can add a dynamic, dramatic effect.
Don’t hesitate to play with perspectives. A worm’s-eye view can make your miniatures appear larger than life, while capturing them through a frame or window can add depth. Every angle and perspective tells a different story, so move around, explore, and let your creativity shine!
Tips for Capturing the Perfect Toy Scene Photograph
To capture the perfect toy scene photograph, focus on mastering lighting and shadows to add depth and drama to your shots. Experiment with camera angles to find the most engaging perspective, making certain to highlight the unique qualities of your miniature set. Finally, control depth and focus to guarantee the main elements of your scene stand out, drawing the viewer’s eye exactly where you want it.
Lighting and Shadows Mastery
Mastering lighting and shadows is key to creating enchanting toy scene photographs. Start by choosing a light source that complements your scene. Natural light is excellent, but artificial light offers more control. Position your light source to create soft shadows, adding depth and realism to your scene. Experiment with angles and distances to find what works best for the toys’ scale.
Consider these tips to elevate your lighting game:
- Diffuse Light: Use diffusers or sheer fabric to soften harsh light and prevent unwanted glare.
- Reflect Light: Bounce light onto your scene with reflectors or white surfaces to fill in shadows.
- Backlighting: Create dramatic effects by positioning a light behind your toys.
- Consistent Lighting: Maintain uniformity to avoid distracting inconsistencies in your photos.
With practice, your toy photographs will truly shine.
Camera Angles Technique
When capturing the perfect toy scene photograph, experimenting with camera angles can make a world of difference. Start by getting down to the toy’s eye level. This perspective immerses viewers, making the scene feel more realistic. Try shooting from above for a bird’s-eye view; it can reveal patterns and layouts you might miss otherwise. Angling your camera slightly can add dynamic elements, giving the scene movement and energy. Don’t shy away from extreme close-ups to highlight details or wide shots to capture the entire setup. Always consider the story you want to tell. Move around your miniature set, taking shots from various angles to find the most intriguing composition. Remember, the right angle can transform a simple setup into a compelling visual narrative.
Depth and Focus Control
Capturing the perfect toy scene photograph often hinges on mastering two elements: depth and focus control. When you control these aspects, you bring tiny worlds to life, making them feel expansive and immersive. Start by setting your camera to aperture priority mode to control the depth of field. A wide aperture (like f/2.8) blurs the background, emphasizing your subject. Use a tripod to keep your camera steady, ensuring your focus remains sharp. Also, manually adjust the focus to pinpoint the exact element you want to highlight.
- Use a wide aperture: Isolate the subject with a beautifully blurred background.
- Employ manual focus: Gain precision and avoid auto-focus mishaps.
- Utilize a tripod: Keep your scene stable and sharp.
- Experiment with angles: Discover how different perspectives affect depth.
Frequently Asked Questions
How Can I Ensure My Miniature Set Is Safe for Children to Handle?
To guarantee your miniature set is child-safe, use non-toxic materials and avoid small, detachable parts. Make sure everything’s securely assembled. Regularly inspect the set for wear and tear to prevent hazards during play.
Are There Any Recommended Online Communities for Sharing Toy Scene Photography?
Looking to share your toy photography? Immerse yourself in Instagram or join Facebook groups like Toy Photography and Toy Photo Community. They’re great places to connect, share tips, and showcase your creative masterpieces with fellow enthusiasts.
What Are Some Budget-Friendly Tips for Acquiring Miniature Set Materials?
You can find budget-friendly miniature set materials by repurposing household items, visiting thrift stores, or checking online marketplaces for deals. Use natural elements like twigs and stones, and don’t shy away from crafting your own pieces.
How Do I Store and Maintain My Miniature Sets to Prevent Damage?
Store your miniature sets in airtight containers, organize by theme or size, and keep them away from sunlight. Dust regularly, handle with care, and avoid moisture. You’ll prolong their life and keep them looking pristine.
Can I Use Digital Editing Software to Enhance My Toy Scene Photographs?
Absolutely, you can use digital editing software to enhance your photographs. Adjust lighting, color balance, and add special effects to bring your scenes to life. Just remember, subtlety often creates the most realistic and engaging images.
At a Glance
You’ve woven a tapestry of tiny worlds, each scene a symphony of imagination and creativity. As you snap that final shot, let your heart dance to the rhythm of shadows and light playing across your miniature wonderland. Feel the magic in the everyday objects that breathe life into your toy tales. With each angle explored and every prop perfectly placed, you capture not just a photo, but a fleeting moment where fantasy meets reality.


