
You can effectively add depth of field effects in post-processing for toy photography by using software like Adobe Photoshop or GIMP. Duplicate the original layer, focus on your subject with a selection tool, and apply a blur to the background. Adjust the brightness and contrast for a polished effect. For more realistic results, incorporate lighting adjustments and subtle vignetting. Continue exploring to enhance your toy photography skills even further. Additionally, consider experimenting with mobile toy photography techniques that can enhance your creative process. Using apps designed for photo editing on smartphones can streamline your workflow, enabling you to apply filters and effects directly to your images. This flexibility allows for spontaneous shooting and editing, making it easier to capture the perfect moment on the go. For those looking to achieve sharpness throughout their composition, consider employing focus stacking techniques for photography. This method involves taking multiple images at different focus points and blending them in post-processing to create a final image with an extended depth of field. By combining this technique with your depth of field effects, you can elevate your toy photography to new heights, ensuring every detail stands out beautifully.
Understanding Depth of Field in Photography
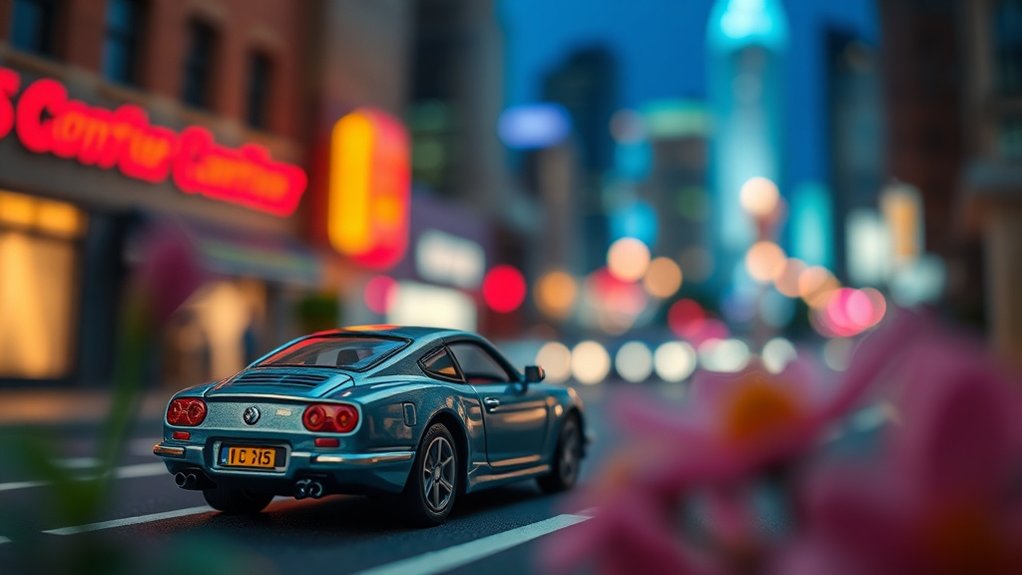
When you take a photo, the depth of field is the zone of sharpness that stretches from the nearest to the furthest point in the image. It’s essential for creating the desired focus in toy photography, allowing you to highlight specific elements while softly blurring others. By adjusting the aperture on your camera, you can control how much of the scene stays in focus. A wide aperture (small f-number) results in a shallow depth of field, perfect for isolating a toy and creating a dramatic effect. Conversely, a narrow aperture (large f-number) keeps more of the scene in focus, ideal when you want to showcase the entire setup. Understanding these principles helps you craft visually compelling toy photographs with depth and storytelling.
Choosing the Right Software for Post-Processing
How do you elevate your toy photography to the next level? By selecting the right software for post-processing, you can dramatically enhance your images. Start with Adobe Photoshop; it’s a powerhouse for creating depth of field effects. Its robust tools and vast tutorials help you understand its capabilities quickly. Another great option is Adobe Lightroom, which offers more straightforward tools and can seamlessly integrate with Photoshop. For those on a budget, consider GIMP. It’s free and provides many similar features to Photoshop. Capture One is also worth exploring for its excellent color grading and tethering options. Whichever you choose, make certain it aligns with your workflow and needs. Investing time in learning your software will pay off with stunning, professional-looking toy photos.
Step-by-Step Guide to Creating Depth of Field Effects
With your software selected and ready, it’s time to focus on crafting enchanting depth of field effects in your toy photography. Start by opening your image in the software. Duplicate the background layer to preserve the original. Use the selection tool to highlight the toy or the area you want in focus. Once highlighted, create a mask to isolate this region. Now, apply a blur effect to the background layer, adjusting the intensity to mimic natural lens blur. Avoid over-blurring to maintain realism. Tweak the mask edges with a feather effect for a seamless shift between focused and blurred areas. Finally, adjust brightness and contrast to enhance the effect, making your toy pop against the softened background. Your image now has enthralling depth!
Tips for Achieving Realistic Results
Ever wondered why some toy photos look almost lifelike? It’s all about mastering depth of field (DoF) effects in post-processing. To achieve realistic results, start by understanding your scene’s scale. Smaller toys require a shallower DoF to mimic real-world proportions. Use the blur tool strategically; focus on your subject and gradually increase blur towards the background. Verify lighting is consistent. Shadows and highlights should match your DoF adjustments to avoid a mismatched look.
Pay attention to lens distortion effects. Incorporate subtle vignetting or chromatic aberration for authenticity. Experiment with different aperture settings digitally to see what enhances realism best. Finally, always compare your edits with real-life references. This way, you’ll fine-tune your skills and make those toys pop!
Showcasing Your Work on Social Media Platforms

Once you’ve mastered depth of field effects and created stunning toy photos, it’s time to share your work with a wider audience. Social media platforms like Instagram, Facebook, and Pinterest are perfect for showcasing your creativity. Start by crafting a cohesive feed that highlights your best shots. Use hashtags strategically to reach enthusiasts interested in toy photography. Engage with your audience by responding to comments and participating in relevant online communities.
Regularly update your profiles with fresh content to maintain interest. Experiment with different posting times and formats to see what resonates best. Collaborate with other photographers to expand your reach. Most importantly, stay true to your style and enjoy the process. Your passion will shine through, attracting followers who appreciate your unique perspective.
Frequently Asked Questions
How Can I Simulate Tilt-Shift Effects in Toy Photography?
To simulate tilt-shift effects, use photo editing software to blur edges while keeping the subject sharp. Adjust the focus gradient to create a miniature effect. Experiment with the radius and feathering for a realistic look.
What Are Common Mistakes to Avoid When Adding Depth of Field in Post?
When editing, avoid over-blurring, which makes your scene look artificial, like a foggy lens. Guarantee smooth shifts between focused and blurred areas for realism. Don’t forget consistent light and shadow to maintain depth and believability.
How Do Lighting Conditions Affect Post-Processed Depth of Field?
You’ve got to take into account lighting because it impacts shadows and highlights, which affect post-processing depth of field. If lighting’s inconsistent, your depth effect might look unnatural or disjointed, so make certain consistent lighting for seamless results.
Can Depth of Field Effects Be Applied to Group Toy Shots?
You might wonder if you can apply depth of field effects to group shots. Yes, you can! Just focus on one toy, blur the background, and see how it enhances your composition’s visual appeal.
Are There Specific Lenses Recommended for Initial Toy Photography Before Post-Processing?
You should use a macro lens for initial toy photography, as it allows you to capture intricate details. Prime lenses with wide apertures are also great for creating natural bokeh before you start any post-processing work.
At a Glance
As you weave the magic of depth of field into your toy photography, remember you’re not just editing photos; you’re crafting miniature worlds where stories unfold. With the right tools and techniques, your creations can leap from the screen, enchanting viewers with their lifelike allure. Share your masterpieces on social media, and watch as your art resonates, like ripples in a pond, inspiring others to explore the mesmerizing domain of toy photography.


