In toy photography, mastering a three-point lighting setup makes all the difference. Position the key light at a 45-degree angle to highlight your toy, while the fill light, placed opposite the key, reduces shadows. A backlight, directly behind, adds dimension by separating the subject from the background. Experiment with light intensity, colors, and angles to perfect your scene. Get ready to reveal the secrets behind crafting striking, mood-enhancing images.
Understanding the Three-point Lighting Setup
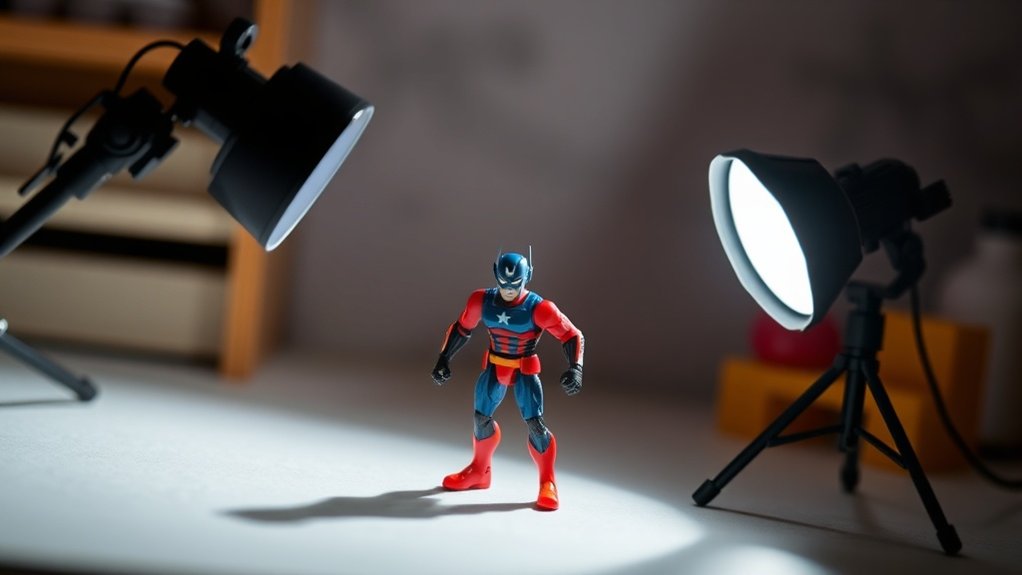
When diving into toy photography, understanding the three-point lighting setup is essential for creating alluring images. You’ll need three lights: the key, fill, and back (or rim) light. Each plays a distinct role in enhancing your subject and adding depth.
Position the fill light opposite the key light. It softens shadows and reduces contrast, ensuring your toy doesn’t look too harsh. Adjust its intensity to create a balanced look. The backlight, placed behind the toy, adds dimension by separating it from the background. This creates a subtle halo effect, making your subject pop.
Experiment with the positioning and intensity of these lights. By mastering this setup, you’ll elevate the quality of your toy photography, capturing your audience’s attention.
Key Light: The Main Source of Illumination
Your key light is the primary source of illumination and sets the mood for your toy photography scene. Position it carefully to highlight your subject’s features, adjust its intensity for the right balance, and pick a light color that complements your theme. By mastering these elements, you’ll give your toys the spotlight they deserve.
Positioning the Key Light
To achieve stunning toy photography, carefully positioning your key light is essential. Start by placing it at a 45-degree angle to your subject. This positioning helps create depth and dimension, casting natural-looking shadows that add realism. Keep the light slightly above your toy, mimicking how sunlight falls from the sky, which enhances highlights and contours.
Adjust the distance between the light and the toy to control shadow length and intensity. A closer light source will produce sharper shadows, while moving it further away softens them. Experiment with the light’s height to see how it affects the toy’s features. Remember, the key light sets the mood and tone, so take your time to find the perfect position that complements your subject’s character.
Adjusting Light Intensity
Finding the right balance of light intensity in your toy photography can make all the difference. Too much light can wash out details, while too little can leave your subject in the shadows. To achieve the perfect illumination, adjust the intensity of your key light to highlight the toy’s features without overpowering them. Start by setting your light to a moderate level and observe how it interacts with the toy. Gradually increase or decrease the intensity until the subject appears vibrant and well-defined. Use diffusers or reflectors to soften harsh shadows or create a more even distribution of light. Remember, the goal is to make your toy the focal point, drawing attention to its details and creating a sense of depth and dimension.
Choosing Light Color
How do you choose the right light color for your key light in toy photography? Start by considering the mood you want to convey. Warm light (around 2700K-3200K) adds a cozy, nostalgic feel, perfect for creating intimate or vintage scenes. Cooler light (5000K-6500K) offers a bright and energetic atmosphere, ideal for modern or futuristic setups.
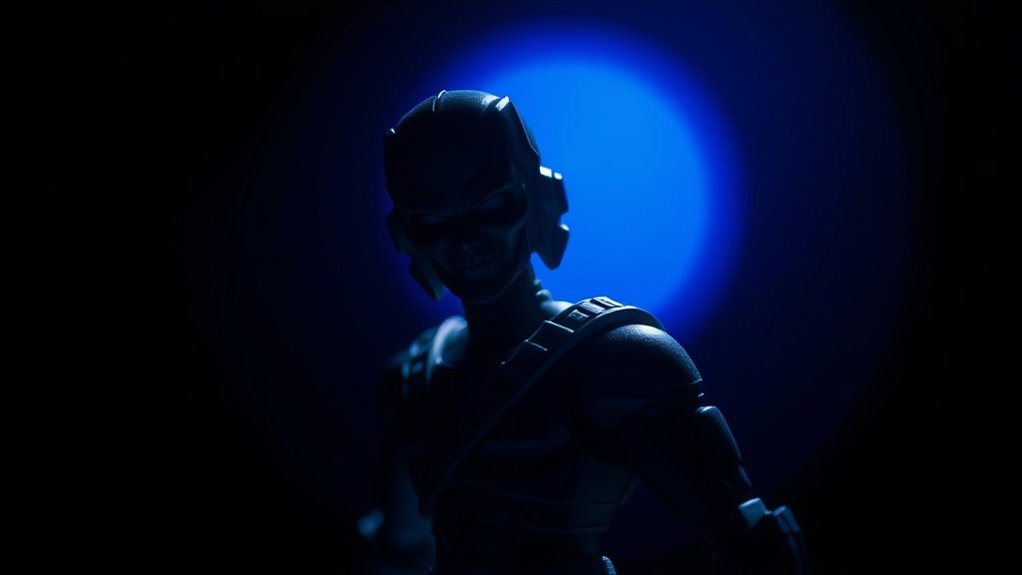
Next, think about the toy’s colors. A neutral light (around 4000K) guarantees accurate color representation, preventing hues from appearing too warm or cold. Experiment with gels to introduce creative color shifts and enhance specific themes. For example, using a blue gel can evoke a nighttime ambiance, while a red gel can intensify drama. Always test different options to see what suits your scene best.
Fill Light: Balancing Shadows and Highlights
To achieve stunning toy photography, you’ll want to use a fill light to soften harsh shadows and bring out details. By adjusting the light intensity, you can create a natural balance between shadows and highlights, making your photos more lifelike. Experiment with different setups to find what best complements your scene.
Softening Harsh Shadows
While capturing the intricate details of toy photography, it’s crucial to address the issue of harsh shadows that can detract from your subject’s charm. Harsh shadows can make your toy look less appealing and obscure its fine details. To soften these shadows, use a fill light strategically. Position it opposite your main light source to fill in those dark areas without overpowering your subject. You can also experiment with different reflectors or diffusers to spread light evenly. Try using materials like white foam boards or translucent fabrics to diffuse the light, creating a gentle, even illumination. Always adjust the intensity and angle of your fill light to achieve the desired effect, ensuring your toy stands out with balanced lighting.
Achieving Natural Balance
Softening harsh shadows is just one piece of the puzzle when it comes to achieving natural balance in toy photography. You also need to take into account how fill light can help illuminate areas that are too dark, ensuring that every detail of your toy is visible. By placing a fill light opposite your key light, you’ll reduce contrast and create a more even lighting setup. This technique softens shadows without eliminating them, preserving depth and dimension.
Aim for a fill light that’s softer and less intense than your key light. You can use reflectors or white cards to bounce light gently onto your subject. Experiment with the positioning to achieve the right mood and texture. The result? A natural, balanced scene where your toy shines and shadows don’t overwhelm.
Adjusting Light Intensity
When you’re looking to adjust light intensity in toy photography, getting the balance right between shadows and highlights is vital. The fill light plays a significant role here. It softens shadows cast by the key light, guaranteeing details aren’t lost in darkness. Start by positioning your fill light at an angle opposite the key light. Keep its intensity lower than the key to maintain depth and dimension. Use diffusers like softboxes or reflectors to spread the light evenly. Adjusting fill light intensity can be as simple as moving it closer or further from the subject. Don’t forget to check the highlights; they should look natural, not washed out. Always review your setup through the camera to make sure everything’s balanced perfectly.
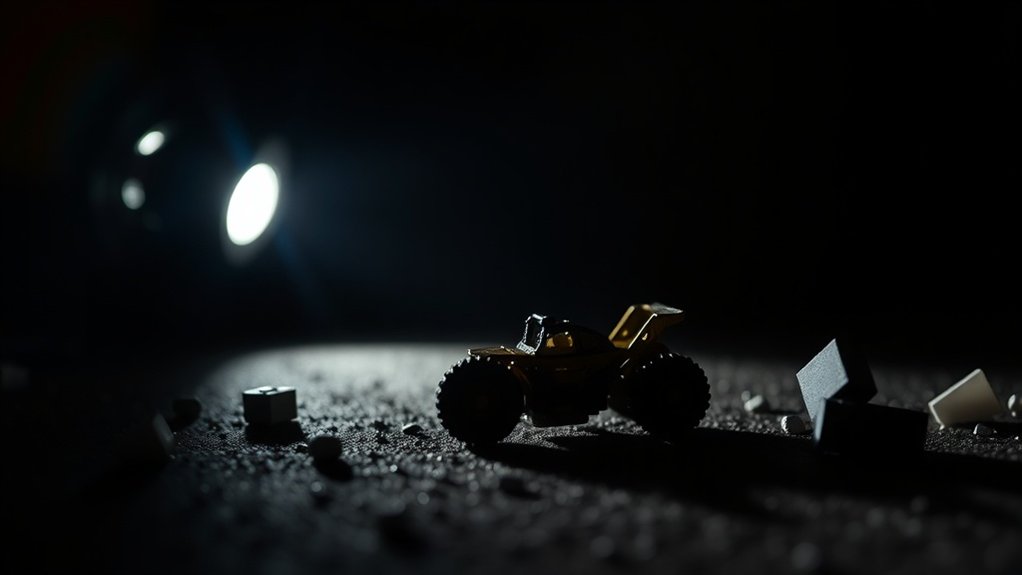
Back Light: Adding Depth and Separation
Creating impactful toy photography often hinges on your ability to manipulate light effectively, and backlighting is a technique that can truly elevate your shots. By placing a light source behind your subject, you add depth and separation, making your toy stand out dramatically from the background. Here’s how to use backlighting effectively:
- Position the Light: Place your light source directly behind the toy, slightly higher than your subject to create a halo effect.
- Adjust Intensity: Use a dimmer or diffuser to soften the light and avoid harsh shadows.
- Create Silhouettes: Experiment with stronger backlighting for dramatic silhouette effects.
- Highlight Textures: Backlighting can reveal intricate details and textures on your toy, adding interest and realism.
Master backlighting, and watch your toy photography come alive!
Choosing the Right Light Sources
How do you know which light sources will bring your toy photography to life? Start by considering the mood you want to create. For a soft, natural look, go for daylight bulbs or LED panels with adjustable color temperatures. They mimic natural light and are perfect for detailed shots. If you’re aiming for dramatic shadows, consider using a spotlight or focused beam light. These will highlight specific areas and add depth.
Pay attention to the size of your light source. Larger lights provide a softer glow, which is great for eliminating harsh shadows. Smaller lights, like LED cubes or even a smartphone flashlight, can create more contrast. Also, think about portability. Lightweight, battery-operated lights are ideal for setups that require flexibility or outdoor shoots.
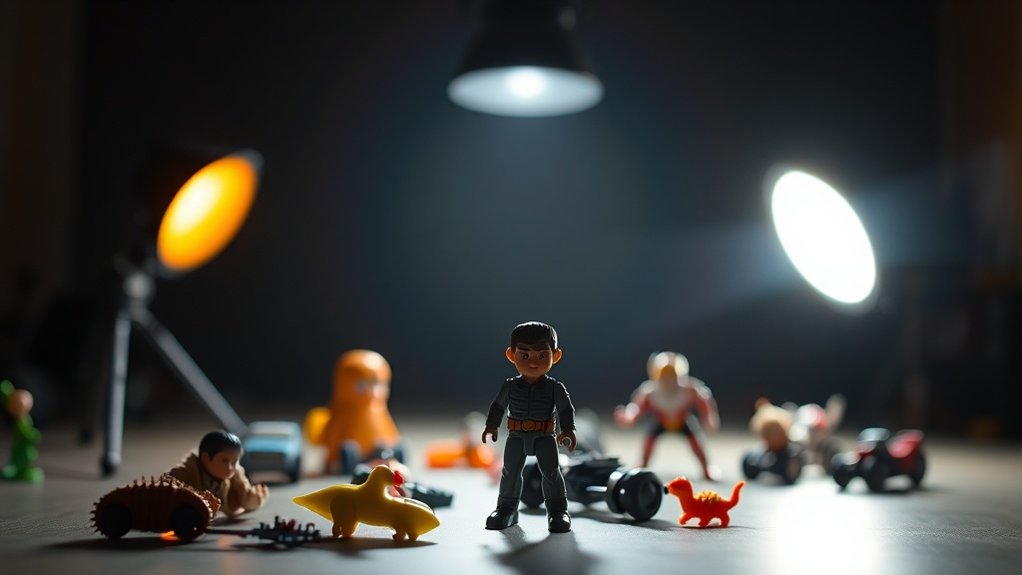
Setting Up Your Lighting Equipment
You’ve chosen your light sources; now it’s time to position them for the best effect. Consider how the angle and distance of your lights impact shadows and highlights on your toys. Don’t forget to adjust the light intensity to create the mood you want in your photos.
Choosing Light Sources
When setting up your toy photography lighting equipment, selecting the right light sources can dramatically impact your results. You’ll want to take into account the type of light and how it affects your subject. Here’s a quick guide to help you choose:
- LED Lights: These are energy-efficient and offer adjustable brightness, perfect for fine-tuning your setup.
- Softboxes: They provide diffused light, reducing harsh shadows and creating a softer look on your toys.
- Ring Lights: Ideal for close-up shots, these lights offer even illumination and minimize shadows.
- Natural Light: When available, it’s a great cost-free option that provides a natural, warm tone.
Positioning Your Lights
Although choosing the right light sources is essential, how you position them can make all the difference in your toy photography. Start by setting up your key light, the primary source of illumination. Place it at a 45-degree angle to your subject to create depth and highlight details. Next, set up the fill light opposite the key light to soften shadows, but keep it less intense. Finally, position the back light, or rim light, behind your subject to add separation from the background. This creates a sense of three-dimensionality. Make sure all lights are stable and not casting unwanted shadows. Experiment with different angles and distances to find the perfect setup, enhancing your toys’ features and bringing them to life.
Adjusting Light Intensity
To truly master toy photography, adjusting light intensity is key to achieving the desired mood and detail in your shots. You’ll often need to tweak lighting to suit your creative vision. Here’s how to adjust light intensity effectively:
- Dimmer Switch: Use a dimmer switch for easy control over light levels. This allows you to adjust the brightness without moving the lights.
- Distance: Alter the distance between the light source and your subject. Moving it closer increases intensity, while pulling it back softens the effect.
- Diffusers: Employ diffusers to reduce harshness. Placing them in front of lights softens shadows and evenly spreads the light.
- Bulb Wattage: Swap out bulbs with different wattages. Lower wattage bulbs produce softer light, perfect for delicate details.
Adjusting Light Intensity and Angles
Mastering the art of adjusting light intensity and angles can transform your toy photography from basic to breathtaking. Start by controlling the intensity of your lights. Use dimmers or adjust the distance between the light source and your subject to achieve the perfect brightness. Softer light can create gentle shadows, while a brighter setup highlights details.
Next, play with light angles. Experiment by moving your lights around the subject to see how shadows and highlights change. A high angle can create dramatic effects, while a side angle adds depth and texture. Don’t be afraid to try unconventional angles; sometimes, the most unexpected position brings your toys to life. Remember, subtle tweaks in intensity and angles can make all the difference in capturing that perfect shot.
Creating Mood and Atmosphere With Color Gels
When you want to add a unique touch to your toy photography, color gels are your secret weapon for creating mood and atmosphere. They’re incredible for transforming ordinary shots into something extraordinary. Here’s how you can use them effectively:
- Select the Right Gel: Choose a color that complements your scene. For a warm, inviting feel, go with orange or red. For a cooler, mysterious vibe, blue or purple works wonders.
- Layer Gels: Experiment by layering multiple gels to create custom colors and enhance depth.
- Positioning: Place gels over your light sources strategically to highlight key features or cast intriguing shadows.
- Experiment: Don’t be afraid to try different combinations. Every setup offers a new opportunity for creativity and storytelling.
Troubleshooting Common Lighting Issues
While color gels can transform your toy photography, they can also introduce some challenges that might affect your final image. First, watch out for color casts overpowering your subject. If colors look too intense, try repositioning your lights or swapping gels for softer hues. Shadows can be another issue. If you notice harsh shadows, adjust your light’s angle or distance to balance them out. Glare is also a common problem, especially on shiny surfaces. To reduce glare, try diffusing your light with a softbox or repositioning your light source. Finally, if your photos look too dark or too bright, tweak your camera settings or adjust light intensity. Address these issues promptly to guarantee your toy photography shines!
Tips for Experimenting With Creative Lighting Techniques
Have you ever wondered how to make your toy photos stand out with creative lighting? Experimenting with various techniques can elevate your shots from ordinary to extraordinary. Here are some tips to get you started:
- Color Gels: Use color gels over your lights to create vibrant and dramatic effects. Play with different hues to see how they transform your scene.
- Silhouettes: Position the light behind your subject to craft striking silhouettes. This technique adds mystery and intrigue.
- Reflections: Utilize mirrors or reflective surfaces to bounce light in unexpected ways, adding complexity and depth to your composition.
- Shadow Play: Experiment with shadows by placing objects between your light source and subject, casting interesting shapes and textures.
Dive in, and let your creativity shine!
Frequently Asked Questions
What Equipment Is Needed for Starting Toy Photography Beyond Lighting?
You’ll need a good camera, a sturdy tripod to keep shots steady, and a variety of lenses for different perspectives. Don’t forget props and backgrounds to add depth, and editing software for post-production tweaks.
How Can I Effectively Display Toy Textures in Photos?
Oh, you thought snapping a photo was enough to show off those intricate toy textures? Use a macro lens for sharp detail, and play with side lighting to enhance textures, giving your toys the spotlight they deserve.
What Are Some Creative Backgrounds for Toy Photography?
You can use colorful paper, nature scenes, or even printed cityscapes as backgrounds. Experiment with fabric textures or build mini sets. Don’t forget to play with depth and perspective to bring your toy photos to life!
How Do I Maintain Consistent White Balance in Different Lighting Conditions?
Did you know 60% of photographers struggle with white balance? Stick to a custom white balance setting on your camera and use a gray card in each lighting condition to guarantee consistent results across different shoots.
What Are the Best Camera Settings for Toy Photography?
You should set your camera to a low ISO to reduce noise. Use a small aperture for sharpness and a faster shutter speed to capture details. Manual mode gives you full control over your shots.
At a Glance
You’ve now mastered the art of three-point lighting for toy photography. Remember, the key light is your spotlight, the fill light is your harmonizer, and the back light is your depth creator. Choose your light sources wisely and tweak their intensity and angles to sculpt your scene. Don’t shy away from color gels to set the mood. If challenges arise, don’t fret—experiment and let creativity light your way. After all, isn’t art about illuminating imagination?