Embrace toy photography’s magic by backlighting for silhouette effects. Use natural sunlight during golden hour or control with LED panels. Emphasize shapes with a contrasting background and minimize distractions. Experiment with camera angles for dynamic perspectives and adjust distances for silhouette clarity. Increase contrast and adjust exposure in post-processing for standout images. Dive deeper to elevate your creative storytelling and intrigue with dramatic shadows and textures.
Understanding the Magic of Backlighting

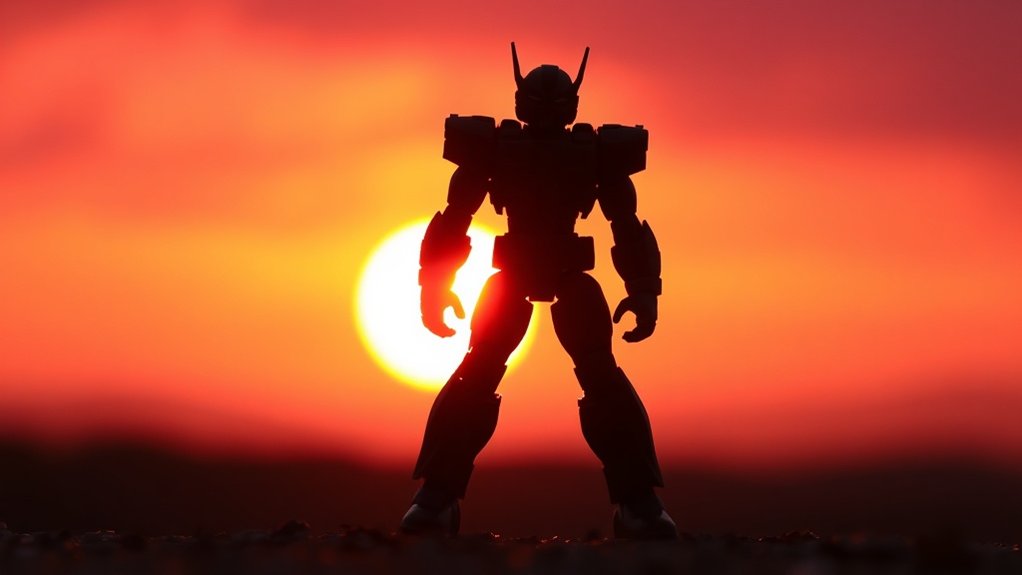
Backlighting can transform your toy photography by adding depth and drama to your images. When you position the light source behind your subject, it creates a striking silhouette effect that highlights shapes and outlines. This technique emphasizes the profile of your toy, making it stand out against a contrasting background. You’ll notice how textures become more pronounced, and shadows create intrigue.
To master backlighting, pay attention to the angles. Try moving around your subject to achieve different lighting effects. Look through your camera’s viewfinder to see how the light interacts. Adjust your position until you capture the desired mood and intensity. Remember, backlighting is all about experimentation. Embrace the shadows and let them tell a story, creating enchanting and dynamic images.
Choosing the Perfect Light Source
When it comes to toy photography, choosing the right light source is essential for achieving that perfect backlit effect. You’ll want to experiment with different types of lights to see what works best for your vision. Natural sunlight is a fantastic option, offering a soft, diffused glow, especially during golden hour. If you prefer artificial lighting, consider using LED panels or even a simple desk lamp. These allow you to control brightness and position more effectively. Pay attention to the intensity of your light source; too harsh, and you’ll lose detail in your silhouette. Adjust the distance between the light and your toy to get the look you’re aiming for. Remember, the key is balance—enough light to define shapes without overpowering them.
Selecting a Suitable Background

When selecting a background for your toy photography, focus on contrasting it with your toy’s colors to make them pop. Keep distractions to a minimum so the toy remains the focal point. A well-chosen backdrop can also enhance the silhouette, adding depth and drama to your shots.
Contrast With Toy Colors
Choosing the right background is essential to making your toy photography pop, as it can greatly influence how the toy’s colors are perceived. To create strong contrast, select a background color that complements the toy’s hues. For instance, if your toy is bright red, a muted green or blue background will make it stand out. This contrast draws the viewer’s eye directly to the toy, enhancing its features. Avoid backgrounds that mirror or clash with the toy’s color scheme, as they can dilute its visual impact. Experiment with bold or neutral tones, depending on the mood you want to convey. Remember, the key is to make your toy the star of the shot, and a well-chosen background can do just that.
Minimize Background Distractions
While a well-chosen background can highlight your toy’s colors, it’s equally important to minimize distractions that could pull focus away from your subject. A clutter-free background makes your silhouette stand out, allowing viewers to appreciate the creativity of your composition. Pay attention to unwanted elements and keep things simple. Here are some tips to help you select a suitable background:
- Solid Backgrounds: Use plain walls or sheets to prevent visual noise.
- Nature Settings: Choose open fields or clear skies for a natural, unobtrusive backdrop.
- Neutral Colors: Opt for muted tones that won’t compete with your toy.
- Consistent Textures: Avoid busy patterns that could detract from the silhouette effect.
Enhance Silhouette Definition
To enhance silhouette definition in toy photography, start by selecting a background that complements the toy’s outline. Opt for simple, contrasting backgrounds to make the silhouette pop. A plain, light-colored background works wonders if your toy is dark. Conversely, dark backgrounds suit lighter toys. This contrast guarantees the toy’s shape stands out sharply.
Keep the background uncluttered. Busy scenes can steal attention away from the silhouette. A single-color backdrop or a softly textured surface can add subtle interest without overpowering the subject. Consider using materials like paper, fabric, or even a computer screen displaying a solid color.
Experiment with distance between the toy and the background. This can affect shadow sharpness, adding depth to the silhouette. By carefully choosing your backdrop, you’ll elevate your toy photography to new heights.
Positioning Your Toy Figures
When positioning your toy figures, place your light source effectively to highlight details and create dramatic effects. Arrange figures strategically to guarantee they complement each other and maintain balance within the frame. Control depth and perspective by varying distances and angles, adding dimension to your shots.
Optimal Light Source Placement
Positioning your toy figures for ideal light source placement is essential to achieving stunning backlighting effects. Start by ensuring your light source is behind your toy, creating a silhouette. Experiment with different angles to see what highlights the figure’s unique contours. Here are some tips to reflect on:
- Height Variation: Place your light source at varying heights to create depth and interest.
- Distance Matters: Adjust the distance between the light and the toy for different shadow intensities.
- Angle Adjustment: Change the light’s angle for diverse effects, like dramatic shadows or subtle outlines.
- Light Type: Use a consistent light source, like an LED or flashlight, for controlled results.
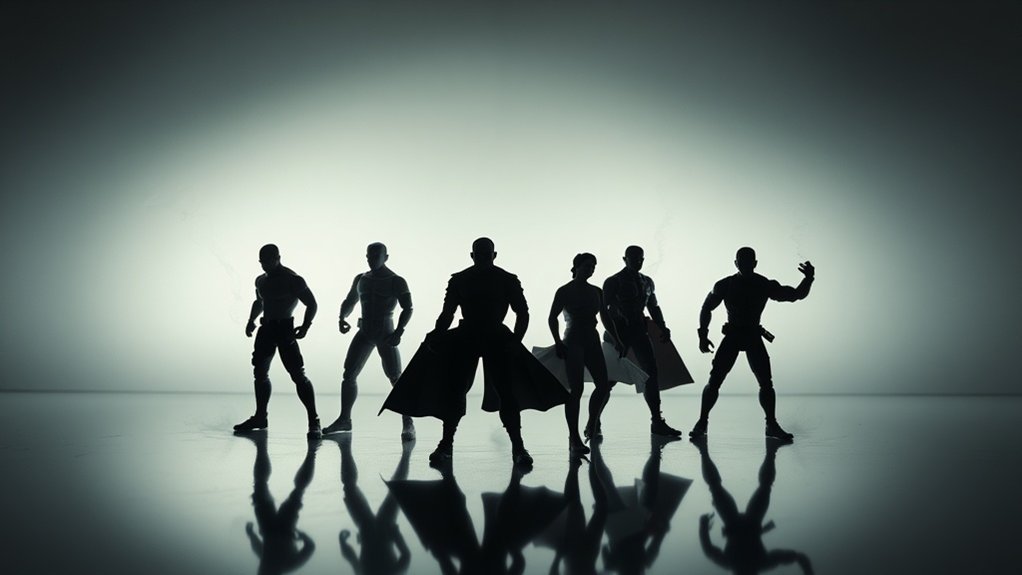
Strategic Figure Arrangement
Ever wondered how to give your toy figures that perfect dramatic pose? Start by considering the story you want to convey. Arrange figures to emphasize action or emotion. For a silhouette effect, guarantee figures have distinct, recognizable outlines. Spread limbs and accessories to create interesting shapes. The space between figures matters, too. Avoid overlapping them; instead, create a sense of interaction or tension. This adds depth and intrigue to your photo.
Experiment with angles. A low angle can make figures appear larger and more imposing, while a high angle might convey vulnerability. Try positioning figures at varying heights using props or stands. This variation adds dynamic interest. Keep adjusting until you capture that striking silhouette that tells the story you imagined.
Depth and Perspective Control
Building on the dynamic poses you’ve set for your toy figures, controlling depth and perspective is the next step to elevate your toy photography. By adjusting the distance and angles, you can create engaging compositions that draw the viewer in. Here’s how you can master depth and perspective:
- Foreground Focus: Position a figure close to the camera to emphasize its details, making it the focal point.
- Layering Figures: Arrange your toys at varying distances to add depth and a sense of scale.
- Angle Variations: Experiment with shooting from high or low angles to alter the perception of size and importance.
- Leading Lines: Use elements like roads or beams of light to guide the viewer’s eye through the scene.
These techniques can transform your shots by adding dimensionality and intrigue.
Experimenting With Camera Angles
When capturing the perfect shot in toy photography, experimenting with camera angles can transform an ordinary scene into something extraordinary. Try shooting from low angles to create a sense of grandeur and make your toys appear larger than life. This perspective can add drama and intrigue, drawing the viewer in. Alternatively, shooting from above can offer a unique view, highlighting the scene’s layout and creating a more intimate feel.
Don’t hesitate to move around your subject. Sometimes a slight tilt or shift can change the whole mood of the photo. Play with angles to highlight the silhouette’s shape, ensuring it stands out against the backlight. Remember, your creativity is key. Trust your instincts, and you’ll find the angle that makes your toys come alive.
Managing Exposure and Contrast
To manage exposure and contrast in toy photography, start by adjusting your camera settings to balance light and shadow effectively. Focus on enhancing silhouette definition by experimenting with different exposure levels and contrast adjustments. By fine-tuning these elements, you’ll create striking images that highlight your subject’s unique features.
Adjusting Camera Settings
Mastering camera settings is essential for capturing stunning backlit toy photography. To achieve the perfect silhouette effect, you need to manage exposure and contrast effectively. Start by setting your camera to manual mode to have full control. Adjust the aperture to keep your toys in focus while blurring the background. Use the lowest possible ISO to reduce noise and keep your image crisp. Experiment with shutter speed to balance the light and achieve the desired silhouette effect.
Here are some tips to take into account:
- Use Spot Metering: Focus on the bright background rather than the toy for better exposure.
- Bracket Shots: Capture multiple exposures to choose the best one.
- Check Histograms: Verify your highlights aren’t blown out.
- Shoot in RAW: Preserve details for post-processing adjustments.
Enhancing Silhouette Definition
Understanding camera settings lays the groundwork for enhancing silhouette definition in toy photography. Your first step is to manage exposure effectively. Lowering the exposure value helps darken the toy subject, creating a strong contrast against the bright background. You should guarantee your light source is directly behind the toy for a pronounced silhouette.
Next, focus on adjusting contrast. Use your camera’s contrast settings or post-processing software to deepen the shadows and highlight the light areas. This step amplifies the toy’s outline, making it pop against the background. Avoid overexposing the backdrop, as it can wash out details.
Experiment with different angles and distances to find the best silhouette shape. Keep practicing, and soon you’ll capture stunning toy silhouettes.
Utilizing Natural and Artificial Light
When you’re exploring toy photography, harnessing both natural and artificial light can transform your images dramatically. Natural light offers a soft, authentic glow, perfect for capturing delicate details. Position your toys against the sun during golden hour for stunning silhouettes. Artificial light, on the other hand, provides control and consistency. You can easily adjust the intensity and direction to achieve the desired effect. Consider combining both types for a unique look. Here’s how you can make the most of lighting:
- Experiment with different light sources: Use lamps, torches, or even your phone’s flashlight.
- Diffuse artificial light: Use fabric or paper to soften harsh shadows.
- Use reflectors: Bounce light to fill in dark areas.
- Adjust angles: Change light positions for varied effects.
Creating Depth With Shadows
Though often overlooked, shadows play an essential role in creating depth and dimension in toy photography. When you position your light source behind the toy, it casts a shadow that adds a sense of three-dimensionality to your image. By adjusting the angle and intensity of the light, you can manipulate these shadows to highlight the contours and shapes of the toy, making it appear more lifelike. Don’t hesitate to experiment with different light positions; slight changes can dramatically alter the shadow’s effect. Use shadows to guide the viewer’s eye through the composition, emphasizing certain features while subtly concealing others. Remember, it’s not just about the toy itself; it’s about how the shadow interacts with its surroundings to create a fascinating scene.
Enhancing Colors and Textures
Vibrancy takes center stage when you enhance colors and textures in toy photography. By mastering these elements, your silhouettes will pop with life and detail. Start by choosing toys with bold hues and interesting surfaces. Position your light source to highlight these features, creating eye-catching contrasts.
- Experiment with angles: Adjust your light to find the perfect balance between shadow and color.
- Use colored gels: Place them over your light source to add dramatic flair to the scene.
- Play with natural elements: Incorporate textures like sand or leaves to complement your toy’s surface.
- Select the right background: A contrasting or neutral backdrop can enhance the toy’s colors and textures.
These techniques will make your toy photography vibrant and engaging without post-processing.
Post-Processing Techniques for Silhouettes
Capturing the perfect silhouette in toy photography requires a deft touch in post-processing. Start by importing your image into your preferred editing software. Adjust the contrast to accentuate the dark areas, ensuring the toy remains a solid shadow against the backdrop. Use the exposure settings to darken the toy further if needed, while keeping the background vibrant and bright. Next, enhance the saturation of the background colors to create a striking contrast.
Dodge and burn can help refine edges, ensuring your silhouette is sharp and defined. Finally, use a vignette to subtly draw focus to your subject. Remember, less is more; avoid over-editing to maintain a natural look. With these techniques, your toy silhouettes will truly stand out.
Frequently Asked Questions
How Can I Prevent Unwanted Reflections in My Silhouette Shots?
You can prevent unwanted reflections by positioning your light source carefully. Use non-reflective surfaces around your setup, and adjust angles to minimize glare. Experiment with diffusers and polarizing filters to control and reduce any unexpected reflections.
What Are Some Creative Uses for Props in Silhouette Photography?
In silhouette photography, use props to create intriguing shapes and add depth. Try placing translucent materials behind your subject for texture or use frames to guide the eye. Experiment with angles and distances to enhance composition.
How Do I Ensure My Camera Settings Are Optimal for Silhouette Effects?
Set your camera to manual mode. Lower the ISO to reduce noise. Use a small aperture, like f/8, for depth. Adjust the shutter speed to balance exposure. Focus on the subject’s edges for crisp silhouettes.
Can Silhouette Photography Be Effectively Done With Smartphone Cameras?
With a smartphone in hand, you’re wielding a brush to paint shadows. Yes, you can achieve stunning silhouettes. Use manual mode, adjust exposure, and position your subject against a bright background. Experiment and capture magic!
What Are Common Mistakes to Avoid in Toy Silhouette Photography?
You’re likely to make mistakes like poor lighting placement, cluttered backgrounds, or improper focus. Ascertain the background contrasts well with your subject and your light source is behind the toy for a striking silhouette.
At a Glance
In the domain of toy photography, mastering silhouette effects with backlighting is like wielding a magic wand. You’ve explored the enchanting dance of light and shadow, discovering how to make your toy figures pop against the perfect backdrop. With a keen eye for angles and a blend of natural and artificial light, your creations will leap off the screen. So go ahead, capture the epic drama of your miniature scenes and let your imagination run wild!


