
In low-key toy photography, you focus on dramatic scenes using minimal light to create rich contrasts and deep shadows. By angling a small LED at your subject, you capture intriguing details and textures. Experiment with light intensity to control mood without overwhelming the scene. A black velvet backdrop helps maintain focus. Use your camera’s manual settings for exposure control and stabilize with a tripod. Master these techniques for enchanting moody scenes that excite and satisfy. Explore further for deeper insights.
Understanding Low-Key Lighting Principles
When it comes to mastering toy photography, understanding low-key lighting principles can elevate your images to a whole new level. You’ll create dramatic, moody scenes by emphasizing shadows and highlights. Start by using minimal lighting to cast strong contrasts, making your toy subjects pop against darker backgrounds. Position your light source at an angle to capture the toy’s texture and details, adding depth and intrigue to your shots. Experiment with various light intensities and distances to see how they affect the mood. Remember, the key is subtlety; too much light can ruin the effect. Practice with one or two light sources, and adjust your camera settings to enhance shadows while maintaining clarity. Your toy photography will transform into enchanting storytelling.
Choosing the Right Equipment
To elevate your toy photography, selecting the right equipment is essential. Start with a reliable camera, preferably one with manual settings. This gives you control over exposure, aperture, and ISO, allowing for those dramatic low-key shots. A sturdy tripod is a must for stability, especially in longer exposures common in low-light conditions.
Consider investing in a macro lens to capture intricate details of your toys. For lighting, opt for small LED panels or portable lights that let you easily manipulate shadows and highlights. A reflector or diffuser can help soften harsh light and control contrast. Don’t forget a background that complements your scene, like black velvet for a deeper mood. With the right tools, your toy photography will truly shine.
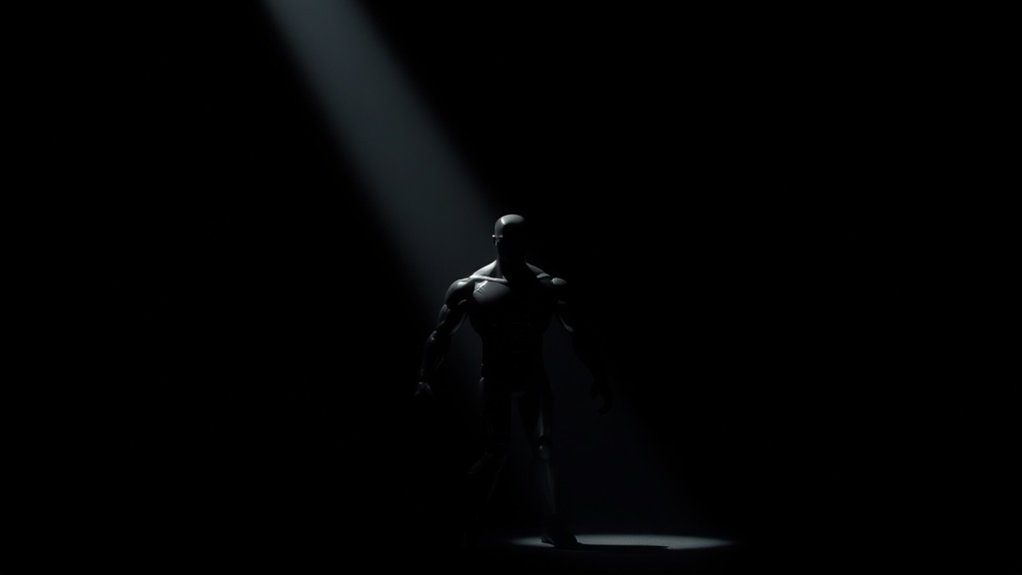
Setting Up Your Lighting Environment

To create enchanting toy photos, start by choosing the right light sources that suit your style and mood. Control the light intensity to highlight details and avoid washing out your subject. Don’t forget to experiment with shadows and contrast to add depth and drama to your shots.
Choosing Light Sources
Selecting the right light sources is essential for creating an enchanting toy photography setup. When you choose the perfect lighting, you breathe life into your scenes, emphasizing textures and colors. Consider these light sources to evoke emotion and drama:
- LED lights: Versatile and energy-efficient, they offer adjustable color temperatures.
- Fairy lights: Add a whimsical touch with their soft, twinkling glow.
- Flashlights: Direct and focused, they create dynamic shadows and highlights.
- Candles: Their flickering warmth infuses scenes with mystery and nostalgia.
- Desk lamps: Easily accessible, they provide consistent and controllable lighting.
Each choice brings its own mood, helping you transform ordinary setups into enthralling stories. Use these sources to craft the perfect atmosphere for your miniature masterpieces.
Controlling Light Intensity
Crafting the perfect ambiance with your chosen light sources is just the beginning; now, it’s time to master the art of controlling light intensity. Begin by dimming or brightening your lights to match the mood you want. Use dimmers to adjust brightness levels precisely. If you’re using a lamp, experiment with different wattage bulbs. For more sophisticated control, try using LED panels with adjustable output settings.
Modifiers like diffusers can soften harsh light, creating a subtler effect. You can also place materials like tracing paper or thin fabric over lights to tame intensity. Reflectors help bounce light back onto your subject, letting you fill in shadows without direct exposure. Experiment until you achieve the perfect balance, enhancing your toy photography’s emotional depth.
Shadows and Contrast
While setting up your lighting environment, understanding shadows and contrast will elevate your toy photography. You’ll create a world where toys come alive with drama and depth. Shadows add mystique, while contrast highlights details that might otherwise go unnoticed.
To harness this effect, consider these elements:
- Angle of light: Experiment with where your light source hits the subject to lengthen or shorten shadows.
- Light distance: The closer the light, the softer the shadows; farther away, they become sharper.
- Background color: Dark backgrounds enhance contrast, making your subject pop.
- Reflectors: Use them to bounce light and soften harsh shadows, adding subtlety.
- Light modifiers: Diffusers or grids can shape and direct light, controlling contrast effectively.
Embrace these techniques for striking, moody scenes.
Manipulating Shadows and Highlights

When photographing toys, understanding how to manipulate shadows and highlights can dramatically enhance your images. Shadows add depth, creating a sense of mystery and drama, while highlights bring out textures and details. Start by adjusting your light source’s angle. A low side light casts long, dramatic shadows, while overhead lighting creates softer, more subtle shadows. You can use reflectors or white cards to bounce light back onto your subject, controlling how shadows fall. To emphasize highlights, adjust the intensity of your light source or move it closer for sharper contrasts. Experiment with diffusers to soften harsh highlights. By fine-tuning these elements, you’ll create enchanting, moody scenes that breathe life into your toy photography, making each shot a visual story.
Selecting the Perfect Background
A well-chosen background can elevate your toy photography from ordinary to extraordinary. It sets the scene and mood, drawing viewers into your tiny world. Think carefully about what surrounds your subject. A cluttered or distracting background can detract from your photo’s impact. Instead, aim for a setting that complements your toy and enhances the emotional tone you’re aiming for.
Consider these elements when selecting your background:
- Color: Use contrasting or complementary colors to make your toy pop.
- Texture: Add depth and interest with different materials like fabric or paper.
- Theme: Match the background to the story you want to tell.
- Simplicity: Keep it simple to avoid overshadowing your subject.
- Lighting: Confirm the background aligns with your lighting to maintain mood consistency.
Choosing wisely can transform your shots.
Posing Your Toys for Maximum Impact
When you’re posing your toys for maximum impact, focus on using dynamic angles to add excitement and depth to your shots. Try incorporating visual storytelling techniques to convey a scene or emotion, making your photos more engaging. By combining these elements, you’ll transform simple toy arrangements into enchanting images that draw viewers in.
Dynamic Angles Matter
To capture the most striking images in toy photography, dynamic angles are your best friend. By experimenting with different perspectives, you can infuse life and energy into your shots. Move around your subject and observe how shadows and highlights change. Don’t be afraid to get up close or shoot from below. Highlighting your toy’s most compelling features can create drama and intensity.
Consider these emotional triggers when choosing angles:
- Excitement: Capture the thrill of action with a low angle.
- Empowerment: Convey strength and dominance by shooting upward.
- Mystery: Use side angles to cast intriguing shadows.
- Tension: Frame tightly to emphasize detail and suspense.
- Wonder: Experiment with overhead shots for a fresh perspective.
Visual Storytelling Techniques
As you harness dynamic angles to breathe life into your toy photography, consider how posing adds another layer of depth to your visual storytelling. Positioning your toys creatively can evoke emotions and suggest narratives. Think about the mood you want to convey—are your toys engaged in an epic battle, or sharing a quiet moment? Use their body language to tell that story. A slight tilt of the head, an outstretched arm, or a powerful stance can make all the difference. Remember, the space around your toys is just as important. It frames your scene, guiding the viewer’s eye. Experiment with different poses and compositions until you capture that perfect moment. Don’t be afraid to get imaginative and tell a story only you can envision.
Adjusting Camera Settings for Low Light
Capturing stunning toy photographs in low light can be challenging, yet it’s entirely achievable with the right camera settings. Start by adjusting your ISO to a higher value, allowing your camera to be more sensitive to available light. Use a wide aperture to create a shallow depth of field, adding drama to your scene. A slower shutter speed can help capture more light but be cautious of camera shake. Consider using a tripod for stability.
Here’s what you’ll feel when you get it right:
- Awe as shadows dance around your miniature subjects.
- Satisfaction when you see the intricate details emerge.
- Excitement when your toys look larger than life.
- Inspiration to experiment more with lighting.
- Pride in your ability to create moody masterpieces.
Editing Techniques for Enhanced Moodiness
When you want to enhance the moodiness of your toy photographs, post-processing can be your best ally. Start by adjusting the contrast to deepen shadows and highlight the subjects. Use desaturation to mute colors, creating a somber tone. Vignetting can focus attention on the toy by darkening the edges, adding drama. Experiment with split toning to introduce subtle color shifts in shadows and highlights, enhancing the atmosphere.
Consider using a touch of grain to give your images a gritty, film-like quality. Adjust the clarity slider to soften or sharpen details, depending on your desired effect. Don’t forget to play with exposure settings; lowering the overall brightness can amplify the mysterious mood. With these techniques, your toy photos will convey emotion and intrigue.
Tips for Consistent Results and Experimentation
While post-processing can add moodiness to your toy photography, achieving consistent results starts with solid techniques during the shoot itself. Begin by understanding your camera settings and how they affect light. Experimentation is key, but consistency requires a mindful approach. Here are some tips to keep your results steady while still allowing room for creative exploration:
- Embrace the Shadows: Let shadows play a significant role in setting the scene’s mood.
- Use a Single Light Source: This simplifies control and creates dramatic contrasts.
- Keep a Shooting Journal: Note down settings and conditions for future reference.
- Play with Angles: Change perspectives to discover unique compositions.
- Trust Your Instincts: When something feels right, it usually is.
These tips help you create powerful and evocative imagery.
Frequently Asked Questions
How Can I Incorporate Natural Light Into Low-Key Toy Photography?
You can incorporate natural light by positioning your toy near a window during late afternoon or early evening. Use curtains to control intensity. Block unwanted light with cardboard or cloth to maintain the moody, low-key atmosphere you desire.
What Are Some Common Mistakes to Avoid in Low-Key Lighting?
Ever tried capturing a dramatic scene but ended up with flat lighting? Don’t overexpose or use too much fill light. Avoid placing lights too close to your subject. Keep shadows deep to maintain that moody atmosphere you’re aiming for.
How Do I Prevent Reflections on Glossy Toy Surfaces?
To prevent reflections on glossy toy surfaces, adjust your light’s angle and use diffusers. Experiment with polarizing filters on your camera lens. Keep unwanted reflections at bay by minimizing ambient light sources and covering shiny surroundings.
Can Low-Key Photography Work for Outdoor Toy Scenes?
Yes, you can definitely use low-key photography outdoors. Focus on natural shadows and backlighting. Position toys strategically and control the light with reflectors or diffusers. You’ll create stunning, moody scenes that capture attention and imagination.
How Long Does It Typically Take to Set up a Low-Key Scene?
Setting up a low-key scene usually takes about 30 minutes to an hour. You’ll focus on adjusting lights, manipulating shadows, and ensuring everything aligns perfectly. Don’t rush; experimenting with angles and props might take some extra time.
At a Glance
As you explore the world of low-key toy photography, you’ll find a surprising coincidence: the shadows you manipulate echo the hidden stories your toys are enthusiastic to tell. By mastering lighting principles, choosing the right equipment, and experimenting with camera settings, you create moodiness that elevates your work. With each shot, you’ll not only capture the essence of your subjects but also discover unexpected narratives—both in your toys and within yourself.


