
Use rim lighting behind toys to create mesmerizing backlit photos with a cinematic feel. Select translucent or light-colored toys for stunning effects. Position your light source behind the toy for an enchanting glow and soften it with a diffuser. Adjust your camera’s aperture, shutter speed, and ISO to capture sharp, noise-free images. Experiment with angles, framing, and editing techniques to enhance mood. Discover how these elements transform toys into characters ready for epic adventures.
Understanding Rim Lighting in Photography
Understanding rim lighting is essential for adding depth and drama to your toy photography. By positioning a light source behind your subject, you create a glowing outline that separates the toy from the background, enhancing its three-dimensional quality. This technique highlights contours and adds a cinematic flair to your images, making them visually striking. Experimenting with different angles and intensities of the light source can further refine the impact of rim lighting in your shots. Combining this technique with other toy photography lighting techniques can lead to stunning and dynamic results that draw attention to your subject. Additionally, playing with color gels can introduce mood and evoke emotions, transforming your toy photographs into captivating stories.
To achieve effective rim lighting, make sure the light source is slightly off to the side, creating a soft, even outline rather than harsh shadows. Experiment with different angles and distances to find what works best for your composition. Pay attention to the intensity of the light, as too much can overpower the subject, while too little might not create the desired effect. Mastering this technique elevates your toy photography with engaging results.
Choosing the Right Toys for Backlit Photography
When you’re selecting toys for backlit photography, think about how the material interacts with light. Translucent toys can create stunning effects, while the size and scale of the toy will influence the overall composition. Don’t forget color and texture, as these elements can greatly enhance the mood and depth of your photos.
Toy Material Considerations
Selecting the right toys for backlit photography hinges on the material they’re made from. You want toys that play well with light, so consider translucent or semi-transparent materials. These allow light to pass through, creating a mesmerizing glow around the edges and enhancing the cinematic mood. Think of toys with clear or frosted parts, like action figures with glowing elements or cars with transparent windows.
Avoid toys that are overly glossy or reflective, as they can cause glare and distract from the intended effect. Matte finishes work best for diffusing light softly. Also, keep in mind the color of the toys. Lighter colors reflect light better, while darker shades absorb it, affecting how the rim lighting appears in your photos. Choose wisely to create stunning backlit images.
Size and Scale Importance
Considering the material of your toys is just one part of crafting the perfect backlit photograph. Size and scale are equally significant. You need to think about how the toy’s size affects its presence in the shot. Smaller toys may seem lost against a detailed background, while larger models can dominate and obscure important elements. Pay attention to the scale relative to any props or settings you include. A well-proportioned scene enhances the cinematic feel, making the toy appear more lifelike. Choose toys that fit naturally within your envisioned composition, ensuring they neither overpower nor fade into the scene. Experiment with different sizes to find the right balance, creating dynamic visuals that captivate and draw viewers into your miniature world.
Color and Texture Effects
To create striking backlit toy photographs, pay close attention to color and texture. Choose toys with vibrant colors that pop against a lit background. Bright reds, blues, and yellows create a dynamic contrast, drawing the viewer’s eye. Opt for toys with varied textures, as these add depth and dimension to your photos. Matte surfaces diffuse light softly, while glossy materials capture and reflect light, enhancing the rim lighting effect.
Consider the toy’s material as well. Transparent or translucent toys can produce stunning effects as light passes through them, casting colorful glows or shadows. Experiment with different combinations to find what works best. By carefully selecting toys based on color and texture, you’ll elevate your backlit photography and achieve a cinematic feel.
Setting Up Your Lighting Equipment
When setting up your lighting equipment for backlit toy photography, it is crucial to understand how light placement can dramatically impact the mood of your shots. Position your primary light source behind the toy to create a striking rim light effect, highlighting edges and contours. Use a diffuser to soften the light, preventing harsh shadows and creating a more natural look. Experiment with different angles and distances to find the perfect balance.
Consider adding additional lights or reflectors to enhance your scene:
- Warm gels: Add a cozy, cinematic glow to your setup.
- Mini LED panels: Offer flexibility for tight spaces and precise control.
- Reflectors: Bounce light back onto your subject, reducing unwanted shadows.
- Colored lights: Infuse your scene with mood-enhancing hues.
These elements help you craft dramatic, visually engaging images.
Mastering Camera Settings for Optimal Results

To achieve stunning backlit toy photos, you’ll need to master your camera’s aperture and shutter speed settings. Adjusting the ISO and white balance is also essential to capture sharp details and true colors. With these settings optimized, your toy photography will stand out with vibrant clarity and depth.
Aperture and Shutter Speed
Mastering the intricate dance between aperture and shutter speed is essential for capturing stunning backlit toy photography. You need to balance these settings to control light and focus, creating an ethereal glow around your subjects. Start by choosing a wide aperture to create a shallow depth of field, making the toy pop while softly blurring the background. Keep your shutter speed fast enough to freeze action but slow enough to let in sufficient light. Experiment with these settings to achieve the perfect dynamic range and mood.
- Wide Aperture (e.g., f/2.8): Emphasizes the toy, blurring distractions.
- Fast Shutter Speed (e.g., 1/250s): Captures crisp details, halting motion.
- Golden Hour Lighting: Enhances natural rim lighting for drama.
- Manual Mode: Offers you full control over every shot.
ISO and White Balance
Achieving stunning backlit toy photography requires a keen understanding of ISO and white balance settings. Start by setting your ISO to the lowest possible value that still provides enough light, minimizing noise in your images. When shooting in low light, you might need to increase the ISO, but be cautious—too much can lead to grainy photos.
White balance is crucial for accurate colors. In backlit scenes, you might notice a warm tint. Adjust your white balance to counteract this and achieve true-to-life hues. Use presets like “Daylight” for natural light or “Cloudy” for a warmer tone. For precision, consider shooting in RAW format, allowing you to fine-tune white balance in post-processing. Mastering these settings guarantees your toy photos are crisp, vibrant, and cinematic.
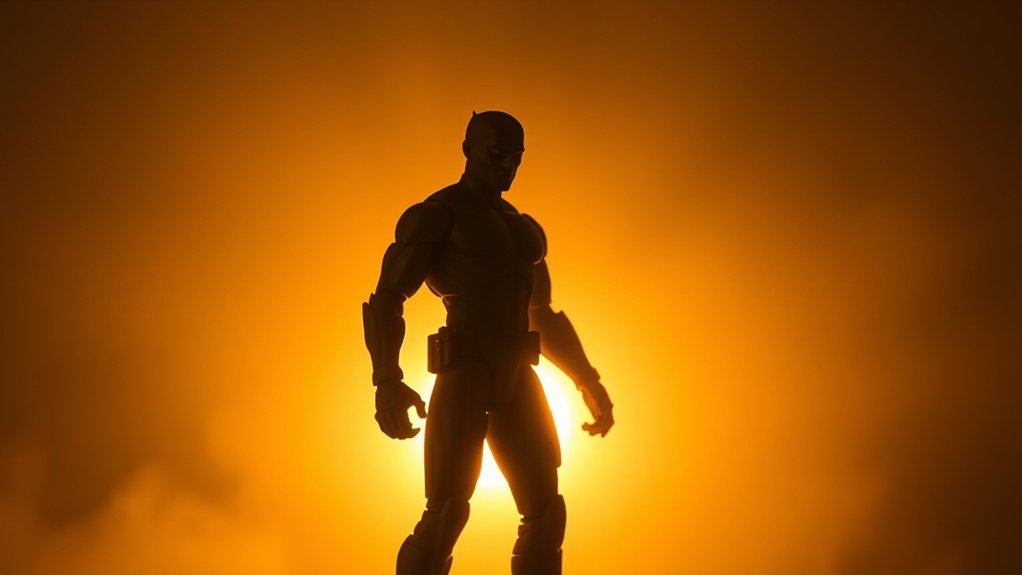
Composing Your Shots for Cinematic Impact
How do you transform a simple toy into a fascinating scene reminiscent of a blockbuster film? It all begins with thoughtful composition. You need to contemplate your subject, background, and lighting to create a visually striking image. Frame your shot so the toy becomes the central focus, drawing the viewer’s eye immediately. Use the rule of thirds to add dynamic tension and balance. Pay attention to your background; verify it complements rather than distracts from your subject.
Imagine:
- A lone action figure silhouetted against a fiery sunset.
- A spaceship model soaring through a starry sky, backlit by a soft glow.
- A doll standing in the shadows, illuminated by a mysterious beam of light.
- A tiny warrior poised for battle, framed by dramatic clouds.
Experimenting With Angles and Perspectives

Why stick to eye-level shots when you can explore a world of visual storytelling by simply changing your perspective? Tilt your camera upwards to make your toys appear larger than life, evoking a sense of power and dominance. Alternatively, shooting from above can create vulnerability or highlight their intricate details. Don’t hesitate to get low to the ground and capture that dramatic, ground-level view, infusing your photos with a sense of impending action or adventure.
Experiment with angles to introduce dynamic lines and depth. A slight tilt can add tension, while diagonal shots often convey movement. Use reflections or shadows creatively, incorporating them as part of the composition. Each angle offers a new narrative, inviting viewers to see your toys from a fresh, exciting perspective.
Editing Techniques to Enhance Mood and Atmosphere
With your camera angles setting the stage for enchanting visual narratives, it’s time to bring those stories to life through thoughtful editing. Start by adjusting the contrast to emphasize the play between light and shadow, making your toys pop against their backlit surroundings. Focus on color grading to evoke the desired atmosphere, whether it’s a warm sunset glow or a cool, eerie night scene.
Consider these editing techniques:
- Boost highlights to intensify the rim lighting, enhancing the dramatic silhouette of your subject.
- Add a vignette to draw the viewer’s eye toward the toy, creating a focal point that feels intimate.
- Use texture overlays to add depth and a sense of realism or fantasy.
- Adjust the saturation to either mute colors for a somber mood or make them vivid for a lively effect.
These techniques will transform your photos into cinematic stories.
Inspiring Ideas for Creative Backlit Toy Scenes
Imagine your favorite toy as the protagonist of an enchanting tale, set against the mesmerizing glow of a backlit scene. Picture a tiny astronaut exploring an alien world, with vibrant planets softly illuminating the background. Or perhaps a brave knight standing on a cliff, silhouetted by a fiery sunset. You could even recreate iconic movie moments, like a superhero leaping into action, backlit by city skyline lights.
To spark creativity, consider using household items. A simple flashlight can mimic moonlight, while colored paper filters can add dramatic hues. Small mirrors or foil can reflect extra light, enhancing the scene’s depth. Experiment with angles and shadows to craft unique stories. Your toys aren’t just figures; they’re characters ready to set off on epic adventures.
Frequently Asked Questions
How Can I Prevent My Toys From Melting Under Intense Lighting?
To prevent your toys from melting under intense lighting, don’t place them too close to the light source. Use LED lights, which emit less heat, or add diffusion material to soften and reduce the heat on your toys.
What Materials Are Best for Creating Realistic Miniature Backdrops?
You should use foam board, cardstock, or plaster for realistic miniature backdrops. They’re versatile and easy to paint or texture. Don’t forget to add natural elements like sand or moss for enhanced realism in your scenes.
How Do You Manage Battery Consumption During Extended Photography Sessions?
Isn’t it frustrating when batteries die mid-session? To manage consumption, lower your camera’s LCD brightness, turn off unnecessary features, and carry extra batteries. With these steps, you’re prepared for those extended photography adventures without interruptions.
Can Smartphone Cameras Achieve Professional-Looking Backlit Toy Photos?
You can definitely achieve professional-looking backlit toy photos with a smartphone camera. Use manual settings, focus on lighting, and position your subject effectively. Experiment with angles and shadows to create depth and enhance the overall composition.
What Safety Precautions Should Be Taken When Using Multiple Lighting Sources?
When using multiple lighting sources, make certain you don’t overload circuits or place lights near flammable items. Check cords for damage and keep lights stable. Use protective gloves if bulbs get hot to avoid burns. Stay safe!
At a Glance
You’ve now got the tools to breathe life into your toy photography, creating scenes that burst with cinematic flair and mood. Like a painter with a palette of light, you can transform simple toys into epic storytellers. Remember, it’s all about experimenting with angles, mastering your camera settings, and using rim lighting to your advantage. With practice, your photos will not just capture images, but also evoke emotions, turning each shot into a fascinating piece of art.


