
To elevate your miniature photography, start with the Rule of Thirds to balance your scenes. Use leading lines to direct the viewer's eye, and play with depth of field to highlight or blur your subjects. Experiment with angles to introduce unique perspectives, and focus on lighting to set the mood and enhance details. Create a story by arranging your miniatures with narrative intent, and incorporate natural elements for authenticity. With these tips, your images will captivate and create an emotional connection. As you explore further, you'll uncover more about mastering this enchanting art form.
Utilize the Rule of Thirds
Why is the rule of thirds so essential in miniature photography? It transforms your images from ordinary snapshots to compelling stories. When you use this guideline, you're dividing your frame into nine equal parts, using two horizontal and two vertical lines. Placing your subject along these lines or at their intersections creates a balanced, harmonious composition that naturally draws the viewer's eye.
In miniature photography, where details are often intricate and scenes are small, this rule helps in highlighting the central elements without overwhelming the viewer. By positioning your miniature subjects off-center, you create more space for the surrounding environment, adding context and depth to your image. This approach not only emphasizes the subject but also enhances its interaction with the scene.
Moreover, the rule of thirds encourages creative exploration. It pushes you to think outside the box, experimenting with different angles and perspectives. Don't be afraid to shift the focus away from the center. This technique often results in more dynamic and interesting shots, making your miniature world appear larger and more engaging. Mastering this rule can greatly elevate your miniature photography, giving each photo a professional touch.
Play With Depth of Field
After mastering the rule of thirds, it's time to explore another intriguing aspect of miniature photography: depth of field. This technique allows you to control which parts of your image are sharp and in focus, and which are blurred, creating a striking visual contrast. To achieve this, adjust your camera's aperture settings. A wider aperture (lower f-stop number) results in a shallow depth of field, isolating your miniature subject against a soft, dreamy background. This effect draws attention directly to your subject, enhancing its details and textures.
On the other hand, a smaller aperture (higher f-stop number) increases the depth of field, keeping more of the scene in focus. This is useful when your composition includes multiple miniature elements or when you want to highlight the environment around your subject. Experiment with different apertures to see how each setting changes the mood and focus of your photograph.
Don't forget, the distance between your camera and the subject also influences depth of field. The closer you are, the shallower it becomes. By mastering depth of field, you'll add an extra layer of artistry to your miniature photography, making your images truly enchanting.
Experiment With Angles

Exploring different angles in miniature photography can completely transform your images, adding depth and interest. When you change the angle, you alter the viewer's perception, leading them to see your miniature world in a new light. Don't just settle for eye-level shots; instead, try unique perspectives to bring out the best in your tiny subjects.
- Bird's-eye view: Imagine hovering above, capturing the entire scene as if you're a curious giant peering into a tiny world.
- Worm's-eye view: Get low and shoot upward, creating a towering effect for your miniatures, making them feel larger-than-life.
- Tilted angles: Introduce a slight tilt to your frame, adding dynamic tension and a touch of whimsy to your scene.
- Close-up details: Focus on specific elements by zooming in, showcasing intricate details that might otherwise go unnoticed.
- Over-the-shoulder: Position your camera behind a miniature figure, creating a narrative that invites viewers to step into their shoes.
Focus on Lighting
While experimenting with angles can elevate your miniature photography, mastering the art of lighting truly brings your tiny scenes to life. Lighting sets the mood, highlights intricate details, and draws viewers into the miniature world you've crafted. Start by evaluating the natural light available. Early morning or late afternoon often provides soft, diffused light that enhances textures without harsh shadows.
Use reflectors to bounce light into shadowy areas, ensuring even illumination across your scene. A simple white card can work wonders. You can also experiment with artificial light sources like LED panels or small desk lamps. These give you control over the lighting direction and intensity, allowing you to illuminate your miniatures strategically.
Consider the color temperature of your light sources. Cooler tones can create a stark, modern feel, while warmer tones evoke coziness. Adjusting these can drastically change the atmosphere of your photograph. Don't forget to play with shadows—dramatic shadows can add depth and mystery to your composition.
Create a Story
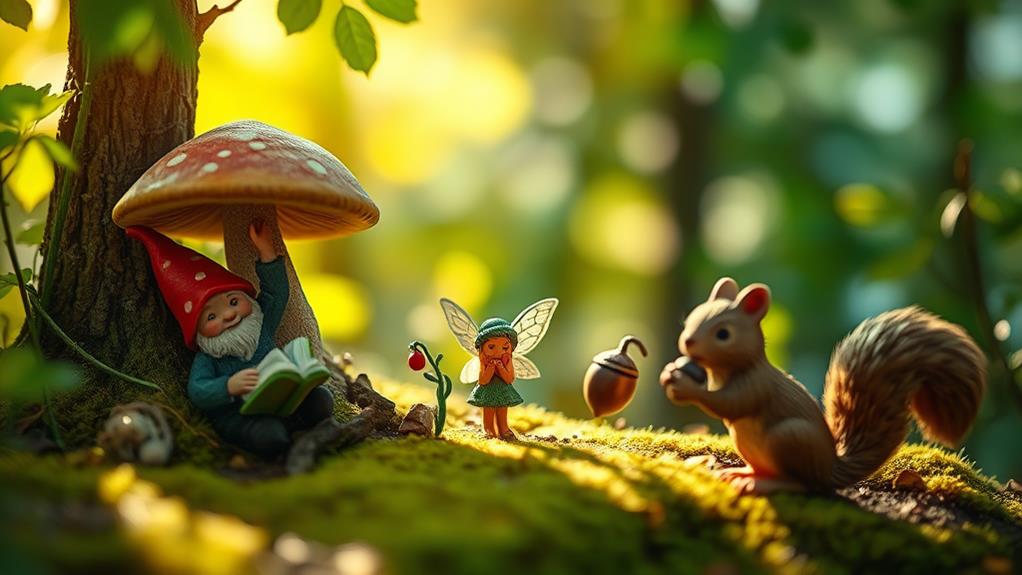
In the domain of miniature photography, creating a story is key to enchanting your audience. Your miniatures should act as the characters in a narrative, pulling viewers into a tiny world brimming with intrigue. Start by envisioning the scene you'd like to capture. Ask yourself: What emotions do you want to evoke? Who are the characters, and what's happening in this moment? These questions guide your composition, allowing you to build a cohesive and compelling story.
Think about the objects and figures you'll use. Each element should serve a purpose, highlighting the narrative you wish to convey. Here are some ideas to spark your imagination:
- A tiny figure standing bravely at the edge of a cereal bowl, like a sailor gazing at the ocean.
- Toy cars lined up on a keyboard, setting off on a trek across a digital landscape.
- A miniature picnic on a patterned rug, as if in a vast meadow.
- A small figure reading a book under a desk lamp, creating a cozy study scene.
- Dolls dining on a plate, transforming it into a grand ballroom.
Use Leading Lines
Leading lines are your secret weapon in miniature photography, directing the viewer's eye through the scene and enhancing your composition. They guide attention, create depth, and add a sense of flow, which is vital when capturing tiny subjects. By using leading lines, you're able to tell a more compelling story, making your miniature scenes feel larger and more immersive than they actually are.
Start by identifying natural or man-made lines in your setting. These could be anything from a path of tiny stones leading up to your subject, the edges of a miniature table, or even the lines formed by shadows. Position your camera so that these lines lead towards the main focus of your photo. This not only draws viewers in but also helps frame the subject, making it stand out.
Experiment with different angles and perspectives to see how the lines can change the dynamics of your composition. Shooting from a low angle may emphasize the lines' strength, while a higher angle might reveal hidden paths. Trust your intuition and try various setups. Over time, you'll develop an eye for spotting and utilizing leading lines effectively in your miniature photography adventures.
Incorporate Natural Elements

Nature's touch can elevate your miniature photography by adding authenticity and texture to your scenes. When you incorporate natural elements, your miniatures gain a sense of realism that transports viewers to a tiny world that feels both familiar and enchanting. By using elements from nature, you can create diverse backgrounds and settings that make your miniatures pop with life.
Consider using these elements to breathe life into your compositions:
- Leaves: Use them as oversized trees or foliage. Their natural veins and colors add depth and scale.
- Pebbles: These can mimic boulders or rocky landscapes, introducing texture and contrast.
- Twigs: Simulate trees, fences, or rustic structures. Their irregular shapes add authenticity.
- Sand: Create beaches, deserts, or roads. Its fine texture provides a realistic ground surface.
- Water: Use droplets or small pools to imitate ponds, lakes, or rainy settings. Water adds shimmer and reflection.
Experiment with these elements in various combinations to craft scenes that captivate and intrigue. When you blend these natural textures with your miniatures, you invite viewers to imagine themselves in a world where the small and the grand coexist in perfect harmony.
Frequently Asked Questions
How Can I Effectively Incorporate Props Into My Miniature Photography?
Choose props that enhance your miniature’s story. Keep the scale consistent and colors complementary. Arrange them to guide the viewer’s eye towards the focal point. Experiment with angles and lighting to create depth and realism in your shots. Incorporating unexpected elements can elevate your miniature scenes, making them feel more dynamic and engaging. Consider exploring creative prop ideas for photography, such as incorporating natural materials like leaves or stones, or using everyday objects like buttons or small toys that can fit seamlessly into your diorama. Don’t hesitate to layer props or create a backdrop that supports the narrative, as this can add an extra dimension to your work and invite viewers to immerse themselves in the story you’re telling.
What Are Some Common Mistakes to Avoid in Miniature Photography Composition?
Did you know 70% of miniature photos lack depth? Avoid flat images by playing with angles, maintaining a clear focal point, and not overcrowding your scene. Focus on balance and contrast to capture viewer interest.
How Do I Choose the Right Background for My Miniature Scenes?
Consider your scene's theme and color palette when picking a background. Verify it complements, not distracts. Use textures to add depth, but avoid overly busy patterns. Experiment with lighting to enhance mood, verifying your miniatures remain the focus.
What Camera Settings Are Ideal for Capturing Miniature Details?
Delicately adjust the aperture to a smaller size, making certain those tiny intricacies shine. Use a macro lens if you've got one, and bump up the ISO gently, avoiding noise. A tripod guarantees your captures remain steady and clear.
How Can I Make My Miniatures Appear More Lifelike in Photos?
Focus on lighting to create natural shadows. Use a shallow depth of field to enhance realism. Position your camera at eye level with the miniature. Add props or backgrounds for context, and edit subtly to retain authenticity.
At a Glance
So, you've mastered the art of making tiny things look grand! By now, you're a pro at Rule of Thirds, juggling depth of field like a circus act, and bending your body into pretzel shapes for the perfect angle. You've lit up your mini-world like a Broadway show, crafted stories worthy of a bestseller, and led lines like a parade marshal. And don't forget those natural elements – because, you know, plastic trees just don't cut it!


