
To master outdoor toy photography, choose diverse locations that complement your subject, like local parks or urban spaces. Utilize natural lighting; early morning or late afternoon provides soft, warm light. Experiment with angles for dynamic compositions and incorporate elements of nature like leaves or water for realism. Don't forget post-processing; adjust exposure, enhance colors, and sharpen details to make your photos pop. Explore these techniques further to elevate your toy photography skills. Incorporating props can also add storytelling elements to your scenes, making your toy photography visually engaging. Additionally, consider researching realistic toy photography techniques used by other photographers for inspiration. By continually practicing and refining your skills, you’ll develop a unique style that showcases your creativity and passion for outdoor toy photography. Consider creating scenes that tell a story, using props to add context and intrigue to your compositions. Look for realistic toy photography ideas by mimicking real-life scenarios or incorporating unexpected elements for a playful twist. Engaging with online communities can also inspire new techniques and perspectives that will help you refine your style. Additionally, consider the time of day to achieve the perfect lighting for toy photography; golden hour offers the most flattering hues and shadows. Incorporating props and thematic setups can further enhance your images, allowing for storytelling that engages viewers. Lastly, practice regularly to develop your style and gain confidence in your photographic eye. Additionally, consider using props or backgrounds that tell a story, adding context and depth to your images. For even more inspiration, seek out communities or forums dedicated to outdoor toy photography where you can share your work and discover creative outdoor toy photography tips. Collaborating with other enthusiasts can also spark new ideas and techniques to further enhance your photography adventures.
Choosing the Perfect Outdoor Location
When you're picking the perfect outdoor location for toy photography, consider how the setting complements your subject. Think about the story you want to tell. A medieval knight toy might look striking against a stone wall or in a forest, while a beach setting could enhance a surfer figure. Your location should enhance the toy's narrative, adding depth and interest.
Explore your local parks, gardens, and urban spaces. Look for textures and colors that will make the toy stand out, like vibrant flowers or gritty urban surfaces. Pay attention to the scale; a toy should feel part of the environment without getting lost. Experiment with angles and perspectives to find the most engaging composition. Remember, the right location can transform an ordinary shot into something extraordinary.
Utilizing Natural Lighting for Dramatic Effects
After finding the perfect backdrop for your toy story, harnessing natural lighting can elevate your photos to new heights. The sun is your best friend, offering free and dynamic lighting that changes throughout the day. Early morning or late afternoon, known as the "golden hour," provides soft, warm light that adds a magical touch. Position your toys so the light highlights textures and details, creating depth and dimension.
Cloudy days shouldn't deter you; they provide even lighting without harsh shadows, letting colors pop naturally. Experiment with backlighting to create dramatic silhouettes or use side lighting to emphasize contours. Adjust your position and angle to manipulate shadows, which can add mystery and intrigue. Remember, nature's light is ever-changing, so stay adaptable and creative.
Creating Dynamic Perspectives and Angles
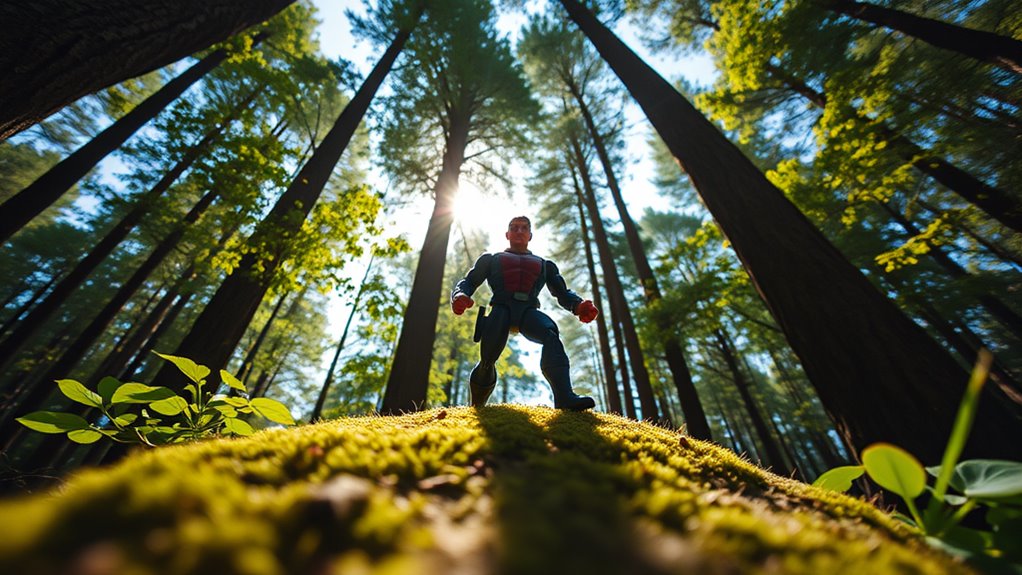
How can you make your toy photos stand out? It's all about creating dynamic perspectives and angles. First, get down low or up high. Changing your viewpoint can make a small toy appear monumental or capture angles most people overlook. Second, consider the rule of thirds to guide where you position your toys in the frame, adding interest and balance. Finally, tilt your camera slightly for an artistic touch that adds movement and drama to your shots.
Here's how to elevate your toy photography:
- Vary your shooting height: Experiment with low and high angles.
- Use the rule of thirds: Place toys off-center for impact.
- Tilt your camera: Add energy and intrigue to your images.
Incorporating Nature Elements for Realism
To bring your toy photography to life, consider weaving elements of nature into your scenes. Nature provides a rich backdrop that enhances realism and depth in your images. Use leaves, rocks, or twigs to create miniature landscapes that fit your toy's scale. A well-placed leaf can mimic a tree canopy, adding an authentic touch. Experiment with water elements, like puddles or streams, to introduce reflections and movement. Position your toys near flowers or grass to add color and texture. Pay attention to natural light; the golden hour delivers soft, warm hues that enrich your composition. Capture shadows cast by trees or plants for an added layer of realism. Embrace nature's imperfections—they'll make your scene look more genuine and compelling. Additionally, consider using various angles and focal lengths to explore different perspectives in your shots. Mastering toy photography techniques, such as staging and composition, will elevate your visual storytelling. Don’t be afraid to experiment with post-processing to enhance the colors and details, ensuring your miniaturized worlds truly come to life. Incorporating seasonal elements can also enrich your scenes, showcasing the changing beauty of nature throughout the year. By enhancing toy photography with nature, you create a dynamic narrative that captivates viewers and engages their imagination. Remember, the more thoughtfully you integrate natural elements, the more vibrant and alive your toy compositions will become. Incorporating props like miniature furniture or vehicles can also amplify the storytelling aspect of your scenes. For those seeking more guidance, searching for realistic toy photography tips can provide valuable insights and techniques that will further refine your skills. Always be open to adjusting your setup and trying new ideas to keep your creativity flowing. Incorporating small props that complement your toys can further enhance the storytelling aspect of your shots. Additionally, utilizing common toy photography scene tips, such as varying the lighting and incorporating dynamic poses, can bring your figures to life and capture the viewer’s imagination. Remember to keep experimenting; each attempt is an opportunity to discover new techniques and refine your craft.
Post-Processing Techniques to Enhance Toy Imagery

Once you've captured your outdoor toy photography, the real magic often happens during post-processing. With a few tweaks, you can elevate your images from good to breathtaking. Start by adjusting the exposure to guarantee your toys are well-lit without losing detail. Next, focus on color correction to make those tiny figures pop against their natural surroundings. Consider enhancing saturation slightly to bring out vibrant hues.
To make your imagery truly stand out, consider these techniques:
- Sharpening: Enhance the fine details of your toys, making them crisp and defined.
- Cropping: Focus attention on the subject by removing any distracting elements.
- Vignetting: Add a subtle vignette to draw viewers' eyes towards the center, emphasizing the toy itself.
Frequently Asked Questions
How Do I Protect My Toys From Outdoor Elements During a Shoot?
You can protect your toys by using a waterproof sealant, carrying a small umbrella, or shooting under cover. Always check the weather forecast, and bring a soft cloth to wipe any moisture or debris off your toys.
What Camera Settings Are Best for Capturing Toy Details?
Think of your camera settings as the brushstrokes on your canvas. Use a small aperture like f/8 for depth, a low ISO to reduce noise, and adjust the shutter speed to let the light paint your story.
How Can I Prevent Toys From Toppling Over in Windy Conditions?
To prevent toys from toppling over in windy conditions, you can use adhesive putty or small weights at the base. Position toys strategically against natural barriers like rocks or trees, and always monitor wind forecasts before shooting.
Are There Specific Toys That Photograph Better Outdoors?
Believe it or not, 60% of photographers find action figures excel outdoors due to their dynamic poses. You'll capture stunning shots as their details pop amidst natural settings. Experiment with lighting to highlight textures and enhance realism.
How Can I Safely Transport My Toys to Different Locations?
Use a sturdy, padded case for transporting your toys. Secure each toy to prevent movement. Keep them away from direct sunlight and heat during travel. Clean them before packing to avoid damage from dirt or moisture.
At a Glance
You've got all the tools to master outdoor toy photography, much like a painter with a vibrant palette. By choosing the perfect location, playing with natural light, and experimenting with dynamic angles, you create magic behind the lens. Incorporate nature's elements for added realism and use post-processing to polish your masterpiece. With practice, each photo becomes a unique story, capturing the essence of play in a single frame. Now, go out and let your creativity soar!


