
Building DIY diorama sets for toy photography is a creative endeavor. First, envision your scene and pick a theme that tells a story. Gather sturdy materials like foam board, and essential tools such as precision knives and glue. Craft a stable foundation, then create realistic textures with paint and natural materials. Play with lighting for dynamic effects and add intricate details for realism. Practicing patience and creativity leads to capturing stunning images, and there’s more to explore ahead. Consider incorporating elements of winter weather for a unique twist, exploring snowy diorama ideas for photography that evoke a serene atmosphere. Use cotton or faux snow for added realism and incorporate miniature trees or figures dressed for the cold to enhance your scene. Experiment with different angles and perspectives to capture the magic of your winter wonderland.
Understanding the Basics of Diorama Construction
When you’re diving into diorama construction, it’s important to grasp the foundational elements that bring your miniature worlds to life. Start by envisioning the scene you want to create. Think about the story you want to tell, the mood you want to set, and how each element in the diorama will contribute to that narrative. Consider scale and proportion as these are essential in achieving realism. Pay attention to the balance between foreground, middle ground, and background to add depth to your scene.
Lighting plays a significant role, enhancing atmosphere and highlighting details. Experiment with angles and shadows to see how they affect the overall look. Remember, practice and patience are key. Your creativity will flourish as you become more familiar with these basic principles.
Gathering Essential Materials and Tools
To start your diorama project, you’ll need to choose the right base materials, which can include foam board or sturdy cardboard. Make certain you have essential crafting tools like a cutting mat, precision knives, and glue for assembling your set. Don’t forget to source miniature accessories that bring your scene to life, adding depth and realism to your toy photography.
Choosing Perfect Base Materials
Before diving into the art of crafting diorama sets for toy photography, selecting the right base materials is essential. Start by choosing a sturdy foundation; foam board or MDF (medium-density fiberboard) are popular choices due to their durability and ease of cutting. Guarantee the base matches the scale of your toys for a realistic effect. Consider texture—cork sheets can mimic earthy surfaces, while smooth surfaces can work for modern scenes.
Don’t forget about color. White or neutral bases provide versatility, allowing you to paint or decorate them according to your scene’s theme. If you’re planning outdoor or natural scenes, grass mats or sandpaper can add an authentic touch. Remember, the base material sets the tone for your entire diorama, so choose wisely!
Essential Crafting Tools
After selecting the right base materials for your diorama, it’s time to gather the crafting tools that will bring your vision to life. Start with a reliable cutting tool, like a sharp utility knife or precision hobby knife, for clean edges and detailed cuts. You’ll need a cutting mat to protect surfaces and guarantee precise measurements. Invest in a good ruler or straightedge for accuracy. A hot glue gun is essential for fast, strong bonds, while a set of paintbrushes will help you add color and texture. Don’t forget sandpaper for smoothing rough edges. Tweezers are handy for positioning tiny elements. Finally, keep a pencil and eraser on hand for sketching layouts and making adjustments. With these tools, you’re ready to create!
Sourcing Miniature Accessories
Where can you find the perfect miniature accessories to bring your diorama to life? Start at local craft stores, where you’ll discover a treasure trove of tiny items like miniature furniture, vehicles, and figurines. Hobby shops are another great spot to explore, offering scale models and unique pieces. Online marketplaces like Etsy and eBay often have handcrafted or rare accessories that add a special touch to your scenes.
Don’t overlook household items either. Buttons, bottle caps, and small boxes can be transformed into props with a little creativity. Thrift stores might surprise you with hidden gems at a fraction of the cost. Finally, consider nature’s bounty: twigs, stones, and leaves can provide realism and texture to your diorama, making it truly one-of-a-kind.
Choosing a Theme for Your Diorama
When choosing a theme for your diorama, think about popular options like fantasy worlds, urban landscapes, or historical settings. Select a color palette that complements your theme and brings your scene to life. Don’t forget to add unique elements that reflect your personal style and capture the viewer’s attention.
Popular Diorama Themes
Choosing a theme for your diorama is like setting the stage for an enchanting story. Popular themes can transport your toy photography into various worlds. Consider a bustling cityscape, where action figures can grapple with urban adventures. Maybe a tranquil forest scene suits your style, offering a backdrop for serene storytelling. For a touch of magic, a space-themed diorama lets you explore galaxies far away. Classic themes like medieval castles or pirate ships bring historical tales to life, while a whimsical fairy garden can add a sprinkle of fantasy.
Think about the toys you have and their narrative potential. Do they belong in a post-apocalyptic desert or a cozy, snowy village? Let your imagination run wild, and choose a theme that enhances your creative vision.
Color Palette Selection
As you plunge into the world of diorama creation, selecting the right color palette can elevate your scene from ordinary to extraordinary. Begin by deciding on the story you want your diorama to tell. Is it a vibrant, bustling city or a serene forest? Your theme will guide your color choices. Use complementary colors to make elements pop and analogous colors for a harmonious feel. Consider the mood: warm tones create energy, while cool tones evoke calmness. Don’t shy away from experimenting with unexpected shades to add depth. Keep lighting in mind, as it can alter color perception. Always test colors together before committing. By thoughtfully choosing your palette, you’ll craft a visually stunning and cohesive diorama that captivates the eye.
Incorporating Unique Elements
Crafting an engaging diorama begins with selecting a theme that resonates with your creative vision. Whether it’s a bustling cityscape, an enchanted forest, or a futuristic space station, the theme sets the stage for your toy photography. Consider what story you want to tell with your diorama and how it reflects your personality or interests.
Start by brainstorming ideas that excite you. Once you’ve chosen your theme, think about unique elements that enhance it. Incorporate materials and textures that bring your scene to life, like sand for a desert or cotton for clouds. Don’t shy away from using unexpected items—sometimes the most unusual objects make the most memorable scenes. Keep your theme consistent throughout to create a cohesive and immersive world.
Designing and Planning Your Scene Layout
When designing your diorama scene layout, start by envisioning the story you want your toys to tell. Think about the setting, time period, and mood. Ask yourself: Are your characters in a bustling city or a serene forest? Sketch your ideas on paper to map out where each element will reside. Consider the scale and perspective, ensuring everything fits harmoniously.
Next, pay attention to lighting. Decide whether your scene requires natural daylight or dramatic shadows. This choice will greatly affect the mood and realism. Make sure you have ample space for the camera angles you plan to use.
Finally, gather props that complement your narrative. A well-thought-out scene layout can transform your diorama into an enthralling story for viewers to explore.
Building the Foundation and Structure
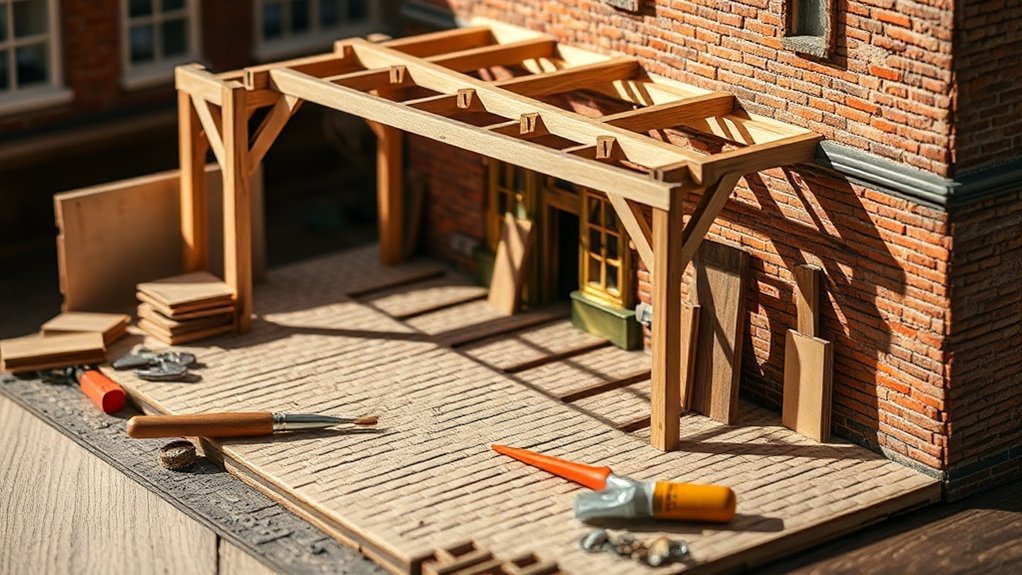
Before diving into the intricate details, make sure you start with a sturdy foundation for your diorama. A solid base guarantees stability and longevity, allowing your toy photography scenes to shine. Consider these steps:
- Choose a Base Material: Opt for foam board, wood, or cardboard, depending on the weight and durability you need.
- Measure Accurately: Use a ruler or measuring tape to cut your base material to the desired size, making certain all pieces fit together perfectly.
- Secure the Structure: Use hot glue or strong adhesive to affix the pieces, creating a seamless, stable assembly.
- Test for Stability: Place your diorama on a flat surface and gently press to check for any wobbling or weak spots.
This groundwork sets a reliable stage for your creative vision.
Creating Realistic Textures and Surfaces
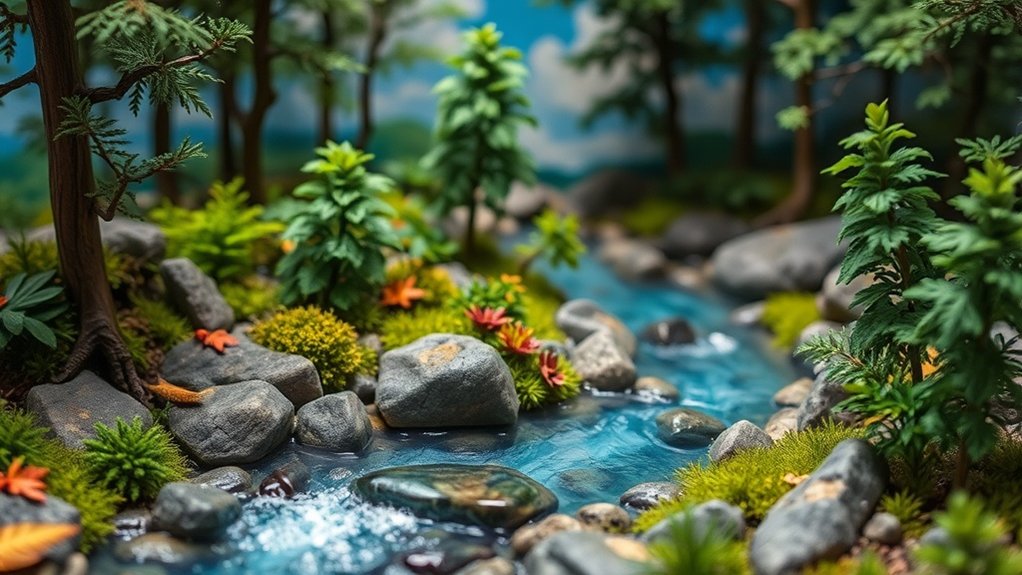
To bring your diorama to life, focus on crafting natural terrain and simulating weathered materials. You can use simple materials like foam, clay, or textured paint to mimic rocky surfaces, grassy fields, or sandy deserts. Experiment with different techniques to achieve aged appearances, making your scenes look convincingly real.
Crafting Natural Terrain
Crafting natural terrain in your diorama sets can bring your toy photography to life with stunning realism. To create believable landscapes, focus on textures and surfaces that mimic the natural world. Here’s how you can achieve this:
- Use Real Materials: Incorporate sand, gravel, or soil to create genuine textures and layers.
- Mix Different Textures: Combine various materials like moss, stones, and bark to add depth and variety.
- Paint for Realism: Apply layers of paint to mimic earth tones. Use dry brushing techniques for highlights.
- Layering for Depth: Stack materials in layers to create the illusion of natural terrain elevations.
Simulating Weathered Materials
Although creating realistic textures and surfaces may seem challenging, simulating weathered materials can greatly enhance the authenticity of your diorama sets. Start by studying real-world examples of aged wood, rusted metal, or chipped paint to understand their characteristics. Use materials like acrylic paints, pastels, and textured gels to recreate these effects. For instance, dry-brushing with a slightly lighter shade can highlight imperfections and create depth.
Don’t overlook the power of layering. Apply thin layers of paint or dust to mimic the passage of time. Incorporate sponges or brushes to add subtle textures, making surfaces look naturally worn. Experiment with sandpaper to roughen edges or create scuffs. By taking these steps, you’ll transform your diorama into a convincing miniature world.
Painting Techniques for Added Depth
When painting your DIY diorama sets, adding depth can transform a flat scene into an enchanting miniature world. Depth creates a sense of realism and intrigue. Start by considering these techniques:
- Layering Colors: Apply multiple layers of paint to create a gradual shift. Use lighter shades to highlight raised areas and darker tones for recesses.
- Dry Brushing: Lightly dip your brush in a tiny amount of paint and skim it across textured surfaces. This technique highlights details and adds dimension.
- Washes: Mix paint with water to create a wash, then apply it over surfaces. It seeps into crevices, accentuating shadows.
- Stippling: Dab the brush to create texture, offering a sense of roughness to rocks or foliage.
Experimentation is key to mastering these techniques!
Incorporating Lighting for Dynamic Effects
As you build your DIY diorama sets, think about how the right lighting can elevate your toy photography to new heights. Lighting isn’t just about visibility; it’s about creating mood and drama. Use natural light whenever possible for a soft, authentic look. If shooting indoors, experiment with desk lamps or LED lights. Try diffusing harsh lights with tracing paper or cloth to minimize shadows. Play around with angles—side lighting can add depth and texture, while backlighting can create stunning silhouettes. Colored gels can introduce unique atmospheres and highlight specific features of your scene. Don’t shy away from using shadows to your advantage; they can add mystery and intrigue. Remember, the right lighting can transform your diorama from ordinary to extraordinary.
Adding Details and Accessories
To bring your DIY diorama to life, focus on adding intricate details and carefully chosen accessories. You need to enhance the scene’s realism and captivate viewers. Think about the setting and era your diorama represents. Use tiny props like furniture, foliage, or everyday items that fit the scale. Here’s how to elevate your diorama:
- Miniature Furniture: Add chairs, tables, or shelves to create a lived-in feel.
- Natural Elements: Incorporate sand, stones, or faux grass for texture and depth.
- Tiny Accessories: Use small items like books, dishes, or gadgets to add character.
- Background Details: Introduce posters, paintings, or signs to enrich the setting.
Capturing the Perfect Shot With Your Diorama
How do you capture the magic of your diorama through photography? Start by considering your lighting setup. Natural light can add warmth, while controlled indoor lighting offers consistency. Experiment with angles; a low angle can make your figures look more heroic, while a high angle offers a broader view. Use the rule of thirds to compose your shot, guaranteeing your main subject is not centered but offset for dynamic interest.
Focus is critical. Confirm your camera or smartphone is set to highlight the most important elements, blurring the background slightly for depth. Don’t forget to adjust the white balance to match your scene’s mood. Finally, review your shots critically, looking for areas to improve. Practice and patience will help you capture the perfect shot.
Frequently Asked Questions
How Do I Store and Maintain My Diorama Sets?
Store your diorama sets in a dry, dust-free area. Use plastic bins for protection. Maintain them by dusting regularly and repairing any damage promptly. Avoid direct sunlight to prevent fading and warping. Keep everything organized for easy access.
What Scale Is Best for Toy Photography Dioramas?
Imagine tiny worlds coming alive under your lens. For toy photography, choose a 1:12 or 1:18 scale. They perfectly balance detail and manageability, enhancing your scenes with realism and charm. Your miniature stories will captivate viewers.
Can I Use Digital Tools to Enhance My Diorama Scenes?
Absolutely, you can enhance your diorama scenes with digital tools. Use software like Photoshop for post-editing or apps for adding effects. It’s a great way to elevate your photography, making your scenes more dynamic and enchanting.
How Can I Create a Weathered Look for My Dioramas?
To create a weathered look, you can use techniques like dry brushing, applying washes, or adding pigments. Start by layering different shades and textures. Experiment with sandpaper or sponges for a distressed effect. It’s all about details!
Are There Any Online Communities for Diorama Enthusiasts?
While vast oceans separate us, online communities unite diorama enthusiasts. You’ll find forums like Reddit’s diorama subreddits and Facebook groups where you can share ideas, showcase creations, and connect with others passionate about tiny worlds and grand visions.
At a Glance
With your diorama complete, it’s like holding a miniature world in your hands—a tiny universe brimming with stories. You’ve gathered the raw materials and transformed them into a vivid tapestry of imagination. Just as you place the final accessory, remember that each detail symbolizes a piece of your creativity. Now, as you capture that perfect shot, let the light and shadows dance, revealing the life you’ve breathed into this small but powerful scene.


