
Capture the magic of Lego diorama photography by focusing on lighting, angles, and composition. Use a DSLR or mirrorless camera with a macro lens for detailed shots. Position your camera at a minifigure’s eye level for immersive perspectives. Experiment with natural and artificial light, keeping the background simple to highlight your creations. Edit your photos to enhance details and colors. By mastering these techniques, you’ll reveal new levels of creativity and storytelling in your miniature worlds.
The Art of Lego Diorama Photography
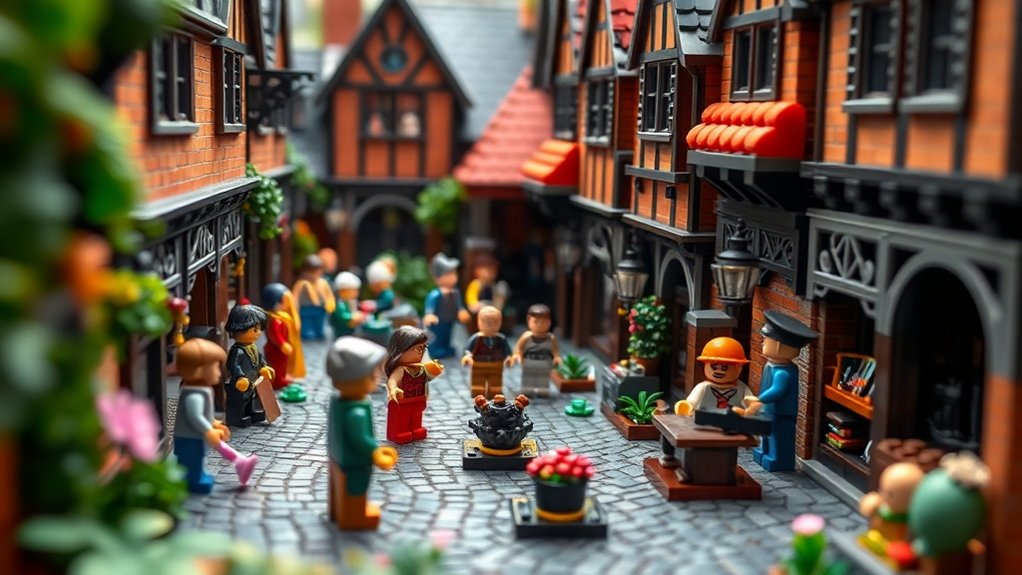
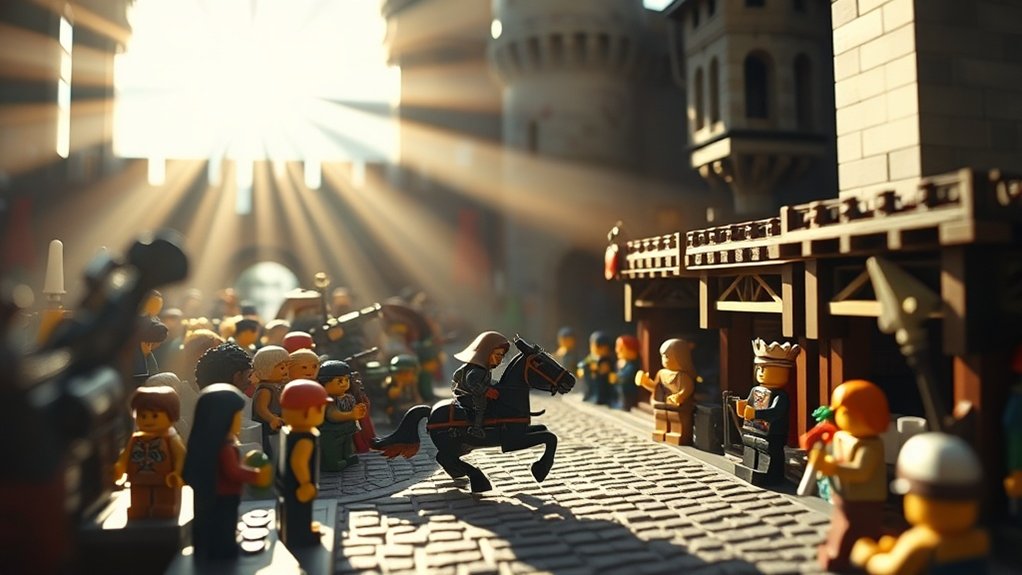
When it comes to capturing the miniature world of Lego diorama photography, every detail counts. You’ll want to focus on lighting, angles, and composition to bring your tiny scenes to life. Experiment with different light sources; natural light can offer soft shadows, while artificial lighting gives you control over brightness and direction.
Angles are essential—try shooting from a minifigure’s eye level to immerse viewers in the scene. Pay attention to composition, ensuring your frame highlights the story you’re telling. Use the rule of thirds to balance elements within the image.
Don’t forget about the background; keep it simple to make your Lego creation pop. With practice, you’ll discover how subtle adjustments can transform your photos into enchanting works of art.
Building the Perfect Lego Scene
When you’re building the perfect Lego scene, start by carefully choosing the right Lego elements that match your vision. Pay attention to scene composition to guarantee everything fits together seamlessly and tells a compelling story. Finally, use lighting and atmosphere to enhance the mood and bring your diorama to life.
Choosing Lego Elements
Creating an enchanting Lego diorama starts with selecting the right elements that bring your vision to life. You’ll want to choose pieces that not only fit your theme but also enhance the realism and charm of your miniature world. Focus on details and colors that will make your scene pop. Consider these essential elements:
- Minifigures: Select characters that match your story or theme.
- Landscape pieces: Use bricks for terrain, like hills or water.
- Accessories: Add items like hats, tools, or plants for realism.
- Architectural elements: Include parts like windows, doors, and roofs for buildings.
- Unique bricks: Incorporate rare or unusual pieces to add intrigue.
Setting Scene Composition
Although crafting the perfect Lego scene requires patience and creativity, the payoff is an enthralling diorama that tells a story. Start by visualizing the narrative you want to convey. Decide if it’s an adventurous jungle, bustling cityscape, or serene countryside. Use contrasting colors and strategic placement to guide the viewer’s eye through your scene. Confirm that each character and element has a purpose, adding depth to your story.
Consider the scale and perspective. Position larger structures at the back and smaller ones upfront to create a sense of depth. Experiment with angles to find the most dynamic composition. Don’t forget to leave some breathing space; overcrowding can make your diorama look cluttered. With thoughtful composition, your Lego scene will captivate any viewer.
Lighting and Atmosphere
With your scene composition ready, it’s time to focus on lighting and atmosphere to bring your Lego diorama to life. The right lighting can transform your scene, highlighting details and creating mood. Consider the following tips:
- Natural Light: Use soft morning or late afternoon light for gentle, even illumination.
- LEDs and Lamps: Experiment with small, adjustable lights for dramatic shadows and highlights.
- Colored Gels: Apply these over lights to infuse your scene with mood-enhancing colors.
- Reflectors: Use white paper or foil to bounce light and fill in shadows.
- Dim the Lights: For nighttime scenes, use minimal lighting to simulate a dark environment.
Essential Equipment for Capturing Miniature Worlds
To capture the magic of your Lego dioramas, start with a camera and lens that highlight the intricate details of your scenes. Invest in good lighting and accessories to set the right mood and bring your creations to life. Don’t forget a sturdy tripod for stability, ensuring your shots are crisp and clear.
Camera and Lens Selection
When diving into Lego diorama photography, your choice of camera and lens plays an essential role in capturing the intricate details of miniature worlds. A DSLR or mirrorless camera offers flexibility and quality. Look for a lens that provides macro capabilities to get up close and personal. Consider using a tripod for stability, especially in low-light conditions. A remote shutter release can prevent camera shake, ensuring sharp images. Finally, think about a lens with a wide aperture for beautiful bokeh effects.
- DSLR or mirrorless camera: Offers flexibility and image quality.
- Macro lens: Crucial for close-up detail.
- Tripod: Provides stability for sharper shots.
- Remote shutter release: Helps prevent camera shake.
- Wide aperture lens: Creates stunning background blur.
Choose wisely to bring your Lego scenes to life!
Lighting and Accessories
Lighting is one of the most essential elements in Lego diorama photography, as it brings your miniature scenes to life. Use soft, diffused lighting to minimize harsh shadows and create an even, natural look. Desk lamps with adjustable arms or LED panels with dimming options work wonders for achieving the right balance. Experiment with different angles to highlight unique details and textures in your Lego creations.
Incorporate accessories like small reflectors or white foam boards to bounce light into darker areas, adding depth and dimension. Colored gels can introduce creative effects, enhancing mood or simulating different times of day. Don’t forget a light meter if you want precise control over your exposure settings. With the right lighting and accessories, your Lego dioramas will truly shine.
Tripod and Stabilization
While lighting sets the scene, stability guarantees the sharpness and clarity of each shot in Lego diorama photography. You need a sturdy tripod to guarantee your camera doesn’t shake, especially when capturing intricate details of Lego mini-worlds. Focus on getting the right tripod that fits your camera and shooting style. Here are key features to contemplate:
- Adjustable height: Allows you to shoot at various angles.
- Compact design: Easy to transport if you’re shooting in different locations.
- Quick-release plate: Enables fast setup and adjustments.
- Ball head: Offers flexible movement and precise positioning.
- Non-slip feet: Ensures stability on various surfaces.
Investing in a reliable tripod and stabilization tools will elevate your photography, making your Lego dioramas come to life with crisp, clear images.
Lighting Techniques for Lego Dioramas
Capturing the perfect shot of your Lego diorama often hinges on effective lighting techniques that bring your miniature scenes to life. Start by using soft, diffused lighting to eliminate harsh shadows and highlight the intricate details of your Lego creations. You can achieve this with a lightbox or by placing a thin sheet of white paper over your light source. Experiment with different angles by moving your light around to find the most flattering position.
Consider incorporating natural light by photographing near a window, but be mindful of direct sunlight, which can create unwanted glare. You might also use small LED lights to add depth and focus to specific areas. Remember, balance is key; too much light can wash out details, while too little might leave your scene in the dark.
Composing and Framing Your Shots
When composing and framing your Lego diorama shots, think about the story you want to tell. Consider the elements that enhance your narrative and draw the viewer into the scene. A well-composed photo captures attention and evokes emotion. Here are some tips to elevate your Lego photography:
- Choose a focal point: Direct the viewer’s eye to the most important part of your scene.
- Use the rule of thirds: Position your subject off-center to create a balanced and dynamic composition.
- Experiment with angles: Capture unique perspectives to add interest and depth.
- Fill the frame: Remove distractions by zooming in or getting closer.
- Create depth: Use foreground elements to frame your subject and add layers.
Editing Tips for Enhancing Lego Photos
With your Lego diorama shots thoughtfully composed, enhancing them through editing can bring your photos to life. Start by adjusting the brightness and contrast to make your colors pop. Use cropping to remove unwanted elements and focus on your subject. Experiment with saturation to emphasize the vibrancy of your Lego bricks, but be careful not to overdo it.
Sharpening is useful for highlighting intricate details in your diorama. Use the vignette effect to subtly draw attention to the center of your image. If your photo feels too warm or cold, adjust the white balance to achieve a natural look. Don’t forget to straighten any tilted horizons or structures. Finally, apply filters sparingly to maintain the authenticity and charm of your mini-world.
Showcasing and Sharing Your Lego Creations

Although you’ve spent time perfecting your Lego diorama photography, showcasing and sharing your creations is where the real fun begins. Engaging with fellow enthusiasts can provide inspiration and feedback. Here’s how you can share your mini-worlds effectively:
- Social Media Platforms: Use Instagram, Facebook, or Pinterest to reach a vast audience. Use relevant hashtags to increase visibility.
- Online Forums: Join Lego forums and communities like Eurobricks or Reddit to connect with like-minded individuals.
- Local Exhibitions: Participate in local Lego exhibitions or events to showcase your work physically.
- Photography Contests: Enter Lego photography contests to challenge yourself and gain recognition.
- Create a Blog or Website: Share detailed insights about your process and creations to build a dedicated following.
Start sharing today and watch your creativity flourish!
Frequently Asked Questions
How Do I Prevent Dust From Accumulating on My Lego Dioramas?
To prevent dust on your dioramas, cover them with a clear display case. Regularly use a small, soft brush or compressed air to clean delicate areas. You can also keep your display area dust-free by vacuuming frequently.
What Are the Best Storage Solutions for Lego Pieces Used in Photography?
Did you know 62% of photographers use stackable containers for storage? You should organize your Lego pieces by color or size in clear bins, ensuring easy access and visibility, keeping your creative process smooth and efficient.
Can Lego Diorama Photography Be Monetized, and if So, How?
Yes, you can monetize Lego diorama photography. Start by selling prints online or offering workshops. Collaborate with brands for advertising or use platforms like Patreon for support. Explore stock photo sites to license your creative work.
How Do I Transport Large Lego Dioramas Safely for Photography?
You’re transporting large dioramas? Secure them in sturdy boxes, use bubble wrap for padding, and guarantee no loose pieces. Label boxes carefully and handle with care. Plan your route to avoid bumpy roads and sudden stops.
What Are Some Creative Themes for Lego Diorama Photography Projects?
You can explore creative themes like space exploration, medieval castles, or bustling cityscapes. Think about incorporating nature scenes or fantasy worlds too. Let your imagination run wild and design unique stories through your Lego diorama photography projects.
At a Glance
Capturing Lego dioramas is like being the director of a tiny, vibrant world where you hold the power to bring stories to life. You’re the artist who paints with bricks and light, crafting scenes that echo with imagination. As you frame each shot, think of yourself as a storyteller spinning tales in miniature. With every click, you reveal a universe of wonder, inviting others to step into your miniature masterpiece and share in its magic.


