
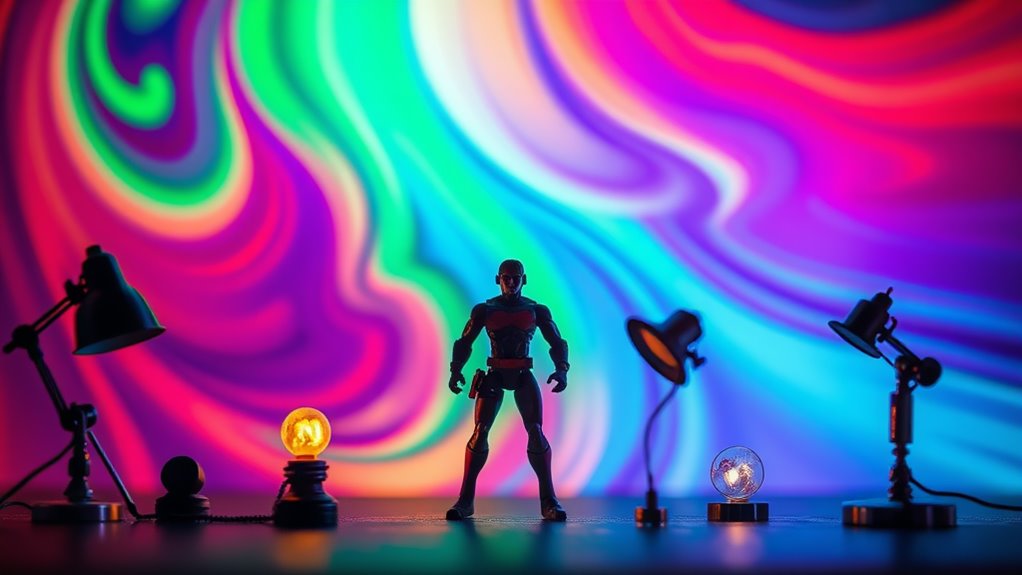
Using props for lighting in toy photography transforms scenes with ambiance, infuses textures, and creates enchanting depth. With small lamps and LED strips, you can craft dynamic moods and enhance textures by experimenting with light sources. Positioning lights simulates natural sunlight, while colored gels add vibrant hues. Adjusting light angles avoids unwanted reflections, bringing out the best in your images. With these techniques, you can elevate your photography skills when you explore further.
Enhancing Mood and Atmosphere
To truly enhance the mood and atmosphere in toy photography, consider how lighting can transform your scene. Use props like small lamps, LED strips, or even flashlights to introduce different light sources. Position these props carefully to highlight your toys' features and create an immersive environment. You can experiment with colored gels over lights to add unique hues, making your scenes more vibrant or mysterious. Adjusting the intensity and angle of your light sources can evoke various emotions, from warmth and joy to tension and suspense. Don't forget to use natural light to your advantage—early morning or late afternoon sun provides a soft, magic glow. With thoughtful lighting choices, you can elevate your toy photography to new creative heights.
Creating Dynamic Shadows
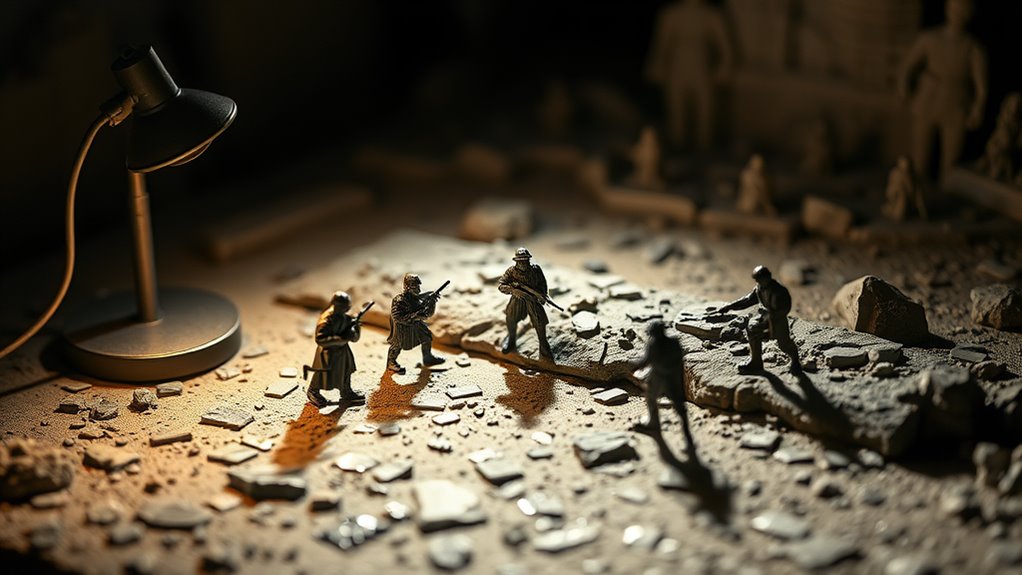
While lighting sets the mood, shadows add depth and intrigue to your toy photography. By using props strategically, you can create dynamic shadows that bring your scenes to life. Positioning a light source at an angle can cast elongated, dramatic shadows, transforming a simple setup into a visually striking composition. Experiment with everyday objects like leaves, mesh, or even your fingers to project interesting patterns across your toys.
Focus on how these shadows interact with your subject. Shadows can highlight certain features, create a sense of movement, or enhance the storytelling aspect of your image. Play around with the intensity and direction of the light to manipulate shadow size and sharpness. With practice, you'll master the art of shadow play, adding layers of excitement to your photos.
Adding Depth and Dimension
In toy photography, adding depth and dimension can transform a flat image into an enchanting scene. By strategically placing props, you can create layers that draw the viewer's eyes through the scene. Think of props as your tools for building a miniature world. Place items in the foreground, middle ground, and background to guide the viewer's gaze and make the scene feel immersive.
Use smaller props to simulate distance and create perspective. For instance, placing a tiny tree behind your main subject can give the illusion of depth. Experiment with different angles and positions to find the best composition. Remember, lighting plays an essential role in enhancing these elements. Adjust the light's angle to emphasize textures and shadows, adding that extra layer of dimension.
Simulating Natural Light Sources
You can transform your toy photography by mimicking sunlight effects, which adds realism and drama to your scenes. Pay attention to creating realistic shadows, as they help ground your toys in their environment, making your compositions more believable. By enhancing scene depth, you'll engage viewers and elevate the storytelling aspect of your photos.
Mimicking Sunlight Effects
Capturing the warm glow of sunlight in toy photography can transform an ordinary scene into something magical. You don't need to rely solely on natural light; you can mimic sunlight effects using props. Use a warm LED light to recreate a golden hour ambiance. Position the light source at an angle to imitate sunlight streaming through a window. You can add a diffuser, like a thin white cloth, to soften the light and create that gentle, glowing effect.
For added realism, consider using colored gels to adjust the light's hue subtly. Experiment with different angles and intensities to find what works best for the scene. With a bit of creativity, you'll create enchanting, sunlit images that bring your toy characters to life.
Creating Realistic Shadows
While achieving the perfect lighting, don't underestimate the power of realistic shadows to enhance the depth of your toy photography. Shadows add dimension and realism, making your miniature scenes more lifelike. To simulate natural light sources, use props strategically. Position a small lamp or flashlight to mimic sunlight, casting soft or sharp shadows depending on your desired effect. Experiment with angles; a low-angle light can create long, dramatic shadows, while a higher angle offers subtle, softer ones. Use white paper or foil reflectors to control shadow intensity. Adjusting the distance between the light source and the toys can also modify shadow clarity. By mastering shadow creation, you'll elevate your images, giving them a professional touch that resonates with viewers.
Enhancing Scene Depth
Achieving realistic shadows is just one aspect of creating intriguing toy photography. To truly bring your scene to life, you need to enhance depth by simulating natural light sources. Think about how sunlight streams through a window or how a streetlamp casts a glow. Use small lamps, LED lights, or even candles to mimic these natural effects. Positioning your light source at different angles can create dynamic layers, making your toys pop against the background.
Don't forget about color gels or diffusers to soften harsh lights and add warmth. Experiment with various props like mini blinds or textured materials to filter light, adding complexity and realism. By carefully crafting your lighting setup, you'll give your photos a rich, immersive quality that draws viewers in.
Controlling Reflections and Highlights
When you're shooting toy photography, controlling reflections and highlights is essential to avoid unwanted glare. By adjusting your light sources and using diffusers, you can enhance the direction of light and minimize harsh shadows. This balance guarantees your toys are captured with the right amount of detail and depth.
Minimizing Glare Issues
Although toy photography can be incredibly rewarding, dealing with glare and unwanted reflections often poses a challenge. To minimize glare issues, start by using diffusers. Place a diffuser, like a translucent fabric or a softbox, between your light source and the toy. This spreads the light evenly, reducing harsh reflections.
Next, consider the angle of your light. Adjusting the direction of the light source can help avoid direct reflections on shiny surfaces. Experiment with moving lights around until you find the sweet spot.
Another helpful tool is a polarizing filter on your camera lens. This filter can cut down reflections, allowing you to capture clearer images. Finally, keep a microfiber cloth handy to clean dust or smudges that amplify glare.
Enhancing Light Direction
Dealing with glare is just one part of the lighting equation in toy photography; now, let's focus on enhancing light direction to control reflections and highlights. By understanding light direction, you can emphasize or soften specific features of your toys. Use props like reflectors and diffusers to manipulate how light interacts with your subject. Position a reflector to redirect light onto darker areas, highlighting them without creating harsh reflections. Diffusers help spread light evenly, reducing unwanted highlights that can distract from details. Try positioning a small piece of white card or foil to bounce light precisely where you need it. This control over reflections and highlights lets you craft the perfect mood and focus, elevating your toy photography to a professional level.
Balancing Shadow Intensity
Balancing shadow intensity is essential to creating enchanting toy photography. You can achieve this by controlling reflections and highlights, which helps maintain focus on your subject. Start by using diffusers, like thin fabric or parchment paper, to soften harsh light and reduce strong shadows. Experiment with reflectors—aluminum foil or white foam boards work great—to bounce light into darker areas, evening out the contrast.
Position your props strategically. Placing them at various angles lets you manipulate how light interacts with your toys, ensuring highlights don't overpower your scene. Use small mirrors or metallic objects if you need to add specific highlights without overwhelming the composition. Mastering these techniques gives you the ability to craft mesmerizing, balanced images that draw viewers into your miniature world.
Experimenting With Color and Texture
When you're experimenting with color and texture in toy photography, the possibilities for creative expression are endless. You can transform a simple toy scene into a vibrant masterpiece by playing with different colored lights. Try using colored gels or filters on your lights to cast unique hues across your subjects. Don't shy away from mixing colors—layering them can create fascinating effects.
Texture also plays a significant role. Use props like fabric, foliage, or sand to add depth and realism. Adjust your lighting angles to emphasize these textures, casting shadows that enhance the scene's complexity. Reflective surfaces, like aluminum foil, can introduce interesting highlights or patterns. By combining these elements, you'll elevate your toy photography, making each shot uniquely enchanting.
Frequently Asked Questions
How Can Props Affect the Overall Narrative in Toy Photography?
Props can transform your toy photography by adding depth and context to the story. They create an immersive atmosphere and enhance the narrative, making your scenes more engaging and visually compelling. Don't underestimate their storytelling power.
What Are Some Budget-Friendly Prop Options for Beginners?
You can use household items like lamps, flashlights, or even string lights as budget-friendly props. Don't overlook colored paper, mirrors, or aluminum foil for creative effects. These inexpensive options can enhance your toy photography dramatically.
How Do I Choose the Right Size Props for My Toy Figures?
Imagine your toys as actors on a stage. Choose props that complement their stature, like giving a knight a noble steed, not a giant. Match the scale to maintain balance and enhance your scene's storytelling.
Can Props Be Used to Enhance Storytelling in Toy Photography?
Absolutely, props can definitely enhance storytelling in toy photography. You can use them to create scenes that add depth and context, making your photos more engaging. They help convey emotions and narratives, drawing viewers into your miniature world.
How Can Props Help in Creating a Specific Historical or Cultural Setting?
You're diving into toy photography and want to create a specific historical or cultural setting, props set the stage. They instantly transport your viewers, making them feel like they've traveled back in time or across the globe.
At a Glance
In toy photography, you might wonder if using props for lighting is really necessary. However, they're key to enhancing mood and atmosphere while adding depth and dimension. By creating dynamic shadows and simulating natural light sources, props help you control reflections and highlights effectively. Plus, they allow you to experiment with color and texture, elevating your creativity. So, don't hesitate—embrace props to transform your toy photography into a mesmerizing visual experience.


