
When you’re building miniature sets for toy photography, start by picking a theme or story and stick to a consistent scale. Use materials like paper and fabric to craft detailed backgrounds and props. Essential tools include a hobby knife, cutting mat, and a variety of adhesives. Pay attention to realistic textures and lighting to create depth and mood. With every piece carefully placed, you’ll end up telling a fascinating story. Discover more about crafting these miniature worlds.
Exploring the Basics of Miniature Set Building
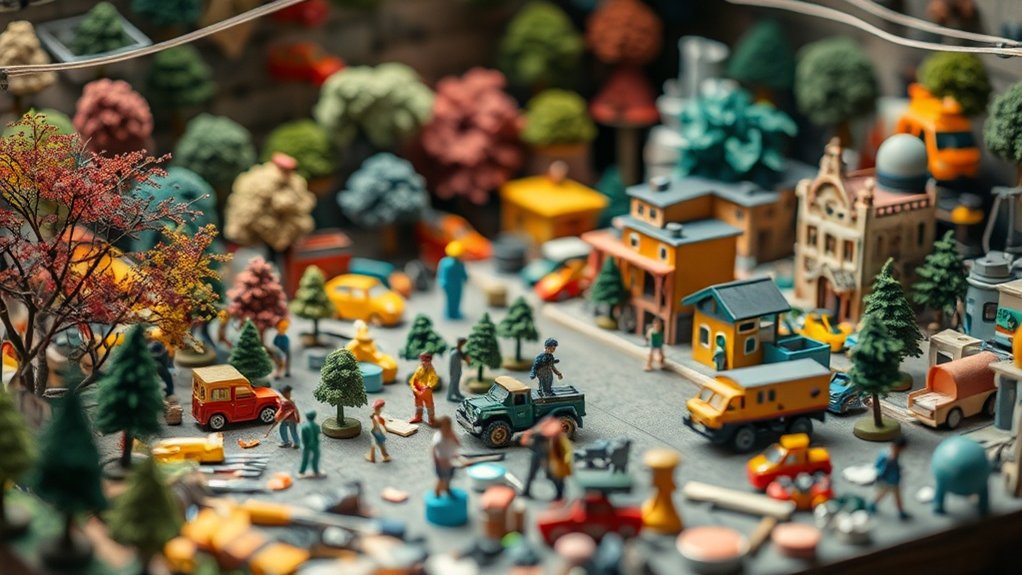
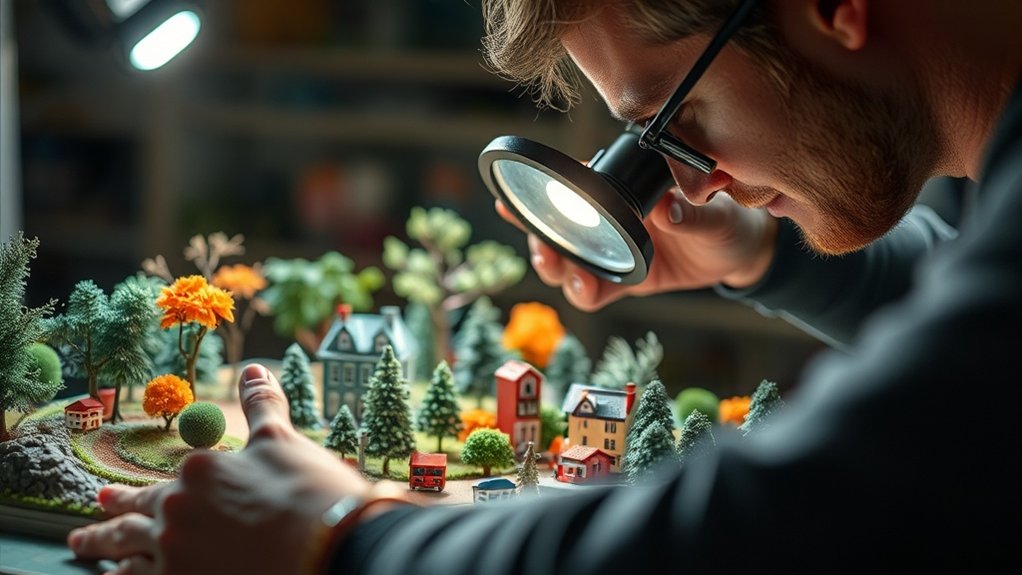
When diving into the world of miniature set building for toy photography, understanding the basics is essential. You’ll start by selecting a theme or story for your scene. Think of it as creating a tiny universe where every detail matters. Consider the scale: your miniatures should match the size of the toys you’re photographing. This guarantees a realistic look. Next, plan your layout; sketching it out can help visualize your ideas. Don’t forget to pay attention to background elements and foreground details. They add depth and context, making your scene come alive. Use materials like paper, fabric, and found objects to build your set. Experiment with textures and colors, as they’ll bring your miniature world to life. Enjoy the creative journey!
Essential Tools for Crafting Miniature Worlds
To bring your miniature world to life, you’ll need a set of essential tools that make crafting easier and more precise. Start with a sharp hobby knife for cutting materials like foam board and balsa wood. A cutting mat protects surfaces and guarantees clean cuts. Rulers and measuring tapes help maintain scale accuracy, while tweezers allow precise placement of tiny details.
Glue guns and various adhesives, like super glue or tacky glue, are vital for assembling pieces. Small paintbrushes and a palette are perfect for adding color, texture, and depth. Don’t forget a magnifying lamp for clear visibility when working on intricate areas. Finally, a sturdy workbench keeps your tools organized and your projects steady, making your creative process smooth and efficient.
Techniques for Creating Realistic Miniature Landscapes
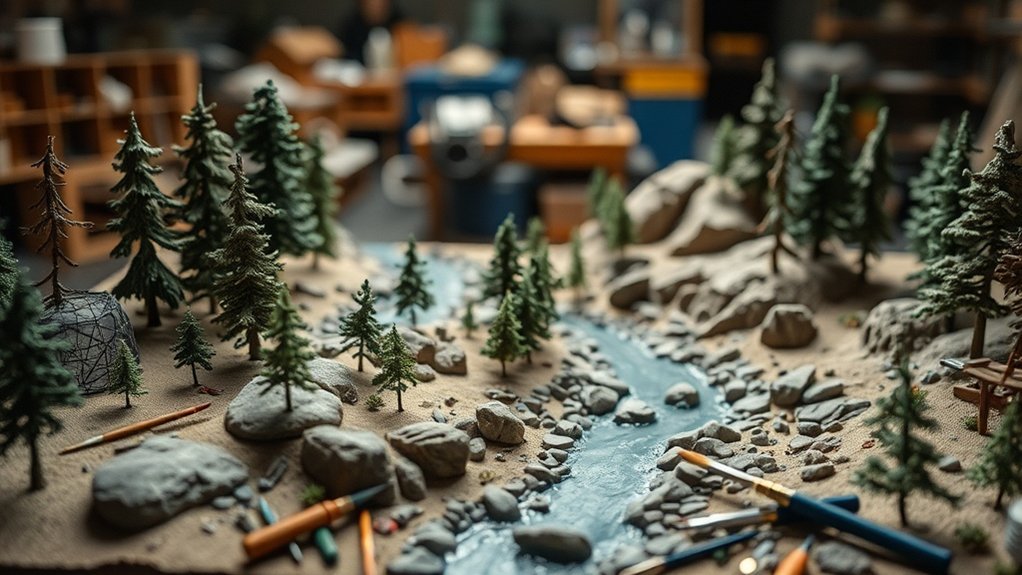
Creating realistic miniature landscapes requires a keen eye for detail and a bit of creativity. Start by observing real landscapes and noting their natural elements. You can replicate these in your miniature scenes by paying attention to texture, color, and scale. Use materials like foam, clay, or even natural elements like dirt and rocks for authenticity. For added depth and realism, apply various techniques to mimic the natural world.
- Texture: Use different materials to create varied textures, like sand for a beach or moss for a forest floor.
- Color: Paint with a mix of colors to achieve natural gradients and shadows.
- Scale: Confirm all elements are proportionate to maintain realism.
- Lighting: Experiment with lighting to create mood and time of day.
- Perspective: Position objects to guide the viewer’s eye naturally.
Crafting Miniature Furniture and Props
When crafting miniature furniture and props, you’ll want to choose materials like balsa wood, foam board, and polymer clay for their versatility and ease of use. Experiment with techniques such as cutting, sculpting, and painting to bring your tiny creations to life. Don’t forget to pay attention to scale and detail, as these elements can make or break the realism of your toy photography sets.
Materials for Mini Furniture
Crafting miniature furniture for toy photography is an art that requires a keen eye for detail and the right materials. You’ll need to select materials that mimic real furniture’s textures and colors while maintaining the miniature scale. Start by gathering versatile materials, which can be found in craft stores or even around your home.
Here’s a list of materials you might use:
- Balsa Wood: Lightweight and easy to cut, perfect for tables and chairs.
- Foam Board: Great for creating walls or larger pieces.
- Fabric Scraps: Ideal for miniature upholstery or curtains.
- Wooden Dowels: Use these for legs or structural supports.
- Cardstock: Offers flexibility for detailed designs like books or picture frames.
These materials help you create realistic and detailed miniature furniture for your scenes.
Techniques for Prop Creation
Mastering the techniques for prop creation in toy photography involves a mix of precision and creativity. Start by sketching your ideas to visualize the final product. Choose lightweight materials like foam board or balsa wood for easy manipulation. Use a craft knife for detailed cuts, ensuring each piece fits perfectly. Paint or stain your props to match the scene’s mood, adding texture with sandpaper or by layering paints. Don’t shy away from using found objects; they can add authenticity and charm. Hot glue guns provide a quick and sturdy assembly option, while tweezers help with placing tiny elements. Experiment with scale by comparing props to your figures. Practice patience and adjust as needed to achieve lifelike and enchanting miniature scenes.
Lighting and Composition in Toy Photography
Understanding the nuances of lighting and composition can elevate your toy photography from simple snapshots to enthralling works of art. Lighting shapes the mood and emphasizes details, while composition guides the viewer’s eye through the scene. Here are some essential tips to improve your toy photography:
- Experiment with Light Sources: Use natural light, LED lights, or flashlights to create different effects.
- Play with Shadows: Shadows can add depth and drama, enhancing the story you’re telling.
- Use the Rule of Thirds: This helps you position your subject off-center for a more dynamic shot.
- Focus on Depth of Field: A shallow depth can make your subject pop against a blurred background.
- Mind the Background: Keep it tidy and relevant to avoid distracting from the main subject.
Incorporating Natural Elements Into Miniature Sets
After perfecting lighting and composition, it’s time to enrich your miniature sets by incorporating natural elements. Start by adding real soil or sand for authentic ground textures. It’s amazing how a sprinkle of dirt can transform a scene! Use small twigs as trees or logs, and gather tiny stones for realistic rock formations. You can also incorporate dried moss to mimic lush greenery or miniature foliage for vibrant plant life. Don’t forget to use water creatively; a small mirror or clear plastic can simulate ponds or streams. Natural elements bring an organic feel to your sets, making them more immersive. Experiment with different materials and observe how they interact with your lighting setup to create an enchanting miniature world.
Inspirations and Resources for Miniature Set Builders
Where do miniature set builders find their inspiration? You can find creativity in everyday experiences and diverse sources. Think about your favorite movies, as their set designs can spark ideas for your toy photography. Books, especially those with vivid descriptions, can transport you to new worlds. Don’t overlook nature; a walk in the park might surprise you with textures or colors perfect for your scenes. Online communities offer a wealth of shared ideas and techniques that can drive your projects forward.
Here’s a quick list of inspiration and resources to reflect upon:
- Movies and TV shows for set design ideas.
- Books with rich descriptions.
- Nature walks for textures and colors.
- Online forums for shared techniques.
- Art museums for historical and cultural context.
Frequently Asked Questions
How Do I Store and Transport My Completed Miniature Sets Safely?
To store and transport your completed miniature sets safely, use sturdy boxes with cushioning materials like foam or bubble wrap. Label each box, keep them upright, and avoid stacking heavy items on top to prevent damage.
Can I Use 3D Printing for Miniature Set Building?
You can definitely use 3D printing for miniature set building. It allows you to create detailed, custom pieces easily. Just guarantee you’ve got the right printer settings and materials to achieve the perfect look and durability.
What Are Some Cost-Effective Alternatives to Expensive Modeling Materials?
Did you know that 60% of DIY creators use recycled materials? You can use cardboard, foam board, or even old toys. They’re affordable and versatile, letting you create detailed scenes without breaking the bank.
How Do I Prevent Dust and Damage to My Miniature Sets Over Time?
You should store your miniatures in airtight containers to keep them dust-free. Use soft brushes to gently clean them and apply a clear sealant to protect against damage. Regularly inspect and maintain them for longevity.
Are There Online Communities for Sharing and Discussing Miniature Set Builds?
Yes, you can find online communities for sharing and discussing miniature set builds. Websites like Reddit, Facebook groups, and specialized forums offer spaces where you can connect, exchange ideas, and get feedback from fellow enthusiasts.
At a Glance
You’ve now got the essentials to plunge into the world of miniature set building for toy photography. Did you know that 85% of toy photographers say creating realistic sets greatly enhances their photos? It’s time to gather your tools, release your creativity, and start crafting miniature worlds that captivate the imagination. Remember, lighting and natural elements can transform your scenes from good to breathtaking. So, get inspired and let your mini masterpieces shine! Consider documenting your process; sharing insights into toy photography behind the scenes can inspire others and foster a community of creatives. Experiment with different materials and textures to add depth to your scenes, making each photo a unique piece of art. Lastly, don’t forget to have fun and embrace the unexpected; sometimes the most magical moments happen when you’re least expecting them!


