Your smartphone camera offers powerful features for capturing toy photography. Adjust manual settings like exposure and ISO for better control, and use portrait mode for depth. Find a scene that complements your toy, and capture shots during golden hour for soft lighting. Try unique angles and perspectives to add dynamism, and enhance your photos using editing apps. When you’re ready, share your masterpieces on social media with targeted hashtags to engage with communities that value your work. Discover more techniques beyond these basics. Experiment with different backgrounds and props to create interesting narratives around your toy figures, enhancing the storytelling aspect of your photography. Joining online forums or groups dedicated to toy figure photography techniques can also provide valuable feedback and inspiration, helping you to refine your skills further. Don’t hesitate to collaborate with other enthusiasts to explore new creative possibilities and expand your understanding of this unique art form.
Understanding Your Smartphone Camera
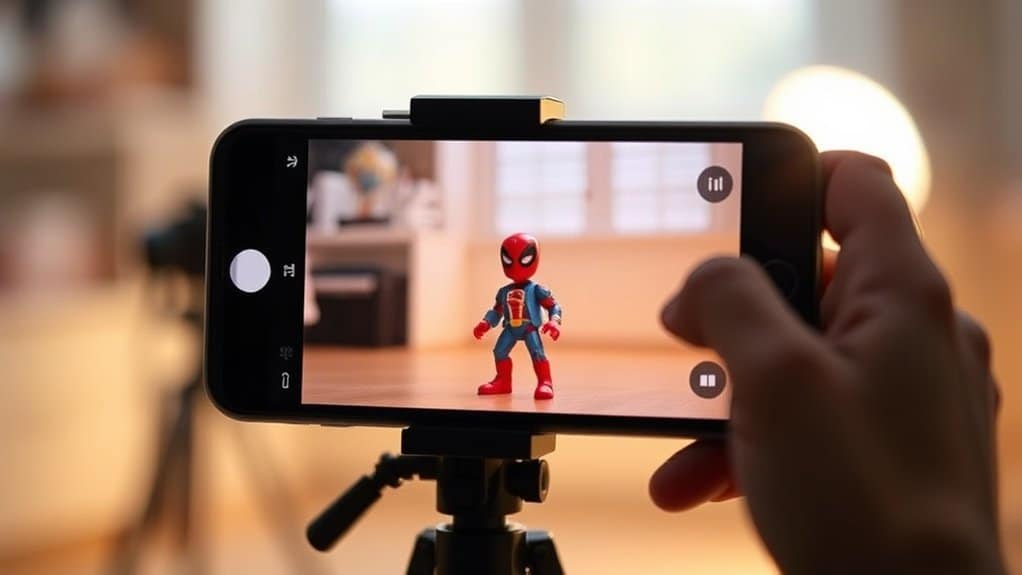
Your smartphone camera is more powerful than you might realize. It’s packed with features that can transform your toy photography. Start by exploring your camera settings. Experiment with modes like portrait, which can create a striking depth of field effect, making your toys stand out. Don’t forget about the manual settings; adjusting exposure, ISO, and white balance can dramatically enhance your shots. Use the gridlines feature to align your toys perfectly, adhering to the rule of thirds for balanced composition. Also, take advantage of the burst mode to capture action shots without missing a beat. Remember, lighting is key, so familiarize yourself with how your camera handles different lighting conditions. With some practice, your smartphone will become your best photography tool.
Choosing the Right Toy and Scene
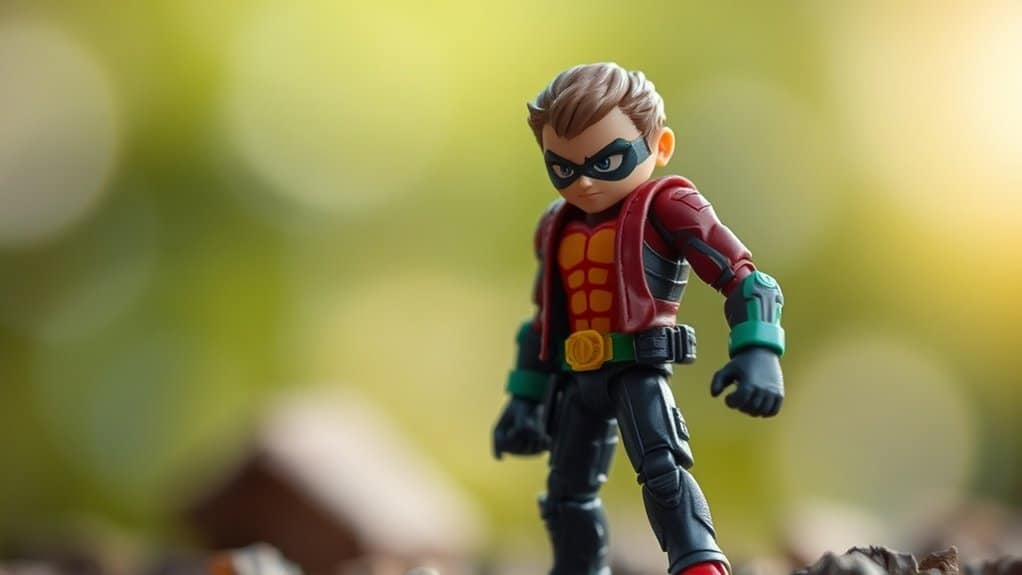
How do you choose the perfect toy and scene for your mobile photography? Start by selecting a toy that inspires you. Consider its colors, details, and poseability. Does it tell a story or evoke emotion? Once you’ve chosen the toy, think about a scene that complements its character. A superhero might look epic against a cityscape, while a dinosaur could roam a backyard jungle. Use props to enhance the setting—small rocks, leaves, or even household items can create a dynamic environment. Keep the background simple if the toy is detailed, allowing it to stand out. By aligning the toy and scene, you create a cohesive story that captivates viewers. Remember, your creativity is the most important tool in your kit.
Mastering Lighting Techniques
To elevate your toy photography, focus on mastering lighting techniques like natural light utilization and creative shadow play. Use sunlight to bring out vibrant colors and create dynamic moods in your shots. Experiment with angles to craft intriguing shadows that add depth and drama to your compositions.
Natural Light Utilization
When it comes to capturing stunning toy photographs with your mobile device, mastering natural light is key. Natural light enhances textures and colors, making your toy figures pop. Here’s how you can make the most of it:
- Golden Hour Magic: Shoot during the golden hour, just after sunrise or before sunset, for soft, warm light that reduces harsh shadows.
- Cloudy Day Advantage: Don’t shy away from cloudy days. The clouds act like a natural diffuser, offering even lighting and minimizing glare.
- Window Wonders: Use window light indoors. Position your toy figures near a window to harness soft, directional light. Experiment with angles to see how shadows and highlights play on your figures.
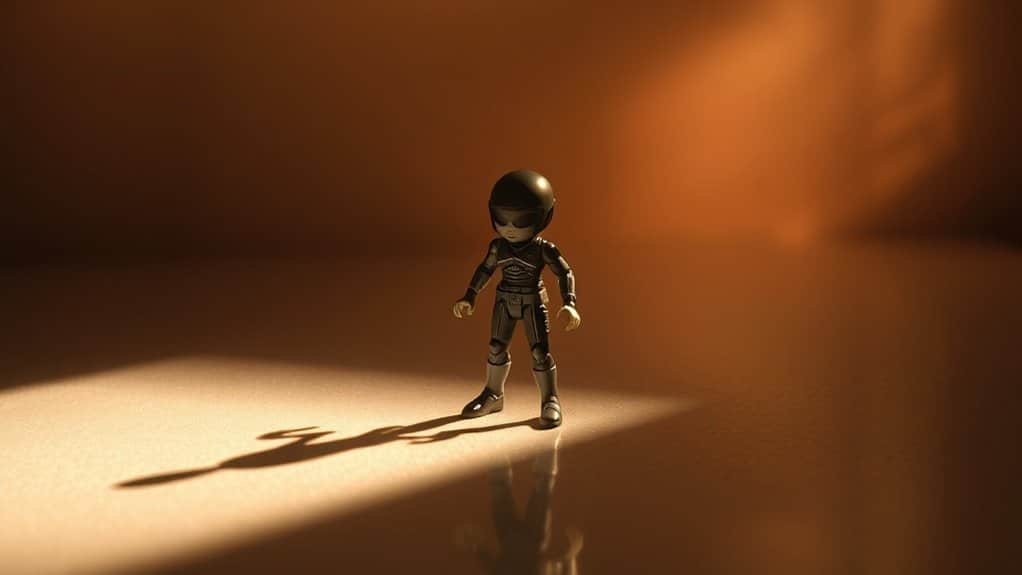
Creative Shadow Play
While natural light is a fantastic tool, playing with shadows can add depth and drama to your mobile toy photography. Use shadows to create intrigue and highlight your toy’s features. Position a strong light source, like a lamp or the sun, at various angles to experiment with shadow lengths and shapes. Try backlighting your figure for a striking silhouette effect or side lighting for dramatic contrast.
Don’t shy away from using everyday objects to cast unique shadows. Simple items like leaves or lace can create intricate patterns, adding complexity to your shots. Adjust your phone’s exposure settings to guarantee details in both light and shadow are captured. With practice, shadow play will enhance your storytelling, transforming simple toy photos into engaging visual narratives.
Composing Engaging Shots
When composing engaging shots in toy photography, start by applying the rule of thirds to bring balance and interest to your images. Experiment with depth and perspective to create a sense of scale and make your toys appear dynamic and lifelike. By mastering these techniques, you’ll transform ordinary shots into enthralling visual stories.
Rule of Thirds
A key principle in crafting compelling mobile toy photography is the Rule of Thirds. This guideline involves mentally dividing your frame into a 3×3 grid. By placing the toy or key elements along these lines or at their intersections, you create a more balanced and engaging composition. Here’s how you can apply it:
- Position the Toy: Place the toy at one of the four intersection points. This draws the viewer’s eye naturally to the subject.
- Balance the Background: Align background elements along the grid lines to complement the toy without overpowering it.
- Experiment With Angles: Shift your camera angle to see how different compositions change the feel of the shot. Practice helps you see which angles resonate most with the Rule of Thirds.
Depth and Perspective
To elevate your mobile toy photography, consider how depth and perspective can transform a simple shot into a dynamic scene. Position your phone at different angles to experiment with how the foreground, middle ground, and background interact. By shooting from a low angle, you can make your toy figures look larger than life, adding drama to the scene. Use leading lines, like paths or shadows, to guide the viewer’s eye through the composition, creating a sense of depth.
Think about layers. Place objects in the foreground to frame your main subject and add context. Play with focus to blur backgrounds or foregrounds, highlighting the subject. Don’t be afraid to move around; sometimes, the best perspective is just a step to the left or right.
Utilizing Depth of Field
Capturing compelling toy photography often hinges on an essential technique: depth of field. By controlling this, you can make your toy figures stand out against blurred backgrounds, creating a more professional look. Here’s how you can utilize depth of field with your phone:
- Use Portrait Mode: Most smartphones have this feature, which automatically blurs the background and keeps your subject in sharp focus. It’s perfect for highlighting your toy figures.
- Get Closer: Move your phone closer to the toy to naturally reduce the depth of field. This will help in making the background less distracting.
- Tap to Focus: Tap on your toy figure in the phone’s viewfinder to guarantee it’s the focal point. This simple action can greatly enhance your photo’s depth.
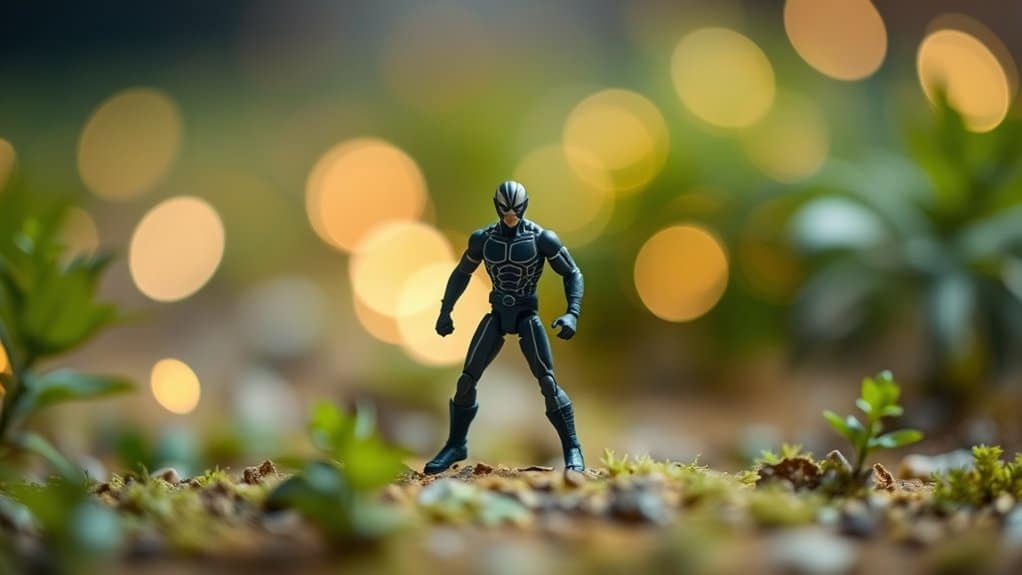
Exploring Angles and Perspectives
Why limit yourself to a single perspective when photographing toys? Experimenting with various angles can bring your figures to life. Try shooting from a low angle to make your toys appear larger than life, giving them a heroic stature. Alternatively, a bird’s-eye view can create a playful, miniature world effect, perfect for storytelling. Don’t hesitate to get up close for dramatic, intimate shots that capture intricate details.
Tilt your phone slightly for dynamic compositions that add energy and movement. Use reflections from glass surfaces or mirrors to introduce symmetry and depth. By changing perspectives, you can create unique and compelling images that keep viewers engaged. Explore different heights, angles, and distances to uncover the best way to showcase your toy’s personality.
Editing and Post-Processing Tips
Once you’ve captured the perfect shot, the real magic often happens in the editing process. Transform your toy photos with these essential tips. First, adjust the brightness and contrast to make your images pop. This simple tweak can turn a dull photo into something vibrant and eye-catching.
Second, fine-tune the color balance. Use your editing app to enhance hues, guaranteeing your colors are true to life or artistically exaggerated for effect.
Finally, crop and straighten your image. A well-cropped photo focuses attention and removes distractions, while straightening ensures a professional look.
Creating Dynamic Action Shots
Bring your toy photography to life by mastering dynamic action shots. Start by imagining the story you want your figures to tell. Use angles and perspectives to create movement. Place your phone at eye level with your figures, or even lower, to capture an intense, engaging viewpoint. Experiment with different camera settings to freeze motion or create a sense of speed.
Consider using props like cotton for smoke or water for splashes to enhance the scene. Pay attention to lighting; natural light can add drama and depth. Try backlighting your figures for a silhouette effect. Be patient and take multiple shots from various angles. Remember, the key is to convey energy and emotion, making your figures appear alive and in motion.
Sharing Your Work on Social Media
When you’ve captured the perfect toy photography shot, sharing it on social media can amplify your creativity and connect you with fellow enthusiasts. To guarantee your photos stand out, keep these tips in mind:
- Choose the right platform: Instagram is ideal for visual content, while Facebook groups allow for community interaction. Pick platforms where your target audience engages most.
- Use hashtags wisely: Include popular hashtags like #toyphotography and #actionfigures to increase visibility. Also, use niche tags to reach specific communities interested in your type of photography.
- Engage with others: Comment on posts you admire and join discussions. Building relationships within the community can lead to more followers and constructive feedback.
Frequently Asked Questions
How Can I Prevent Reflections in My Toy Photography?
To prevent reflections, angle your phone and adjust lighting to avoid direct light hitting reflective surfaces. Use diffused light or a polarizing filter. You can also shoot in a shaded area to minimize unwanted reflections.
What Apps Are Recommended for Toy Photography on Mobile?
Capture the essence with apps like Snapseed and Lightroom; they’re your creative brushes. Enhance colors, adjust lighting, and bring your figures to life. Don’t forget VSCO for filters that add magic to your miniature world.
How Do I Clean and Maintain My Toys for Photography?
You should gently wipe your toys with a microfiber cloth to remove dust. Use a soft brush for intricate details. Avoid harsh chemicals; instead, use mild soapy water for cleaning. Dry them thoroughly before shooting.
How Can I Create Realistic Backgrounds for My Toy Photos?
Use printed images or natural settings to craft realistic backgrounds for toy photos. Adjust lighting to match the scene and consider props for added depth. Experiment with angles to enhance realism, making your toys appear life-sized.
What Settings Help Capture Fast-Moving Toys Effectively?
When toys zoom like racecars, crank up your shutter speed to freeze the action! Boost ISO to let in more light, and switch to burst mode. You’ll capture every high-speed moment like a pro!
At a Glance
You’ve mastered your smartphone camera, chosen the perfect toy and scene, and captured the light just right. You’ve composed engaging shots, played with depth, explored angles, and edited to perfection. Now, it’s time to release your creativity, create dynamic action shots, and share your unique vision with the world. By following these tips, you’ll not only improve your toy photography skills but also inspire others to see everyday objects in a new light. Keep shooting, keep sharing, keep creating!


