
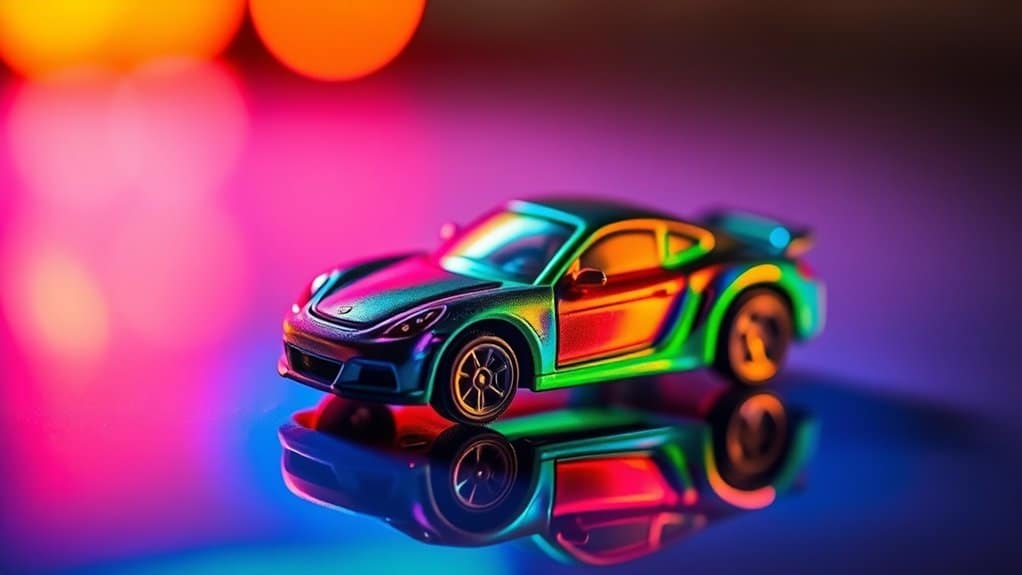
Enhance your toy photography on your phone by using gels and reflector cards. Gels, acting as colored filters, transform ordinary shots, adding vivid backgrounds and mood shifts. Pair them with toys for complementary or contrasting effects. Reflector cards—white, silver, gold, or black—fine-tune light, adding softness, warmth, or depth. Position these tools to capitalize on natural light and experiment with major photography apps for final tweaks. Curious about mastering these techniques? There’s more for you to explore.
Understanding Gels and Their Impact on Toy Photography
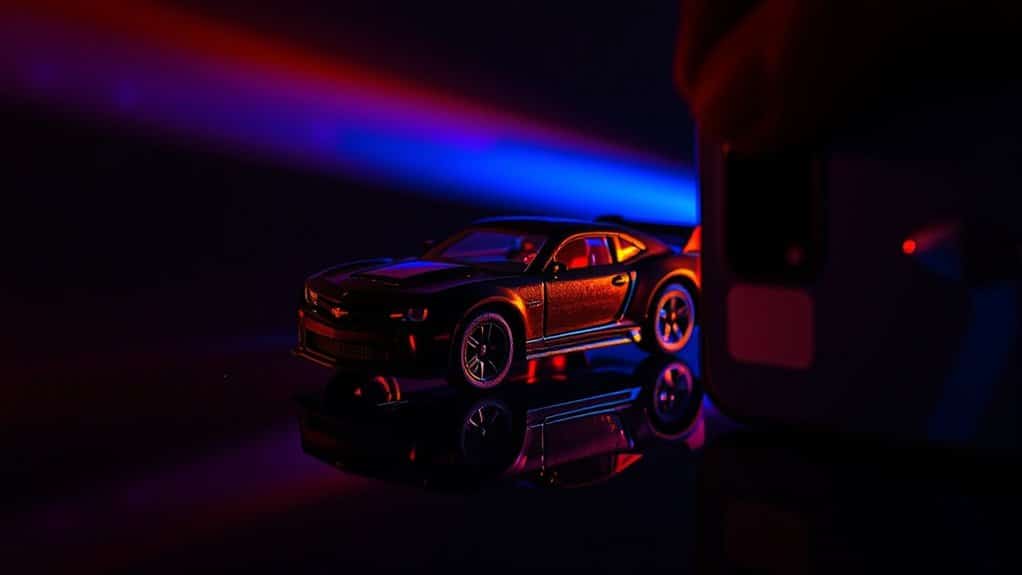
When diving into the world of toy photography, understanding the role of gels can elevate your shots to a new level. Gels, fundamentally colored filters, change the mood and tone of your images by altering the light’s color. By placing gels over your light source, you can create vivid backgrounds or simulate different times of day. Imagine a soft blue gel mimicking moonlight or a warm orange giving a sunset glow. This subtle manipulation can make your toy scenes more dynamic and visually appealing. You’ve got the power to transform ordinary shots into extraordinary ones by experimenting with different gel colors and layering them creatively. Don’t hesitate to play around and see how these simple tools can completely change your photography game.
Choosing the Right Gels for Your Mobile Toy Photography
Now that you’ve seen how gels can dramatically alter the mood and tone of your toy photography, it’s time to focus on choosing the right ones for your mobile setup. First, consider the color palette of your toys. Use complementary gel colors to either contrast or harmonize with them. For example, if your toy has a lot of blues, try orange gels for a striking contrast. Next, think about the mood you want to convey. Warm gels like reds and yellows create cozy, inviting scenes, while cool gels like blues and greens evoke calm or mystery. Finally, make certain your gels are small and flexible enough to fit your mobile gear. Look for gel kits specifically designed for phone photography to get the best results.
Incorporating Reflector Cards for Enhanced Lighting Effects
To create stunning mobile toy photography, selecting the right reflector cards can make all the difference in your lighting. Consider which types of reflector cards best suit your needs, whether you want to add warmth, coolness, or neutral tones. Once chosen, experiment with positioning to find the ideal angle that enhances your subject’s details and brings your toys to life.
Choosing Reflector Card Types
While exploring the world of mobile toy photography, choosing the right reflector card type can greatly enhance your lighting effects and elevate your images. Start by considering the different types available: white, silver, gold, and black. Each offers unique benefits. A white reflector provides soft, natural light, perfect for subtle enhancements. Silver adds more contrast and brightness, ideal for dramatic effects. Gold injects a warm tone, giving your toys a sunlit glow. Black isn’t a typical reflector but absorbs light, adding depth and contrast. Consider your toy’s colors, the mood you’re aiming for, and the surrounding environment when selecting a reflector. By matching the card to your scene, you’ll accentuate details and bring your toys to life with dynamic lighting.
Positioning for Optimal Light
Mastering the art of positioning for ideal light can transform your mobile toy photography. Start by observing the natural light source; is it direct or diffused? Position your toy at an angle that highlights its features, avoiding harsh shadows. Now, bring in a reflector card. Reflector cards are your best friends when it comes to enhancing light. Hold it at a 45-degree angle to bounce light back onto your subject, filling in shadows and adding depth. You can experiment with different card colors: white for soft light, silver for a bright touch, and gold for a warm glow. Don’t be afraid to adjust the card’s position until you achieve the perfect balance. Remember, practice makes perfect in finding that sweet spot.
Setting Up Your Mobile Photography Space
Creating an ideal space for mobile toy photography is crucial for capturing stunning images. Start by choosing a well-lit area, preferably near a window to utilize natural light. Clear any clutter to maintain focus on the toys. Use a solid-colored backdrop to reduce distractions and enhance the subject. A simple piece of fabric or paper will do the trick.
Next, gather your tools: gels, reflector cards, and your phone. Keep them organized and within easy reach. Position gels and reflectors to manipulate light creatively. Verify your phone’s battery is charged and storage is ample.
Finally, set up a stable surface for your toys and phone. A table or desk works great. Keep experimenting with angles and setups to find what works best for your creative vision.
Practical Tips for Capturing Stunning Toy Images

When you’re capturing toy images, choosing the right gels can dramatically change the mood and color of your photos. Use reflector cards to manipulate light and eliminate unwanted shadows, bringing out the toy’s details. By combining these techniques, you can elevate your mobile toy photography to a professional level.
Choosing the Right Gels
Lighting can make or break your toy photography, and choosing the right gels is an essential part of the process. Gels allow you to add vibrant colors or subtle tones, setting the mood of your shot. Start by considering the theme and emotion you want to convey. Warm colors like reds and oranges add intensity, while blues and greens create a calm atmosphere. It’s also important to match the gel’s color temperature with your existing light sources to avoid unwanted color casts. Experiment with layering different gels for unique effects, but remember, less is often more. Keep a variety of gels on hand to adapt to different scenes and moods. With practice, you’ll discover how each gel can transform your toy photography.
Utilizing Reflector Cards
Although often overlooked, reflector cards are a powerful tool in toy photography that can elevate your images from good to stunning. They help you manipulate light, enhance details, and create mood without needing expensive equipment. When you’re shooting toys, positioning a reflector card can fill in shadows and highlight textures, giving your photos depth and dimension. Here’s how you can make the most of them:
- Experiment with Angles: Move the card around to see how different angles affect shadows and highlights.
- Use Different Colors: Silver, gold, and white reflectors add various effects, from cool tones to warm glows.
- Control Brightness: Balance harsh sunlight or indoor lighting by adjusting the card’s distance.
- DIY Options: Create your own reflectors using foil or white paper for budget-friendly solutions.
Editing and Post-Processing Techniques for Mobile Toy Photography
To elevate your mobile toy photography, mastering editing and post-processing techniques is essential. Start by selecting a reliable photo editing app like Snapseed or Lightroom Mobile. Adjust the exposure, contrast, and saturation to make your toys pop. Use the crop tool to refine your composition and eliminate distractions.
Try the healing tool to remove unwanted blemishes or dust. For creative flair, experiment with filters, but don’t overdo it—subtlety is key. Sharpen your image to highlight details, especially in intricate toy designs.
Consider using the vignette feature to draw focus to your subject. Finally, save your edits in high resolution to preserve quality for sharing or printing. With these techniques, your toy photography will captivate viewers and showcase your artistic vision.
Frequently Asked Questions
Can Gels and Reflector Cards Be Used With Any Smartphone Camera Model?
You can absolutely transform any smartphone camera into a professional studio! Gels and reflector cards work wonders with every model. Just attach ’em, and you’ll release colors and light that make your photos look like they’re from another universe.
Do Gels Come in Different Sizes for Various Mobile Devices?
Gels do come in different sizes, so you can find one that fits your mobile device perfectly. Just make sure you choose the right size to enhance your photos without obstructing your camera’s lens or flash.
How Can I Store Gels and Reflector Cards for Easy Access and Portability?
You can store gels and reflector cards in a small, dedicated pouch or case. Keep them organized and protected by using dividers or sleeves. This way, you’ll have easy access and portability for your photography needs.
Are There Any Apps That Simulate Gel Effects for Toy Photography?
You can find apps like Snapseed and Photoshop Express that simulate gel effects. They’re like digital lava lamps, offering vibrant color overlays. Explore their features and enhance your toy photography with ease and creativity.
How Do Gels Affect Battery Life When Using a Smartphone for Extended Shoots?
Using gels doesn’t directly affect your smartphone’s battery life. However, increased screen brightness or prolonged camera use during extended shoots can drain the battery faster. Consider carrying a portable charger to keep your phone powered.
At a Glance
In mobile toy photography, you’ve learned to harness the power of gels, to choose the right ones to create mood, and to incorporate reflector cards for stunning light effects. You’ve set up your space with intention, captured images with creativity, and edited them with precision. By mastering these techniques, you’re not just taking photos; you’re crafting stories, showcasing artistry, and bringing toys to life. So grab your phone, release your creativity, and start capturing magic.


