To capture stunning macro toy photography, choose a dedicated macro lens with a 1:1 magnification ratio for detailed close-ups, and use colored paper or household items as props. Embrace natural or diffused artificial light to highlight toy details and experiment with angles for drama. Select simple backgrounds to make toys pop, and adjust depth of field for focus. Enhance photos through subtle post-processing. Dive deeper into these techniques to elevate your macro toy shots further.
Choosing the Right Lens for Macro Toy Photography
Selecting the right lens is essential for capturing stunning macro toy photographs. You need a lens that lets you get up close while maintaining sharpness and detail. Consider a dedicated macro lens with a 1:1 magnification ratio. This allows you to fill the frame with your subject, highlighting intricate details that bring toys to life. Look for lenses with a focal length between 60mm and 105mm for flexibility in framing and composition.
A lens with image stabilization is a bonus, helping reduce blurriness from camera shake. If you're on a budget, consider extension tubes to transform existing lenses into macro-capable tools. Remember, the right lens can make all the difference, so choose wisely to enhance your macro toy photography experience.
Mastering Lighting Techniques for Detailed Shots
While the right lens can bring you closer to your toy subject, lighting sets the stage for capturing every detail with precision. Start by using natural light; it's soft and adds a gentle touch to your shots. Position your toys near a window, letting the light wrap around them naturally. If you need more control, try diffused artificial lighting. Use a lightbox or a simple diffuser to soften harsh shadows. Remember, the angle of your light source can dramatically change the mood of your photo. Experiment with side lighting for dramatic effects or front lighting for an even look. Don't forget to adjust your camera settings to balance exposure. Play with different lighting setups to find what best highlights your toy's details. After capturing your images, consider employing some top retouching techniques for toys to enhance their visual appeal. Adjust brightness and contrast to bring out the vibrant colors of your toys, and don’t hesitate to clean up any distractions in the background. Fine-tuning the sharpness can also help make the details pop, ensuring your photos stand out even more.
Setting the Perfect Background for Toys
When setting the perfect background for toy photography, you should choose simple background colors to make your subject stand out. Don't overlook the charm of natural elements, as they can add depth and authenticity to your shots. Combine these elements to create an enchanting scene that enhances the toy's features.
Choose Simple Background Colors
A simple background color can transform your macro toy photography from ordinary to extraordinary. By choosing a clean, uncluttered backdrop, you allow your toy subject to shine. Simple colors such as white, black, or soft pastels create a neutral canvas that highlights the toy's intricate details without distraction. This approach helps maintain focus on the toy's unique features, guaranteeing it remains the star of your photograph.
When selecting a background, consider the toy's color scheme. A contrasting background can make vibrant colors pop, while a complementary one guarantees harmony. Remember, the background shouldn't compete with the toy; it should enhance it. Experiment with different shades to see which best suits your subject. With a thoughtful background choice, your toy photography will captivate viewers effortlessly.
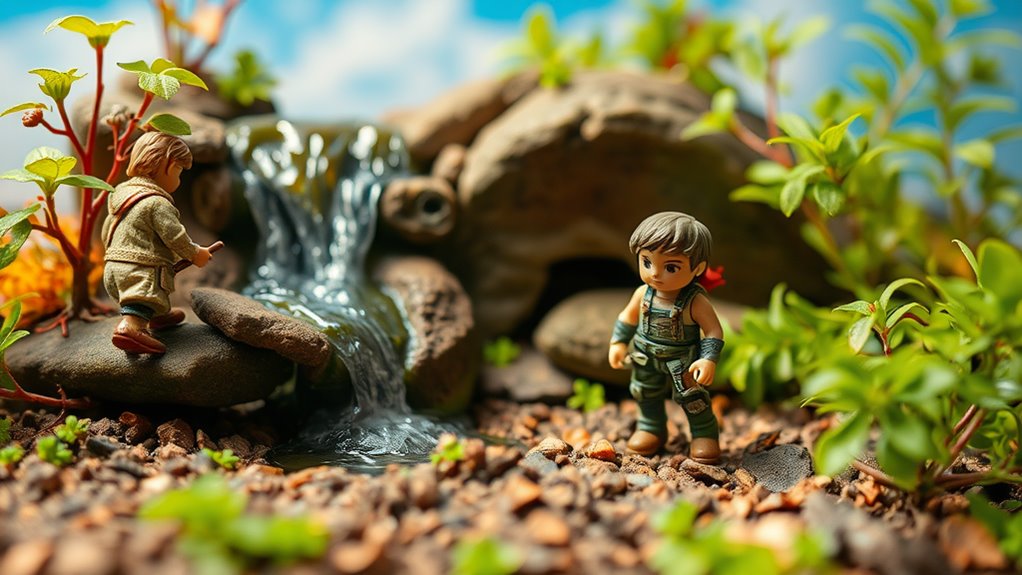
Utilize Natural Elements
After mastering the art of simple backgrounds, it's time to explore the beauty of natural elements for your macro toy photography. Nature offers an endless array of textures and colors that can enhance your toy scenes. Incorporate elements like leaves, rocks, or sand to create a realistic setting. For example, a small patch of moss can look like a lush forest floor, while pebbles might mimic a rocky landscape.
Pay attention to lighting, as natural light can add depth and shadows, making your toys pop. Early morning or late afternoon provides soft, warm tones. Don't forget to experiment with angles—shooting from a low perspective can make the toys appear larger than life. By integrating nature, you'll elevate your toy photography to new creative heights.
Understanding and Using Depth of Field Effectively
Mastering depth of field is essential in macro toy photography, transforming ordinary shots into enchanting works of art. Start by understanding the basics: depth of field refers to the area in focus in your image. A shallow depth of field focuses on your toy, blurring the background and making your subject pop. To achieve this, use a wide aperture setting (a small f-stop number). This isolates your toy, giving it a magical, larger-than-life presence. Conversely, a narrow aperture (a larger f-stop number) expands focus, capturing more detail across the scene. Experiment with different settings to see what works best for your vision. Remember, your choice of depth of field can dramatically alter the mood and storytelling in your photos.
Enhancing Details With Proper Focus Techniques
To enhance details in macro toy photography, start by mastering depth of field to keep your subject sharp while blurring the background. Utilize focus stacking to combine multiple images, ensuring every part of your toy is in focus. Finally, choose an ideal aperture to control the light and detail captured, balancing sharpness and exposure.
Master Depth of Field
When capturing the intricate details of your toy subjects, mastering depth of field becomes essential. Depth of field refers to the range of focus within your image. In macro photography, it's often shallow, so you'll need to be deliberate. Start by selecting a small aperture (higher f-number) to increase the focus range. This guarantees more of your toy is sharp and clear. However, be cautious; smaller apertures can reduce light, so adjust your exposure accordingly. Use manual focus for precision, allowing you to control which part of your toy is highlighted. Position your camera closer or further away to find the sweet spot where details pop. By mastering depth of field, you'll reveal the charm and character of your toy subjects beautifully.
Utilize Focus Stacking
While mastering depth of field sharpens your toy photography skills, focus stacking takes your images to the next level. It allows you to capture every intricate detail of your miniature subjects. Start by taking multiple shots of your toy at different focus points, guaranteeing each part of the subject is clear in at least one image. Use photo editing software to combine these photos into a single, sharp image, enhancing details that a single shot can't capture. This technique is particularly valuable for macro photography, where depth of field is often shallow. Focus stacking guarantees your tiny subjects appear crisp from front to back, making them come alive with detail. Don't shy away from experimenting; it'll transform your photography.
Choose Optimal Aperture
Aperture plays an essential role in macro toy photography, and choosing the right one can greatly enhance your images. When shooting toys up close, a smaller aperture (higher f-stop) increases the depth of field, making more of your subject sharp and detailed. However, be mindful of diffraction, which can soften your image if you stop down too far.
On the flip side, a larger aperture (lower f-stop) creates a shallow depth of field, allowing you to isolate specific details while blurring the background. This technique can make your toy subject pop. Experiment with different apertures to find the sweet spot for your scene. Remember, lighting conditions also influence your aperture choice, so adjust accordingly to maintain proper exposure and guarantee your toy photographs are enchanting.
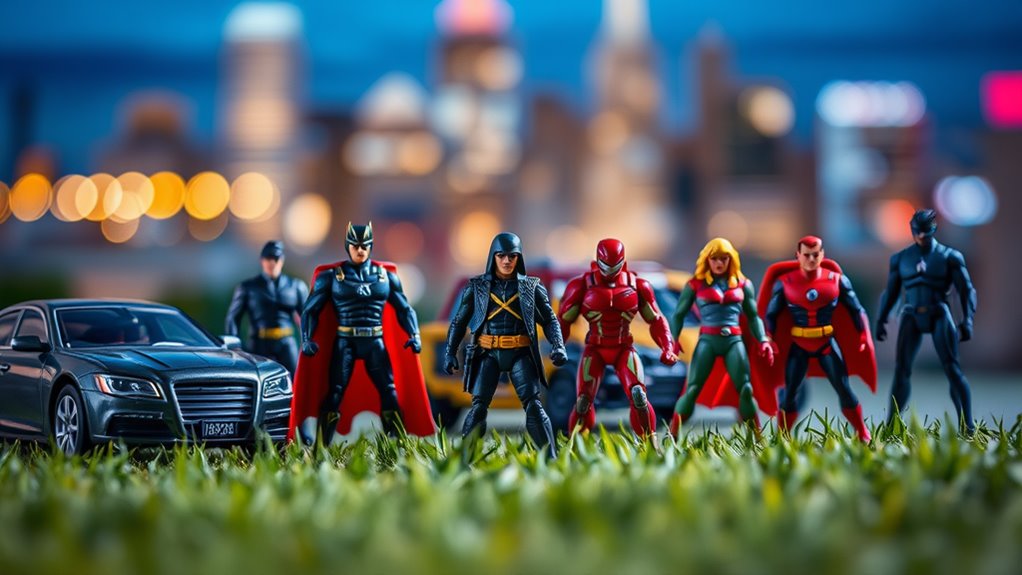
Utilizing the Right Props to Complement Your Toys
Even though the toy itself is the star of the show, the right props can elevate your macro toy photography to new heights. Carefully selected props add context, depth, and a narrative to your images, transforming a simple toy photo into a enthralling story. Think about the toy's theme or character and choose props that complement it. For example, a miniature superhero might look more dynamic with tiny city buildings or action-packed scenes.
Use materials like colored paper for backgrounds or household items scaled appropriately to create realistic settings. Remember, props shouldn't overshadow the toy; they should enhance it. Test different arrangements and angles to find the perfect balance. By thoughtfully selecting props, you'll breathe life into your photos, making them more engaging and memorable.
Post-Processing Tips to Highlight Toy Features
After setting the perfect scene with well-chosen props, it's time to turn your attention to post-processing, a powerful tool in macro toy photography. Start by adjusting the brightness and contrast to make the toy's features pop. Enhance colors slightly to give a more vibrant look without overdoing it. Use sharpening tools to bring out intricate details like textures and small accessories. Don't forget to crop your image to focus on the most compelling parts of the toy. Consider using a vignette effect to draw the viewer's eye toward the subject. Remember, subtlety is key—over-processing can make your image look unnatural. Trust your instincts and review your edits to guarantee they enhance, not overshadow, the toy's charm.
Experimenting With Angles and Perspectives for Unique Shots
Capturing unique shots in macro toy photography often hinges on experimenting with angles and perspectives. Don't just settle for eye-level shots. Get down low or shoot from above to create drama and intrigue. Try tilting your camera for a dynamic effect, making your toy subjects seem larger than life. You can also shoot through objects like leaves or glass for interesting foregrounds.
Move around your subject and explore different angles. Sometimes, what seems like an unusual perspective can highlight details you've never noticed before. Consider how light interacts with these angles; shadows can add depth and mood. Don't hesitate to break traditional rules. Your creativity will flourish when you push boundaries, giving your toy photography a fresh, unique look.
Frequently Asked Questions
How Can I Prevent Dust From Appearing in Macro Toy Photos?
To keep dust out of your macro toy photos, clean the toys and your shooting area before you start. Use a microfiber cloth and compressed air. Regularly check your lens and camera to guarantee they're dust-free too.
What Are Some Common Mistakes Beginners Make in Macro Toy Photography?
Beginners often overlook lighting, leading to lackluster, lifeless images. You might forget to focus on fine details or neglect backgrounds, causing cluttered compositions. Consistently check your settings, ensuring every element enhances your miniature masterpiece. Practice patience and precision!
Which Camera Settings Work Best for Shooting Miniatures in Natural Light?
You'll want to set a narrow aperture for greater depth of field and use a low ISO to minimize noise. Adjust your shutter speed accordingly and consider using a tripod to keep your shots steady and sharp.
How Do I Choose the Best Time of Day for Outdoor Toy Photography?
You choose the best time for outdoor toy photography by considering light's angle, color, and intensity. Early mornings and late afternoons offer soft, warm light. Avoid midday when shadows are harsh and colors appear washed out.
What Are Good Practices for Maintaining and Cleaning Camera Equipment After a Toy Photo Session?
After a toy photo session, always use a microfiber cloth to clean your lenses. Avoid moisture by storing equipment in a dry bag. Regularly inspect for dust and debris. Don't forget to charge your batteries for next time.
At a Glance
You've now got the ultimate arsenal to make your toy photos leap off the screen like they're coming to life! With the perfect lens, impeccable lighting, and a background that complements every detail, you're ready to capture breathtaking shots. Don't forget to master depth of field, focus sharply, and add a touch of creativity with props. Post-processing will be your secret weapon to enhance those tiny features. So, grab your camera and let your imagination soar!


