To add glow effects in toy photography, consider using a mix of natural sunlight and artificial lights like LED panels. Position lights creatively to play with shadows and highlight details. Use colored gels or cellophane for vibrant custom glows. Experiment with backlighting and side lighting for dynamic effects, and apply vignettes and saturation adjustments during post-processing for polish. With these strategies, you’re on the path to creating enchanting and enthralling toy photographs. Discover more exciting techniques ahead!
Understanding Light Sources in Toy Photography
In toy photography, understanding light sources is essential because it dramatically affects the mood and detail of your images. You need to explore different lighting options like natural sunlight, lamps, or LED lights to see how they impact your shots. Each source offers unique qualities; for example, natural light gives a softer, more authentic look, while artificial lights can be controlled for specific effects.
Experiment with angles and intensity to create shadows and highlights that bring your toys to life. Pay attention to color temperatures, as warm or cool tones can change the scene’s vibe. Don’t hesitate to move your light sources around—it’s all about finding that perfect balance that enhances the tiny details and captures the essence of your miniature worlds.
Choosing the Right Equipment for Glow Effects
As you master the impact of different light sources, it’s time to explore how to create glow effects that make your toy photography stand out. Start by selecting the right equipment. LED lights are your best friend for achieving vibrant glows. They’re energy-efficient and come in various colors. Consider using a ring light for even illumination, which helps create consistent glow effects. A portable LED panel is versatile, allowing you to adjust brightness and color temperature. Don’t overlook light diffusers; they soften harsh light, enhancing the glow effect. Small, flexible tripods help position lights accurately, ensuring the glow hits just right. Finally, invest in colored gels to add a splash of creativity, transforming ordinary scenes into enchanting displays.
Techniques for Creating Dynamic Light and Shadow
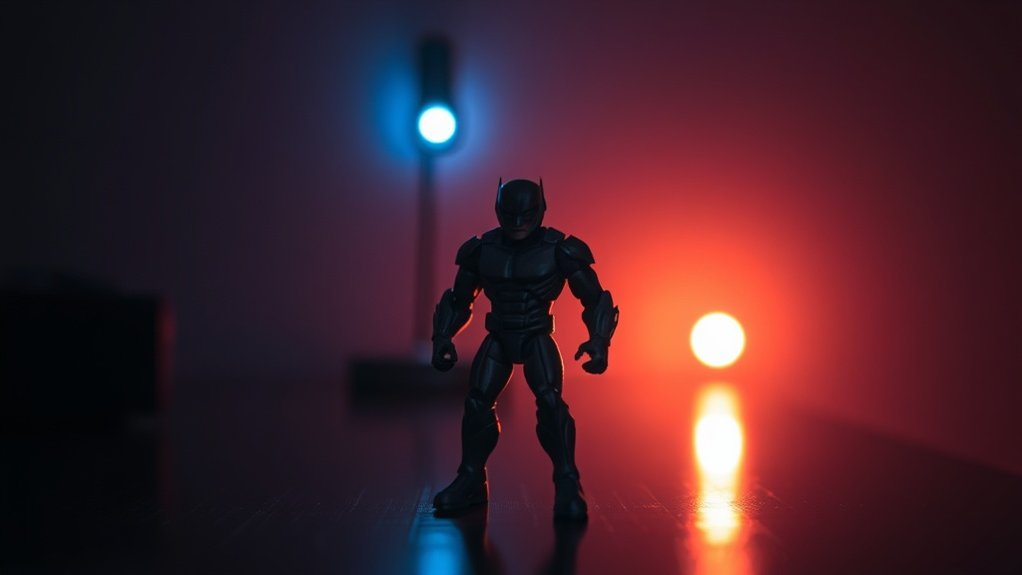
To create dynamic light and shadow in toy photography, you can experiment with backlighting for dramatic effects. Side lighting adds depth and dimension, making your subjects pop. Don’t forget to explore shadow play techniques to craft intriguing and mysterious scenes.
Backlighting for Dramatic Effects
Even though backlighting might seem challenging at first, it’s a powerful technique for adding drama and depth to your toy photography. By placing a light source behind your subject, you create a striking silhouette that highlights the toy’s shape and details. This method adds a sense of mystery and intrigue to your shots. To get started, position your light source behind the toy, slightly above or below, to avoid direct flare into the lens. Experiment with different angles and distances to achieve the desired glow and shadow effect. Use diffusers to soften harsh lights, maintaining a balance between light and shadow. With practice, you’ll master this technique, transforming ordinary toys into engaging subjects with captivating stories to tell.
Side Lighting for Depth
When you want to add depth and dimension to your toy photography, side lighting is a technique you should embrace. By placing your light source to the side of your subject, you create contrasting areas of light and shadow. This contrast enhances texture and makes details pop, giving your photos a more three-dimensional look.
To achieve this, position your light at a 90-degree angle to your toy. Adjust the intensity to control the shadows—softer lighting for subtle depth or harsher light for dramatic contrasts. Experiment with the distance and angle to find what works best. Side lighting not only highlights the intricate features of your toys but also adds a sense of realism and intrigue to your images.
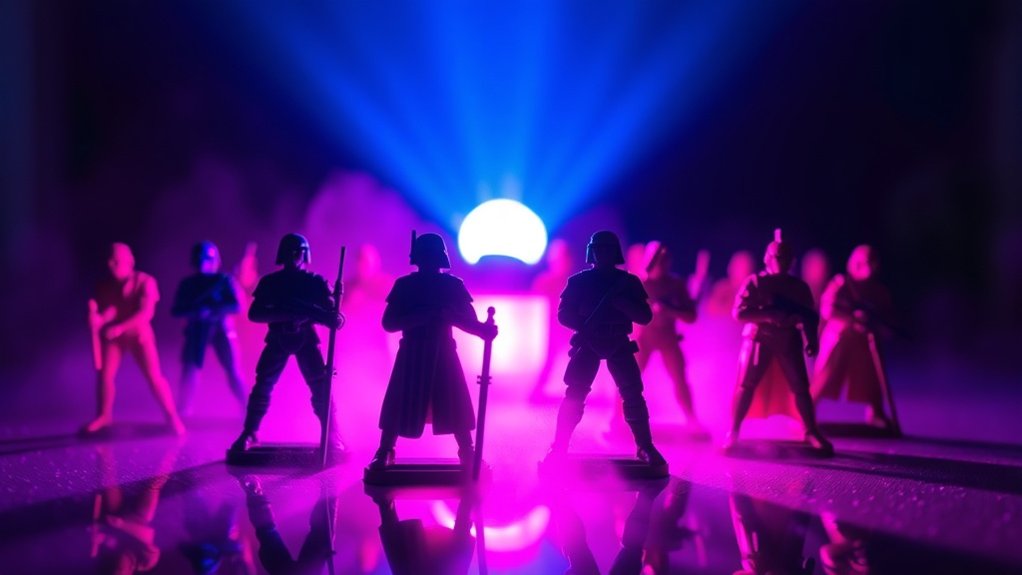
Shadow Play Techniques
Incorporating shadow play techniques into your toy photography can transform your images by creating dynamic interactions between light and shadow. To achieve this, consider the following methods:
- Backlighting: Position a light source behind your toy to cast dramatic shadows in the foreground. This technique adds depth and mystery to your shots.
- Gobos: Use objects to block parts of your light source, creating interesting patterns and shapes in the shadows. Gobos can be anything from leaves to custom-cut designs.
- Theater Lighting: Use multiple light sources at different angles to craft complex and layered shadow effects. This approach adds a theatrical feel to your photos.
- Silhouetting: Place your toy between the camera and a strong light source to create a striking silhouette, emphasizing the toy’s shape and form.
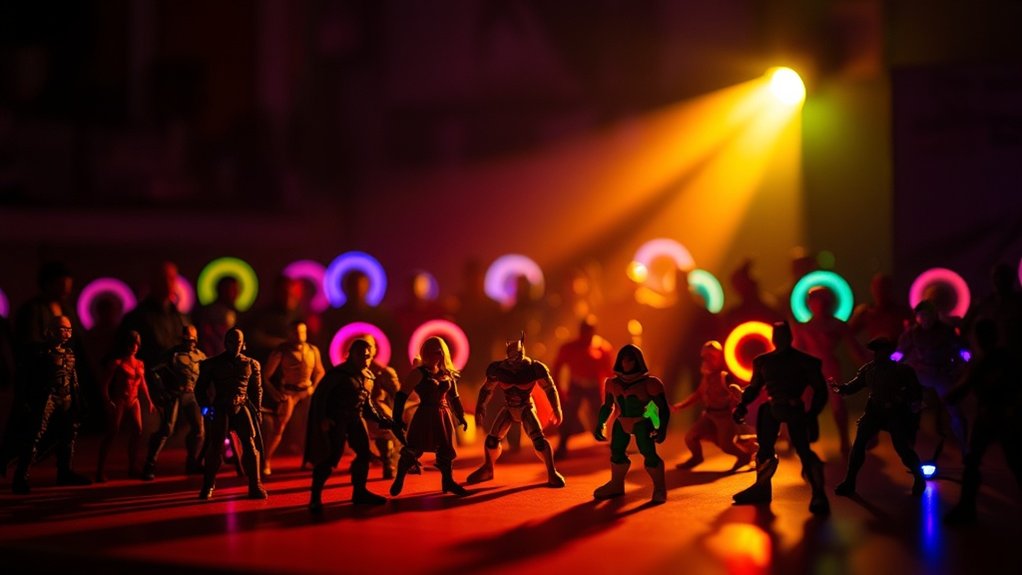
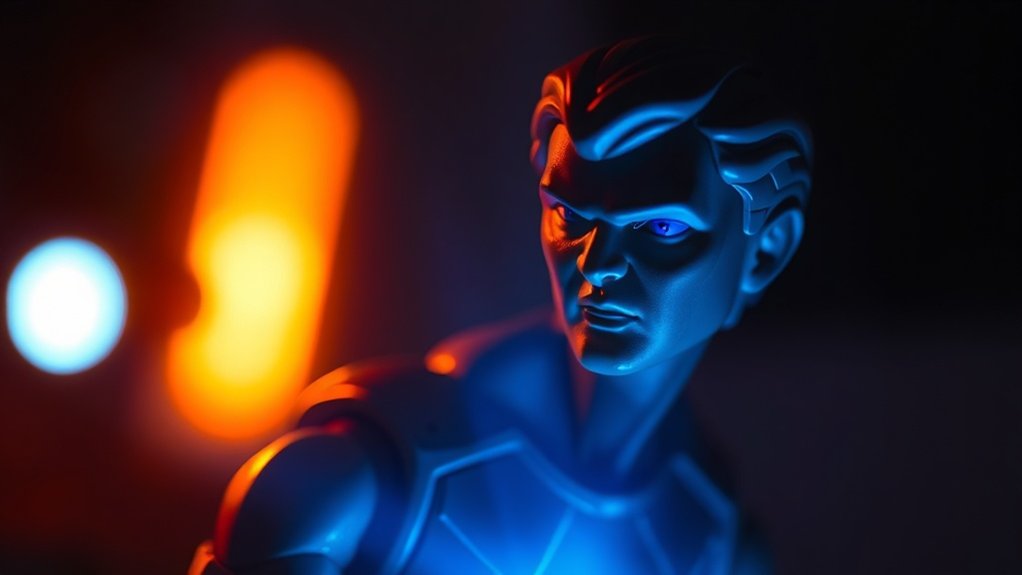
Experimenting With Colored Lights for Unique Glows
When you’re experimenting with colored lights in toy photography, start by choosing vibrant colors that complement your subject. Mixing different light effects can create unique glows that enhance mood and storytelling. Don’t hesitate to switch up colors and angles to discover what works best for your shot.
Choosing Vibrant Light Colors
Although natural lighting has its charm, using vibrant colored lights can transform your toy photography by adding unique glows that capture attention. Selecting the right colors can be intimidating, but focusing on a few key points will make the process easier.
- Determine the Mood: Decide if you want a warm, inviting feel with reds and oranges, or a cool, mysterious vibe with blues and purples.
- Complement the Subject: Choose colors that enhance or contrast with the toy’s features, making them stand out.
- Consider the Background: Make sure your chosen colors don’t clash with the background, maintaining a coherent image.
- Experiment and Adjust: Test different colors and tweak them until you achieve the desired effect, embracing creativity throughout your exploration.
Mixing Light Effects
By blending different colored lights, you can craft mesmerizing effects that elevate your toy photography to an art form. Start by selecting a few colors that complement each other and your subject. Think about how colors interact: red and blue can create a mysterious ambiance, while yellow and green can evoke a vibrant energy. Position your lights at different angles to play with shadows and highlights, adding depth to your scene.
Experiment with intensity by adjusting the light’s distance from your subject. Use diffusers or filters to soften harsh lights and create a dreamy atmosphere. Try contrasting warm and cool tones for dynamic results. Don’t be afraid to experiment; the unique glow effects you achieve can transform an ordinary scene into something extraordinary.
DIY Hacks for Custom Glow Effects
Ever wanted to add a magical touch to your toy photography without breaking the bank? With a few DIY hacks, you can create custom glow effects that make your shots shine. Here’s how:
- LED Tea Lights: Use battery-operated LED tea lights to create soft, ambient glows. They’re perfect for lighting up small spaces around your toys.
- Glow Sticks: Cut open a glow stick and carefully spread the glowing liquid on clear plastic sheets. Place these behind your toys for an ethereal backlight.
- Fairy Lights: String these around your scene for a twinkling, festive effect. They’re versatile and easy to shape.
- Cellophane Wraps: Wrap a flashlight with colored cellophane to create custom-colored glow effects. Aim it strategically for dynamic lighting.
Post-Processing Tips to Enhance Glow Effects
Enhancing your toy photography with DIY glow effects can create enchanting visuals, but the magic truly happens in post-processing. Start by importing your images into editing software like Adobe Lightroom or Photoshop. Use the brush tool to selectively enhance the glow by increasing the exposure and adjusting the color temperature for a warmer effect.
Don’t hesitate to experiment with layer blending modes like “Screen” or “Overlay” to intensify the glow. Adjust the highlights and shadows to guarantee the glow stands out without overpowering the entire image.
Consider applying a subtle vignette to draw the viewer’s eye toward the glowing elements. Finally, fine-tune the overall contrast and saturation to make the colors pop, making sure your toy photography is as enchanting as your creative vision.
Frequently Asked Questions
How Can I Prevent Glare When Using Light Sources in Toy Photography?
You can prevent glare by diffusing your light sources. Use materials like softboxes or sheer fabric to soften the light. Adjust the angle of your light to avoid direct reflections on shiny surfaces. Experiment for best results.
What Are Some Safety Tips for Using Lights in Toy Photography?
When dancing with lights, always guarantee cords aren’t tangled, preventing trip hazards. Keep lights cool to touch to avoid burns. Use surge protectors to shield against electrical storms. Don’t leave lights unattended to prevent overheating.
How Do Weather Conditions Affect Outdoor Toy Photography Lighting?
Weather conditions directly impact your outdoor lighting. Cloudy days provide soft, diffused light, while sunny days give harsh shadows. Wind can disrupt setups, and rain might damage equipment. Always adapt your lighting techniques according to the weather.
Can Natural Light Be Used Effectively for Glow Effects in Toy Photography?
Yes, you can use natural light for glow effects. For example, position your toy near a window during sunrise. The soft, diffused light creates a magical glow, enhancing your photo without artificial light sources.
What Are Common Mistakes to Avoid When Adding Glow Effects?
When adding glow effects, don’t overdo it. You should avoid inconsistent light sources and guarantee the glow complements rather than overwhelms. Be mindful of reflections and shadows, maintaining a balance to enhance realism and depth in your images.
At a Glance
As you explore deeper into toy photography, the art of lighting becomes your secret weapon. Imagine the thrill of capturing that perfect glow, where shadows dance and colors pop. Armed with the right tools and techniques, you’re on the brink of transforming ordinary scenes into extraordinary visions. But here’s the twist—it’s your creativity that holds the ultimate key. What dazzling glow effect will you discover next? The possibilities are endless, and the adventure awaits.


