
Capture expansive toy scenes with your phone’s panorama mode to bring your miniature stories to life. Start by setting up a simple, well-lit scene, using natural light for depth and soft artificial light for highlights. Position your phone level and steady as you pan smoothly from one side to the other for seamless images. Choose dynamic poses and thoughtfully placed toys for visual focus. With a few more tips, you’ll create enchanting, sweeping shots.
Understanding Panorama Mode on Your Phone

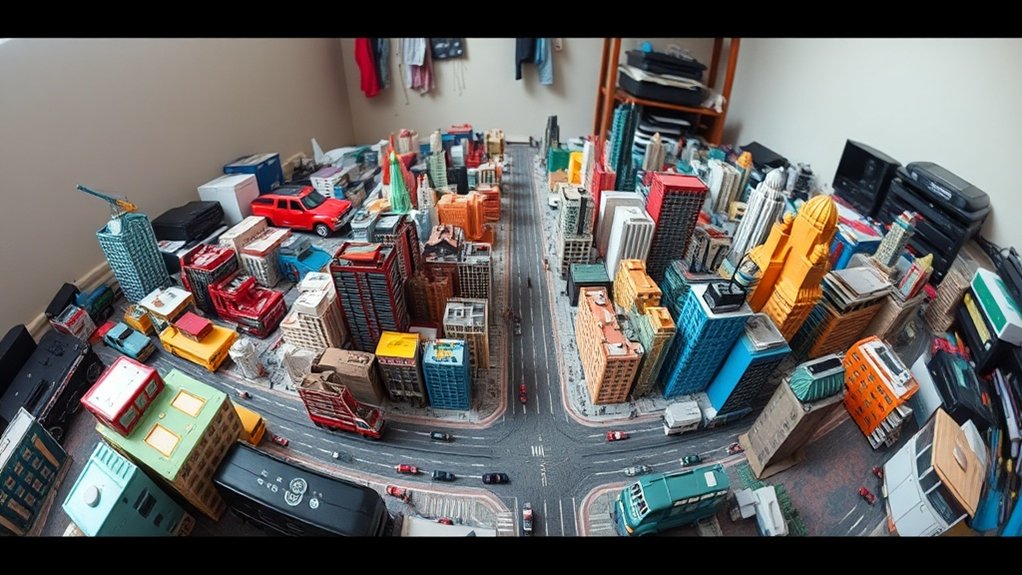
While exploring the creative possibilities of toy photography, understanding your phone’s panorama mode is essential to capturing stunning images. This feature lets you create wide, sweeping photos that add depth and context to your toy scenes. First, locate the panorama mode in your camera app. It’s usually an option alongside other modes like portrait or night. Once found, practice using it by slowly moving your phone in a steady motion from one side to the other. This guarantees a seamless blend of images. Pay attention to alignment; keeping your phone level is vital for avoiding distortion. Don’t rush. Let the camera do its magic as you smoothly pan across the scene, capturing every detail of your miniature world.
Setting Up Your Toy Photography Scene
Now that you’re familiar with your phone’s panorama mode, it’s time to focus on setting up your toy photography scene. Creating an engaging scene is crucial for capturing those wide, breathtaking shots. Start by choosing a suitable location with enough space. Natural light can enhance your scene, so consider areas near windows or open spaces outdoors. Keep your background simple to prevent distractions from the main subjects.
Here’s a quick guide to get you started:
- Plan Your Scene: Sketch a rough layout of where you want each toy and prop to be positioned.
- Set Up Props: Use everyday items to add depth and context, but don’t overcrowd the scene.
- Check Lighting: Verify even lighting, adjusting lamps or reflectors to eliminate harsh shadows.
Choosing the Right Toys for Wide Scenes

When you’re setting up wide scenes with your phone’s panorama mode, it’s essential to select toys that fit well regarding scale and proportion. Consider toys that can be posed dynamically to add a sense of movement and life to your shots. This approach will make your panoramic photos more engaging and visually appealing.
Scale and Proportion Considerations
Choosing the right toys for wide scenes in toy photography can make or break your composition. You’ll want to focus on scale and proportion to guarantee your scene looks realistic and interesting. Here’s how you can achieve that:
- Match Sizes: Choose toys that are proportionate to each other. A giant action figure next to a tiny vehicle can disrupt the scene’s balance.
- Consider Perspective: Position smaller toys in the foreground and larger ones in the background to create depth and maintain a natural perspective.
- Use Accessories: Enhance the scene with appropriately scaled accessories like trees, buildings, or other props. They can add context and depth, making your panorama more enthralling.
Dynamic Poses and Movement
While setting up your toy photography scene, consider incorporating dynamic poses and movement to breathe life into your images. Choose toys with multiple articulation points; they allow for more expressive and flexible positioning. Think of action figures that can bend, twist, and pivot. They’re perfect for creating a sense of motion and drama in your wide scenes. Consider toys that come with accessories or interchangeable parts, as these offer additional ways to convey movement and interaction.
Experiment with angles and positions that suggest action. A superhero mid-leap or a vehicle speeding through a landscape adds excitement to your composition. Use your phone’s panorama mode to capture the full breadth of movement. By focusing on dynamic poses, you’ll create engaging, lively scenes that draw viewers in.
Lighting Techniques for Dynamic Shots
To capture dynamic toy shots using your phone’s panorama mode, start by experimenting with natural light to highlight your scene’s details. Don’t hesitate to introduce artificial light sources for added depth and drama. Play with shadows to create intriguing contrasts and make your toys pop.
Natural Light Utilization
Capturing dynamic toy photography with your phone’s panorama mode becomes considerably more vivid when you harness the power of natural light. Shooting outdoors or near large windows can transform your toy scenes, adding depth and realism. To make the most of natural light, consider these tips:
- Golden Hour Magic: Shoot during the golden hour, shortly after sunrise or before sunset. The soft, warm light adds a dreamy quality to your photos and enhances colors.
- Avoid Harsh Midday Sun: Direct sunlight can create harsh shadows and glare. If you must shoot at midday, find shaded areas to keep the lighting even.
- Cloudy Day Advantage: Overcast skies act as a natural diffuser, providing even, soft light. This is perfect for reducing shadows and capturing intricate details.
Artificial Light Sources
When natural light isn’t available or doesn’t quite fit your creative vision, artificial light sources step in to elevate your toy photography. Use LED lights, desk lamps, or even flashlights to add drama and depth to your scenes. Position these lights strategically to highlight specific features of your toys, creating dynamic shadows and highlights. Experiment with colored gels or filters to introduce mood and emotion, transforming a simple scene into a compelling story.
Don’t forget about light diffusers, like translucent paper or fabric, to soften harsh lighting and spread it evenly. This technique reduces glare and highlights, ensuring your toys are the stars of the frame. Remember, the key is experimentation—adjust angles and intensities to discover what works best for your vision.
Shadow Play Techniques
While exploring the art of shadow play in toy photography, you’ll uncover a new dimension of creativity in your images. Shadows add depth, drama, and intrigue, transforming simple scenes into enchanting stories. To master shadow play, consider these key techniques:
- Light Positioning: Adjust your light source to cast long, dramatic shadows. Experiment with angles to find the perfect balance between light and dark.
- Contrast Control: Use your phone’s settings to tweak contrast. High contrast can make shadows more pronounced, enhancing the mood of your shot.
- Texture Exploration: Introduce textured surfaces like crumpled paper or fabric. These can create interesting shadow patterns, adding complexity to your scene.
Positioning Your Phone for Optimal Results
To achieve stunning toy photography with your phone’s panorama mode, ascertain you’re positioning the device thoughtfully. Start by holding your phone steadily at eye level to match the toys’ height. This perspective immerses the viewer in the miniature world you’re capturing. Make sure your phone remains parallel to the scene to avoid unwanted distortion. As you begin panning, move in a slow, smooth motion to maintain a consistent focus throughout.
Consider the light source. Position your phone so that the primary light is either behind you or to the side. This positioning helps illuminate your scene evenly and avoids harsh shadows that might obscure details. Finally, avoid abrupt movements while capturing, as these can blur your image and ruin the panorama. With careful positioning, your toy photos will shine.
Composing Your Panorama Shot
When composing your panorama shot, focus on framing your toy scene to capture its essence and tell a story. Make sure to balance light and shadows to add depth and dimension, enhancing the visual interest. Experiment with different angles and perspectives to create a striking image that stands out.
Framing Your Toy Scene
Capturing a mesmerizing toy scene with your phone’s panorama mode requires a keen eye for composition. Framing your toy scene is about arranging elements to create a cohesive story. Start by selecting a focal point that draws attention. Position this element slightly off-center to abide by the rule of thirds, which enhances visual interest. Next, consider the background. Guarantee it complements the toys without being too distracting. A simple, uncluttered background often works best. Finally, experiment with angles. Lower your phone to eye level with the toys for a more immersive perspective.
Here are three tips to enhance your framing:
- Choose a focal point – Make it prominent and engaging.
- Simplify the background – Avoid clutter for clarity.
- Use creative angles – Add depth and intrigue.
Balancing Light and Shadows
While creating an engaging toy panorama, mastering the balance of light and shadows is essential. Start by observing natural light sources around your setup. Use indirect sunlight or soft artificial light to create gentle highlights on your toys. You don’t want harsh shadows that overpower your scene, so consider diffusing the light with a white sheet or paper. Position your toys to take advantage of the light, ensuring they’re evenly illuminated.
As you pan your phone for the panorama, maintain consistent lighting. Check for any shadows that might shift or change as you move. Adjust your toys’ positions or your light sources to keep a balanced visual flow. Shadows add depth and dimension, so embrace them wisely for a fascinating panorama.
Editing and Stitching Images Together
Although the panorama mode on your phone can work wonders for toy photography, transforming these images into a seamless masterpiece often requires a bit of editing magic. By stitching images together carefully, you can create a cohesive scene that captivates viewers. Here’s how you can achieve that: Additionally, incorporating a slowmotion video for toy photography can elevate your projects by showcasing the intricacies of your setup and the playful movements of the toys. Experimenting with different angles and lighting during the video shoot will enhance the overall visual appeal. Ultimately, combining static images with dynamic footage can create an engaging experience that resonates with your audience.
- Use Editing Software: Choose a reliable app like Adobe Photoshop or Lightroom Mobile. These tools offer advanced features for aligning and stitching images accurately.
- Align Horizons: Verify that the horizon lines in your images match up perfectly. This prevents awkward breaks and maintains a natural look.
- Blend Colors and Textures: Adjust color balance and texture details to make changes between images smooth. Consistent lighting and color grading help in creating a unified final image.
These steps will help you craft stunning panoramic scenes with your toy photos.
Enhancing Details for Realistic Effects
To truly bring your toy photography to life, focus on enhancing the details that make each scene realistic. Start by observing the lighting and shadows. Use natural light or a small lamp to create soft shadows and highlights, adding depth to your toys. Adjust the exposure and contrast on your phone to guarantee details aren’t lost. Pay attention to textures; capture the grain of wood, the sheen of plastic, or the fuzziness of fabric to make your toys look tangible. Don’t forget the background—adding small elements like rocks or grass can enhance the scene’s authenticity. Zoom in on intricate parts of your toys, capturing facial expressions or tiny accessories. These tweaks make your toy photography visually engaging and lifelike.
Creative Storytelling Through Toy Photography
After enhancing the details for realistic effects, it’s time to weave stories through your toy photography. Using your phone’s panorama mode, you can create dynamic narratives that captivate the viewer. Here are three creative storytelling tips to ponder:
- Establish a Scene: Set your toys in a detailed environment that suggests a larger world. This draws viewers in and provides context for your story.
- Create Action: Position your toys in mid-action to convey movement or tension. This adds drama and keeps your audience engaged.
- Show Progression: Use panorama mode to capture a sequence of events in one sweeping shot. This can portray a journey or transformation.
Overcoming Common Challenges in Panorama Mode
When using your phone’s panorama mode for toy photography, you’ll likely face some common challenges that can affect the quality of your images. First, make sure your hands are steady. A shaky grip can lead to blurred images. Try supporting your elbows on a stable surface. Next, watch out for moving objects in the background that can cause unwanted distortions. Timing is key; wait for a calm moment to shoot. Lighting is essential, too. Panoramas often require even lighting, so avoid harsh shadows or bright spots. Adjust your angle to minimize these. Finally, overlapping frames can cause stitching errors. Move at a consistent speed and follow the on-screen guide. With practice, you’ll capture stunning, seamless toy landscapes.
Frequently Asked Questions
Can I Use Panorama Mode for Indoor Toy Photography?
Yes, you can use panorama mode indoors for toy photography. Make certain there’s enough space to move your phone smoothly. Keep lighting consistent and stable to avoid uneven exposure. Experiment with angles to enhance your toy’s presence.
How Do I Prevent Unwanted Objects From Appearing in My Panorama?
Isn’t it ironic how your phone loves to capture everything except what you want? To avoid unwanted objects, guarantee a clutter-free background, move slowly, and frame your scene carefully. Keep distractions out of the shot!
What Are the Best Apps for Editing Panorama Toy Photos?
You’ll find Snapseed and Adobe Lightroom great for editing panorama photos. They offer versatile tools for enhancing colors and details. Also, try VSCO for filters or Photoshop Express for quick fixes and creative touches.
Are There Specific Phone Brands That Excel in Panorama Mode?
Your phone’s not the Sistine Chapel’s ceiling, but some brands do paint a better picture with panorama. Apple’s iPhones and Samsung’s Galaxies often excel, making your wide shots look more like art than accidental blurs.
How Can I Achieve a Bokeh Effect in Toy Panorama Shots?
To achieve a bokeh effect, open your camera app and select portrait mode. Adjust the aperture settings for a shallower depth of field. Focus on the toy, ensuring the background becomes blurred, enhancing the bokeh effect beautifully.
At a Glance
You’ve now got the tools to create stunning toy photography using your phone’s panorama mode. Did you know that a recent survey found 67% of smartphone photographers use panorama mode for creative shots? So you’re in great company! By setting up your scene thoughtfully, mastering lighting, and editing your images, you’ll bring your toys to life with dynamic, wide-angle scenes. Let your imagination run wild and capture stories that amaze and inspire both you and your audience.


