
To achieve realistic toy photography, choose props that fit the scene's theme and emotions while maintaining scale and proportion. Use natural elements like leaves or sand and everyday objects for added interest. Lighting techniques are essential, so utilize natural light and diffused sources for dynamic effects. Play with textures using varied surfaces and refine images through subtle editing tweaks. Position props to guide the viewer's eye and create a compelling story. Explore more techniques for bringing toys to life.
Choose the Right Props for Your Scene
Selecting the right props is essential for bringing your toy photography scene to life. You want to create an atmosphere that complements your subject and enhances your storytelling. Start by considering your scene's theme and the emotions you want to evoke. Are you capturing an adventurous journey or a quiet moment? Choose props that align with these vibes.
Look for items that add depth and interest without overwhelming your main focus. Everyday objects like leaves, rocks, or fabric can transform a simple setup. Think about textures and colors that contrast or blend with your toys. Lighting can also make a huge difference, so use props that interact well with shadows and highlights. Ultimately, your choices should enrich the narrative and immerse viewers in your miniature world.
Scale and Proportion in Toy Photography
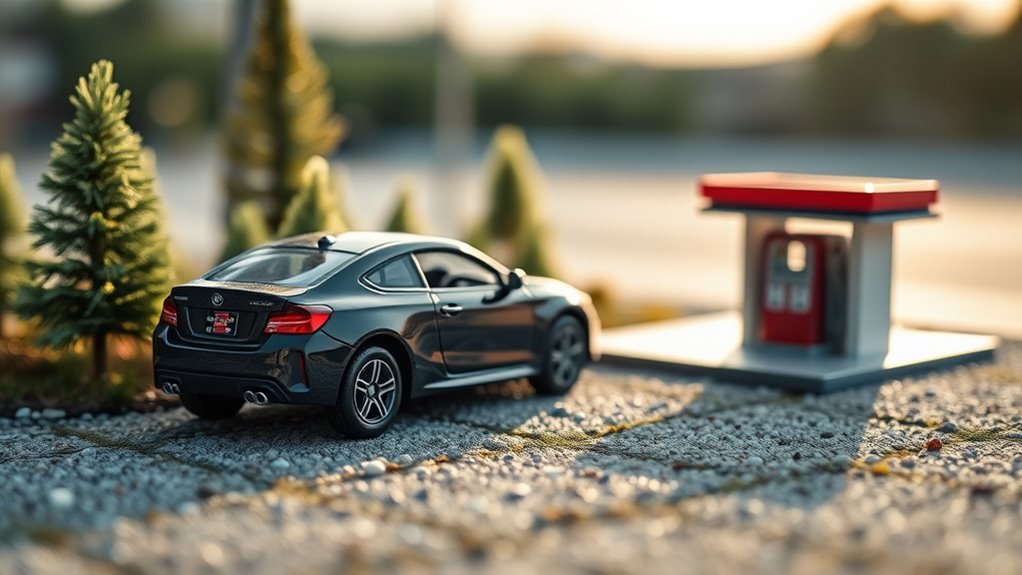
When it comes to toy photography, paying attention to scale and proportion is essential for creating realistic and engaging images. You want your toys to appear as lifelike as possible, and that means ensuring they fit well within their environment. Consider the size of the props you choose; they should complement the toy's dimensions. A tiny chair next to a large action figure will break the illusion, while a well-matched pairing enhances believability.
Don't forget to think about perspective. Shooting from a low angle can make small toys seem larger, while overhead shots might diminish their presence. Experiment with different angles to find what best suits your scene. Balancing scale and proportion enhances the overall storytelling, making your toy photography more enchanting and authentic.
Using Natural Elements for Added Realism
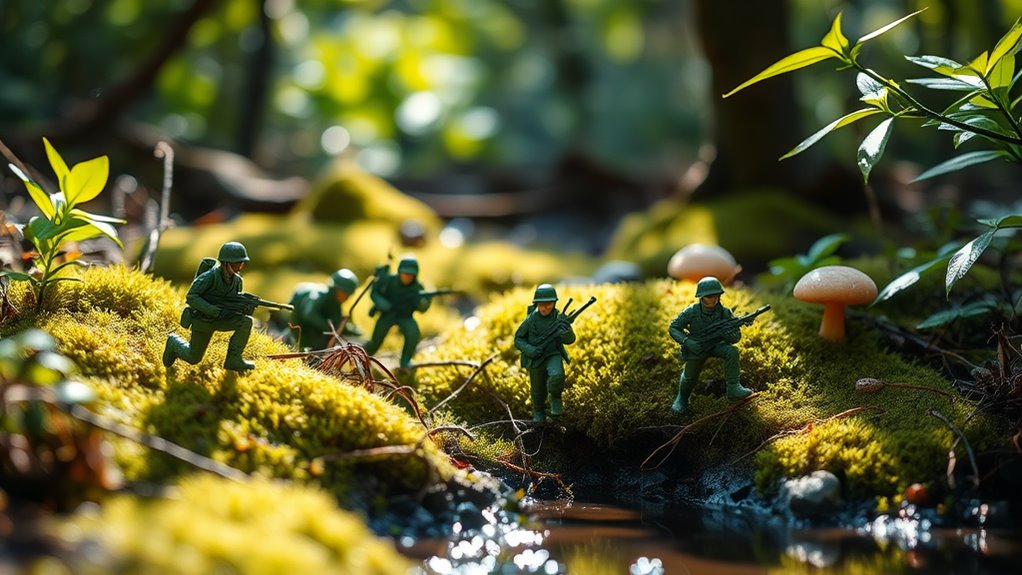
Incorporating natural elements into your toy photography can dramatically enhance realism and depth. Start by taking your toys outside to use elements like grass, leaves, or sand as part of your scene. Positioning a toy soldier in a patch of dirt or creating a jungle atmosphere with leaves can make your images more believable.
Consider the lighting; natural sunlight offers dynamic shadows and highlights that studio lights can't replicate. Capture your toys during the golden hour for a soft, warm glow.
You can also use water to create realistic effects. A small puddle can become a vast ocean in your photos. Don't hesitate to experiment with different angles and perspectives to blend your toys seamlessly into the natural world.
Incorporating Everyday Objects as Backgrounds
While nature provides an excellent backdrop for bringing toys to life, everyday objects offer a creative playground right in your home. Look around and you'll discover countless items that can serve as perfect backgrounds for your toy photography. Here's how you can use them:
- Bookshelves: Create a miniature library or office setting with a few well-placed books.
- Kitchen Counters: Use utensils and appliances to create a bustling kitchen scene.
- Living Room Furniture: Employ couches and chairs for a cozy, domestic atmosphere.
- Bathroom Tiles: Achieve a sleek, modern look with reflective surfaces and clean lines.
Lighting Techniques to Enhance Realism
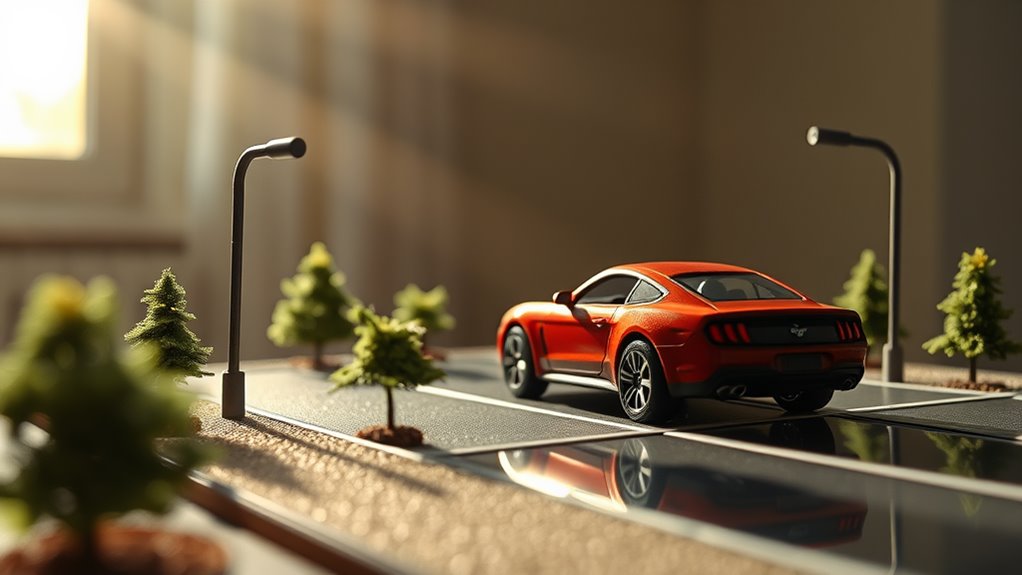
Capturing realistic toy photos hinges on mastering lighting techniques, which can dramatically transform your scenes. Start by using natural light whenever possible. Position your setup near a window for soft, even illumination. Avoid direct sunlight to prevent harsh shadows. If you're indoors, try diffusing artificial light with a white sheet or a softbox to mimic natural lighting.
Consider using a reflector to bounce light into shadows, adding depth without losing detail. Experiment with angles and intensity to create mood and realism. Don't hesitate to use multiple light sources to highlight different parts of your scene, ensuring your toys pop against the backdrop. Remember, lighting can be your most powerful tool in crafting lifelike images, so take your time to adjust and perfect it.
Experimenting With Depth of Field
When you experiment with depth of field in toy photography, you can create stunning effects by blurring the background to highlight your subject. Try focusing on the toy itself to make it pop while the surroundings gently fade away. This technique draws the viewer's eye directly to the toy, enhancing its features and making your photos more engaging.
Blur Background Techniques
Despite the simplicity of toy photography, mastering depth of field to blur the background can make your images truly stand out. You'll find that a beautifully blurred backdrop adds depth and highlights your toy subjects. Here's how you can achieve that effect:
- Use a wide aperture: Set your camera to a low f-stop (like f/2.8 or f/4) to create a shallow depth of field.
- Increase distance: Position your subject far from the background. The greater the distance, the more pronounced the blur.
- Zoom in: Use a telephoto lens to compress the scene and enhance background blur.
- Experiment with angles: Shoot from different angles to see how the background changes, offering unique blurring opportunities.
Foreground Focus Strategies
While many photographers focus solely on background blur, paying attention to foreground focus can add a new dimension to your toy photography. By incorporating objects like leaves, branches, or small props in the foreground, you create a sense of depth and context. This technique draws viewers into your scene, making it feel more immersive and realistic.
Try adjusting your camera's aperture to experiment with depth of field. A wider aperture (small f-stop number) will blur the foreground and background, highlighting your toy subject in sharp focus. Conversely, a narrower aperture (large f-stop number) brings more elements into focus, providing a detailed environment around the toy.
Positioning Props for Dynamic Composition
When positioning props for dynamic composition in toy photography, focus on balancing scale and proportion to create an engaging scene. Enhance depth by layering props, which adds visual interest and dimension to your shots. Don't forget to use negative space effectively to guarantee your composition doesn't feel cluttered, letting the main subject shine.
Balancing Scale and Proportion
To create enchanting toy photography, understanding how to balance scale and proportion is vital. By mastering these concepts, you'll bring life to your toy scenes. Start by considering the size of your props relative to the toys. Here's how:
- Match Sizes: Use props that are in proportion to your toys. A tiny tree next to a large toy figure can disrupt the illusion.
- Perspective Tricks: Place larger props in the background to create depth and maintain the scene's balance.
- Consistent Themes: Guarantee all elements share a coherent theme—similar styles help maintain proportion.
- Angles Matter: Experiment with camera angles to emphasize or minimize the size, enhancing the overall composition.
Enhancing Depth With Layers
Balancing scale and proportion lays the groundwork for creating enchanting toy photography, but adding depth with layers elevates your composition to new heights. Start by arranging props at varying distances from the camera. Place some elements closer, some further back, and others at mid-range. This creates a sense of depth and helps guide the viewer's eye through the scene. Use different materials and textures for each layer to add visual interest. For instance, place a small fence in the foreground, your main toy subject in the middle, and a tree or building in the background. Adjust your focus to emphasize the foreground or background, depending on your desired effect. Experiment with lighting angles to further accentuate the layers and enhance the scene's realism.
Utilizing Negative Space
While many focus on filling every inch of the frame, utilizing negative space can transform your toy photography into something truly dynamic. Negative space, the area around your main subject, helps emphasize your toys and props, making images pop. Here's how to use it effectively:
- Highlight the Subject: Leave space around your toy to draw attention directly to it. The emptiness naturally guides the viewer's eye.
- Create Balance: Use negative space to balance heavier elements in your composition, maintaining visual harmony.
- Add Mood: Empty areas can evoke feelings of solitude or vastness, enhancing your narrative.
- Guide Movement: Position props to lead the viewer's gaze through the scene, using empty space as a pathway.
Practice these tips, and watch your compositions come alive!
Creating a Story With Your Props
When you want to create a story with your props, start by envisioning the scene you're trying to capture. Think about the narrative you want to convey. Is it an adventurous quest or a quiet moment? Choose props that support this theme. For example, a tiny treasure chest might suggest a pirate adventure, while a miniature book could hint at a magical tale.
Arrange your props to guide the viewer's eye through the story. Position them thoughtfully to create connections between characters and elements. Pay attention to scale; props should complement your toys rather than overshadow them. Consider the background too—it should enhance the story, not distract from it. With careful planning, your toy photography can narrate compelling stories that captivate your audience.
Using Textures to Add Depth
Once your story's props are set, think about how textures can enhance the scene and add depth to your toy photography. Textures can transform a flat image into a rich, detailed composition. Here are some ways to incorporate textures:
- Backgrounds: Use textured paper or fabric as a backdrop to add interest without overwhelming the subject.
- Surfaces: Place toys on textured surfaces like sandpaper or a wooden table to introduce natural patterns.
- Props: Select props with varying textures, such as a rough stone or soft moss, to create contrast.
- Lighting: Experiment with light angles to highlight textures, casting shadows that add dimension.
Editing Tips to Enhance Prop Realism
Capturing the essence of realism in your toy photography often hinges on effective editing techniques. To start, adjust the lighting in your photos to match the scene's mood. Use subtle brightness and contrast tweaks to create a natural look. Don't shy away from desaturating colors slightly to avoid an overly vibrant, unrealistic appearance.
Next, focus on the shadows and highlights. Enhance these elements to give depth and dimension to your props. This can make your toys appear more lifelike. Additionally, use the clone stamp tool to remove any unwanted distractions that draw attention away from your main subject.
Finally, apply a slight vignette effect to guide the viewer's eye towards the center, emphasizing your toy and its surrounding props.
Frequently Asked Questions
How Can I Make My Toy Photography Stand Out on Social Media Platforms?
To make your toy photography stand out, focus on unique angles and lighting. Use vibrant backgrounds and props to enhance the scene. Engage with your audience by telling a story through your images, creating a memorable experience.
What Are Some Budget-Friendly Prop Alternatives for Toy Photography?
Channel your inner MacGyver and use everyday items like cotton for clouds, baking soda for snow, or old holiday lights for ambiance. Repurpose cardboard for backgrounds or natural elements like leaves and twigs for authenticity.
How Do I Transport My Props and Toys Safely for Outdoor Shoots?
You should use a sturdy container with padding to transport your props and toys. Wrap each item in bubble wrap or soft fabric. Secure everything inside to prevent shifting during travel, ensuring your setup remains intact for outdoor shoots.
Can Smartphone Cameras Achieve High-Quality Toy Photography With Props?
When you say "the proof is in the pudding," smartphones can definitely capture high-quality toy photography with props. Use good lighting, explore angles, and tweak settings to make your shots pop. Practice makes perfect, so keep experimenting!
What Are Common Mistakes to Avoid in Toy Photography With Props?
You're often tempted to overcrowd the scene with props, but less is more. Don't neglect lighting; it can make or break the photo. Avoid using only one angle; experiment to find the most dynamic shot.
At a Glance
You've explored the art of realistic toy photography, mastering the use of props to create lifelike scenes. As you apply these tips, consider the theory that the magic of toy photography lies in its ability to evoke emotions, just like traditional art. Can a tiny figure by a makeshift river stir adventure in your heart? Try it and see. With the right props and techniques, your scenes might just tell stories that resonate beyond their miniature scale.


