
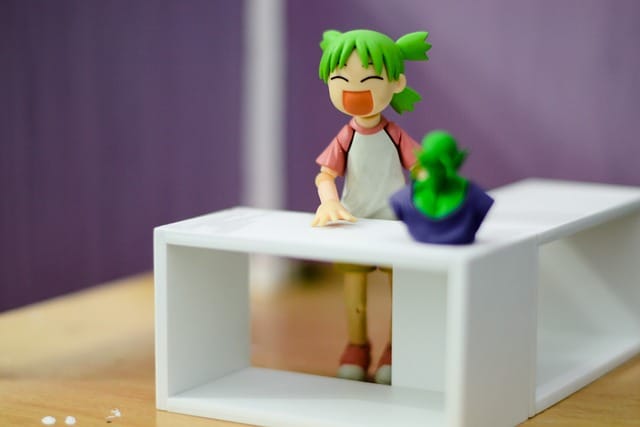
Have you ever looked at a toy photo and wished that you could recreate the same magic? Well, now you can! Toy photography is an exciting new way to combine creative expression with play. It’s all about creating unique images with your toys and capturing moments in time that are only limited by your imagination. What many people don’t realize is the importance of backgrounds when it comes to toy photography.
Backgrounds provide a context for your photo and add depth, texture, and interest to your shot. They can be used to create an atmosphere, set the mood, or even tell a story. Whether it’s a colorful backdrop or something more natural-looking, backgrounds can take your toy photography up a notch and make it come alive.
In this article, we will explore the importance of backgrounds in toy photography and discuss how to choose the right backdrop for your photos. We will look at how different backdrops can affect the tone of an image as well as tips and tricks for creating interesting backgrounds without breaking the bank. By the end of this article, you will have all the knowledge you need to start taking amazing toy photos!
Types Of Backgrounds For Toy Photography
When it comes to toy photography, backgrounds are essential for creating memorable and captivating photographs. They can be the difference between a good and a great photograph. There are many types of backgrounds that can be used in toy photography, each with its own unique set of advantages and disadvantages.
One type of background is natural scenery. Natural scenery provides a beautiful backdrop for any photo, and it can be used to create some stunning shots of toys posed outdoors. The downside is that natural settings are often unpredictable and can require extra effort to make sure the lighting is just right. Additionally, this type of background may require permission from the landowner before shooting on their property.
Another option when it comes to toy photography backgrounds is manufactured backdrops such as paper or fabric sheets. These backdrops come in a wide variety of colors and patterns, making them incredibly versatile for different types of photos. Plus, they’re easy to set up without needing much space or equipment. However, manufactured backdrops don’t offer the same realistic feel as natural settings do, so they might not be suitable for certain types of photographs.
In addition to these two options, there are also digital backgrounds that provide you with even more creative possibilities than physical backdrops do. Digital backgrounds allow you to create unique visuals that wouldn’t be possible with traditional backdrops – like dreamy sunsets or cityscapes – all within your own home or studio space. While digital backgrounds offer a lot of creative freedom, they also require more time and resources than physical ones do due to the need for additional editing software and techniques.
No matter which type of background you choose for your toy photography projects, it’s important to consider what kind of effect you want your photographs to have on viewers before settling on one option. By carefully researching each type of background available and understanding its advantages and disadvantages, you’ll be able to create beautiful photographs that both stand out from the crowd and capture special moments with your beloved toys!
Using Color And Pattern For Creative Effects
When it comes to toy photography, backgrounds play an important role. It can set the stage for the featured toys and help tell a story. The second step in creating great toy photography is using color and pattern for creative effects.
Adding specific colors and patterns to a background can make your photo stand out from the rest. For example, if you’re shooting a bold action figure, you may want to pair it with a vibrant wall mural or patterned fabric backdrop. This will draw attention to the toy itself, while still adding some character to the photo. On the other hand, if you’re looking for something more subtle, consider using muted tones and solid colors for a more peaceful look.
Another way to use color and pattern in toy photography is through props. If you’re looking for an interesting effect, try incorporating small items like books or toys of different shapes and sizes into your photo. You can place them in front of the main subject and use bright colors to give them extra emphasis in your image. Additionally, if there’s a particular theme you’re trying to capture with your photos, add props that fit that theme to bring it all together.
No matter what type of effect you’re going for with your toy photography backgrounds, getting creative with color and pattern is key! From bold designs that draw attention or muted tones that create a tranquil atmosphere – playing around with different options will help make each photo unique and memorable!
Selecting The Right Background For The Scene
The right background can make or break a scene in toy photography. As a photographer, it’s important to select the best backdrop for the photo you’re taking. This doesn’t mean that every background has to be realistic; in fact, using color and pattern can be a great way to get creative with your shots. However, if you want to create a realistic feel for your image, then selecting the right background is key.
When choosing a background for your toy photoshoot, think about what mood you want to convey. Are you going for something natural and rustic? If so, consider incorporating woodgrain textures into your photo or opting for an outdoor setting. On the other hand, if you’re looking for something more whimsical or modern, try introducing geometric patterns or bright colors into the shot.
No matter which type of backdrop you decide on, make sure it complements the subject of your picture. For example, if your toy is wearing a yellow dress, then try not to add too much yellow into the background as it could detract from the focus of the shot. Additionally, pay attention to how much space there is between the toy and the backdrop – too much distance might take away from the overall impact of the image.
In order to capture stunning photos that stand out from others, put some thought into selecting just the right background for each shot. Try experimenting with different textures and colors until you find something that makes your photos come alive!
Understanding Light And Shadow For Composition
Light and shadow play a major role in how a scene is composed in toy photography. Understanding the way light falls on objects and how shadows are cast can help create an interesting shot that stands out. When it comes to creating the perfect background for a toy photo, light and shadow must be taken into consideration.
A photographer must think about the angle of light, or where the light source is coming from. If it’s too harsh or direct, it could create strong shadows that don’t look natural. Placing the toy in indirect lighting can help soften shadows and bring out more detail in colors and textures. Additionally, by focusing on where the light falls on certain areas of the background, photographers can highlight specific details to make them stand out against other elements in the shot.
The same concept applies to shadows as well. While bright light can be used to bring focus to certain elements of a shot, dark shadows can also add depth and contrast to dramatic compositions. Photographers should experiment with different angles of light and consider how placing toys closer or further away from the background will affect their photos. By playing around with these elements, photographers can create stunning shots with strong backgrounds that have balanced lighting and shadows throughout.
Toy photographers who understand these basic principles will be able to create compelling images by adding visual interest through light and shadow composition. It is an essential part of creating a great picture; one which adds character to each scene and makes it unique.
Utilizing The Background To Create Depth
Transitions are an important part of creating depth in any photograph, and when it comes to toy photography, they can be a game-changer. Using the background to create depth is key in toy photography; it allows viewers to become immersed in the image and connect with the toy more effectively. In order to do this successfully, you’ll need to understand how light and shadow work together.
Lighting and shadows can help you create depth by adding contrast between elements in your photo. You can achieve this by positioning your toys strategically against the background or playing around with different angles of light. For instance, if you want your toy to stand out from its background, try positioning it at an angle where there’s more light on one side than the other – this will create a sharper contrast between the two objects. Additionally, using a darker background can help create dimension and make your figure stand out more.
Another way to utilize backgrounds in toy photography is by incorporating props into your shots. Props can add texture and interest to your image that could otherwise be missing with just toys alone. If you’re shooting outdoors, try adding leaves or branches for a naturalistic feel; if you’re shooting indoors, use items like paper cutouts or cloth fabric for extra texture and color. You can also use backdrops of varying colors and textures such as wood grain or brick walls for a rustic look or pastel backgrounds for a dreamy feel.
By understanding how light works with shadows and utilizing interesting props or backdrops in your photos, you can take your toy photography up a notch and create captivating images that evoke emotion from viewers. Experimenting with these techniques will help you find what works best for you so don’t be afraid to explore different options until you find something that resonates with what you want to express through your photos!
Adding Props For Context And Storytelling
Adding props to a toy photography scene can bring an extra dimension to the photo. Props can be anything from plants, furniture, and other toys to everyday items like books, utensils, or other objects that help tell the story of the photo. By using props in your background, your image can come alive with context that evokes emotion and helps viewers understand what’s happening in the scene.
When choosing props for your toy photography, consider items that add variety and texture to create a unique setting. For example, if you’re shooting outdoors in a grassy area, think about adding small rocks or fallen leaves for texture. Inside a home setting? Add items like pillows and blankets that fit the theme of your shoot. Such props will add depth to your scene that will enhance its visual impact.
Props also provide opportunities for creativity when it comes to storytelling. Get creative with how you use them and look for ways they might interact with the toys in unexpected ways. For example, if you want to convey a feeling of adventure or exploration, place repurposed items like old suitcases or bicycles behind your toys as they embark on their journey. Finding ways to make props part of the narrative makes each image more compelling and adds an extra layer of detail that pulls viewers into the story even further.
By utilizing props creatively as part of your background settings in toy photography scenes, you can craft stories that are both visually interesting and emotionally engaging. With just a few carefully chosen additions to your background design, you can bring an entire world of storytelling possibilities within reach.
Exploring Different Framing Techniques
One of the most important aspects of toy photography is framing. By changing the way a toy is framed, you can create different stories and moods. Framing also allows you to focus on particular details or features of a toy while creating an overall composition that draws attention to the background.
There are several ways in which you can change the frame of your photographs. You can use different lenses to change the focal length, allowing you to get closer or farther away from your subject. You can also adjust the angle and distance at which you take your shots. This will allow you to show more or less of the background in your image, creating different effects and storytelling opportunities.
Finally, it’s important to experiment with different crops and compositions. By playing around with the frame, you can create interesting juxtapositions between your subject and its environment. This will help bring out unique elements in each photograph, adding more depth and dimension to your images. With a little experimentation, you’ll be able to explore varying framing techniques for captivating results.
Creating Focal Points With Backgrounds
Backgrounds can be used to create focal points in toy photography. They can draw the viewer’s attention to certain elements of the image and make them stand out. By using a variety of textures, colors, and shapes, photographers can create interesting focal points that draw the viewer in.
Using a colorful background can be a great way to direct the viewer’s gaze toward a specific part of the photo. For example, if you choose a bright blue background, your subject will pop against it and become the main focus of the shot. Similarly, if you choose a textured background like wood or stone, it can add depth and dimension to an image that might otherwise appear flat.
No matter what type of background is used, it should always emphasize the subject rather than overpowering it. Backgrounds should support the overall composition without distracting from it; this allows viewers to appreciate all aspects of an image without being overwhelmed by too many details. With careful consideration, photographers can use backgrounds in toy photography to craft memorable images that will captivate viewers’ attention.
Frequently Asked Questions
Are Backdrops Necessary For Toy Photography?
In toy photography, backdrops are an important component to consider. They can help to create the right atmosphere for a photo and make it look more professional. But are backdrops necessary for toy photography? It depends on what kind of effect you’re trying to achieve.
If you’re aiming for a simple, minimalist look, then you don’t necessarily need a backdrop. You can make use of natural light and the environment around you to create interesting photographs with your toys. However, if you want to add more depth and complexity to your images, then using a backdrop is advisable. It will give your photos more richness and detail, helping them stand out from other toy photographs.
On the other hand, investing in a good backdrop can be expensive and time-consuming. If you’re just starting out with toy photography and don’t have much experience with setting up backdrops or lighting, then it might not be worth the effort. In this case, taking advantage of natural lighting and scenery can be an effective way of creating beautiful photos without having to worry about complex setups.
Ultimately, it’s up to you whether or not to use a backdrop for your toy photography – there is no right or wrong answer here. Experimenting with different techniques will help you find out what works best for your particular style of shooting so that you can create the perfect images for your portfolio!
What Accessories Can I Use To Add Interest To My Photos?
When it comes to toy photography, having a good background can make or break your photo. But while backdrops are certainly important, they are not the only way to add interest to your photos. There are plenty of accessories you can use to add that extra something to your shots.
One of the most common ways to bring life to a photo is through the use of props. Props can range from items found around the house like books and plants, or even small figures and toys. These give your photos context and help create a scene for your toys. You can also use small lights and colorful objects like paper cutouts or streamers for added effect.
Another great way to make your photos more interesting is with textures. Textures can be anything from fabric, burlap, sequins, glitter and so much more. Stick these behind your toy figures as backdrops or even lay them in front of your subjects for an even bigger impact. If you don’t have fabrics lying around at home, you can always get creative with household items such as bubble wrap or tin foil!
Using accessories in toy photography is a great way to take your shots up a notch and make them truly stand out. Whether you’re using props, textures, lights or all of the above – there are plenty of ways to add excitement and depth to any photo!
How Do I Choose The Best Background For My Photo?
When it comes to toy photography, background choice is one of the most important elements. It can make or break a photo and can have a huge impact on how viewers engage with the image. It is crucial to choose a background that complements both the subject and the overall feel of the image.
There are several factors to consider when selecting a background for your photo. Firstly, think about what you want to communicate in the image; does it require an understated backdrop, or something more vivid and exciting? If you’re shooting indoors, make sure your backdrop isn’t overpowering. Natural light can be very helpful in this regard: it provides texture and depth without overwhelming the subject. Outside environments such as parks or gardens can also provide interesting backgrounds – just be mindful of any distractions that might disrupt your composition.
It is also important to think about colour balance when choosing a background for your photo. Consider how the different tones will interact with each other – do they clash or blend together? Aim for contrast rather than conflict – bright colours against neutrals work particularly well – but don’t be afraid to experiment with different combinations until you find one that works best for you.
Overall, selecting the right background requires careful consideration and experimentation. Think about what kind of atmosphere you want to create in your photos, then choose accordingly – don’t be afraid to get creative! With some trial and error, you’ll soon find a look that’s perfect for your shot.
How Can I Make Sure My Photos Are Properly Lit?
Choosing the right background for your toy photography is only half of the job. To get a great shot, you also need to make sure that your photos are properly lit. Lighting can make or break a photo and it’s important to understand how to use it.
When creating a lighting setup for your toy photos, there are some key points to consider. Firstly, you want to find a good balance between natural and artificial light sources. Natural light from windows or doors provides good illumination but you may need to supplement this with additional lighting like desk lamps or LED strips in order to achieve the desired effect.
Secondly, think about where the light is coming from and how it’s interacting with your subject matter. If you’re photographing a large figure, then having light come in from multiple angles will create shadows that give depth and texture to the image. Lastly, experiment with different backgrounds and materials like fabric or paper so that you can achieve different looks depending on what kind of atmosphere you’re trying to create in your photo.
Using lighting correctly can take some practice but once you get the hang of it, you’ll be able to create stunning images every time. Try taking some test shots using different setups until you get one that works for what you’re trying to achieve. This way, when it comes time for taking the actual picture, everything will be ready and all that’s left is pressing the shutter button!
Conclusion
In conclusion, toy photography is a fun way to capture the imagination and creativity of your favorite toys. With careful consideration of the type of camera, backdrop, accessories, lighting, and background you choose, your photos can be amazing and unique.
I’ve found that the best camera for toy photography is one with high megapixels and good zoom capabilities. Backdrops are necessary for adding depth and setting the scene for your photos. Accessories like props and filters can add interest to your photos. When it comes to choosing a background for your photo, pick something that complements the colors in your toy or creates an interesting contrast. And lastly, make sure you have proper lighting so that all details of your photo are visible.
By taking these tips into account when photographing toys, I’m sure you’ll be able to create beautiful pictures each time. Let your imagination run wild and have fun capturing all those special moments!